
Installation Instructions
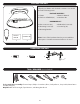


ASSEMBLY INSTRUCTIONS
5
6. Lift the two holes in the xture onto the mounting
bracket screws preassembled to the mounting bracket.
Then, re-attach the two previously removed screw caps to
secure the xture to the mounting bracket.
Note: The hex nuts preassembled to the mounting
bracket screws can be adjusted if the xture does not t
ush to the ceiling.
7. Install the two E26-base ST19 LED bulbs into the sockets
of the xture.
6
7
8
Bulb
Bare/Green
(ground)
Bare
White
White (neutral)
Black
Black (hot)
5
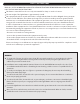
5. Connect supply and xture wires according to the
diagram and these steps:
• Connect the Bare wire from the xture to the Bare/
Green (ground) supply wire.
• Connect the White wire from the xture to the White
(neutral) supply wire.
• Connect the Black wire from the xture to the Black
(hot) supply wire.
Secure all wiring connections together with wire
connectors from hardware bag.
Note: If supply wire colors dier from these, contact a
professional electrician to determine proper wiring.
8. Restore the power at the fuse box and the wall switch.
Assembly is complete.
Screw Cap
Mounting
Bracket
Screw