
Installation Instructions


4
ASSEMBLY INSTRUCTIONS
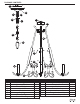
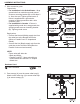
1. Lower decorative cap (L) over coupling (F) and
secure with fixture loop (O).
Note: The arms will need to be evenly spread in
order for the decorative cap to assembly
properly.
Note: The electrical cable will need to get pulled
through the individual parts as they are installed
on this and later steps.
1
O
L
F
3
1/4 Inch
D
C
I
B
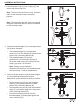
2. Position threaded nipple (C) in mounting bracket
(B) so when mounted:
• The threaded nipple (C) will protrude a
minimum of 1/4 inch beyond the raised center
portion of the mounting bracket (B).
• The threaded nipple (C) height is
positioned so 1/2 the exterior threads of
the screw collar loop (I) will extend past the
canopy (A) when it is mounted.
Note: Canopy is only needed to
determine the position of the threaded nipple
and fixture loop. It will be installed later.
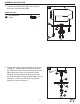
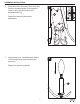
3. Once the proper position of the threaded nipple
(C) and mounting bracket (B) has been
determined, secure with hex nuts (D) as follows:
• Screw one hex nut (D) onto the threaded
nipple (C) and tighten against the raised
portion of the mounting bracket (B).
• Screw another hex nut (D) onto the threaded
nipple (C) and tighten against the flat portion
of the mounting bracket (B).
• Screw the remaining hex nut (D) onto
threaded nipple (C) and tighten against the
screw collar loop (I).
2
B
A
1/4 Inch
I
C