
Installation Instructions

ASSEMBLY AND INSTALLATION
INSTRUCTIONS
WARNING:
TO AVOID RISK OF ELECTRICAL SHOCK, BE SURE TO SHUT OFF
POWER WHILE INSTALLING OR SERVICING THIS FIXTURE.
NOTE: Before installing, consult local electrical codes for wiring and grounding requirements.
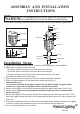
Installation Steps:
356-4836
1. Please turn off the power at fuse or circuit box before starting on the installation.
2. Make wire connections with wire nuts:
---The black wire from fixture to the black wire from the post.
---The white wire from fixture to the white wire from the post.
---The grounding wire from fixture to the grounding wire from the post.
Carefully tuck wires back into the post.
3. Place the glass frame on the post, and then secure with the set screws.
4. Place the glass shades into the glass frame carefully.(See Fig.1)
Important to know:
---Lay the narrow side of the glass shades into the notch inside the glass frame.
---Place the rough side of the glass shades toward the outside.
5. Secure the buckles to fix the glass shades by using the pads and screws. (See Fig.2)
6. Install a bulb. (Please do not exceed the maximum capacity that is recommended
on the package.)
7. Secure the nipple into the top finial. Attach the rubber pad onto the top of the dome. Then
insert the nipple through the hole of the rubber pad and dome, secure it with a washer and
a hex nut.
8. Thread the headless screws into the holes of the glass frame. Attach the dome to the glass
frame by inserting the headless screws, and then secure with the ball nuts.
9. Turn on the power at fuse or circuit box.
Grounding Wire
Fixture Wire
Wire Nut
Post
Set Screw
Glass Frame
Finial
Nipple
Rubber Pad
Headless Screw
Ball Nut
Dome
Washer
Hex Nut
Glass Frame
Glass Shade
Fig. 1
051212
Patriot Lighting
TM
Fig. 2
Screw
Pad
Buckle