
User Manual


7
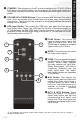
Remote Control
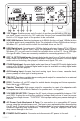
STANDBY: After plugging in the AC cord and switching the POWER ON the
back panel, this button toggles the unit between On mode which lights the
amber.
VOLUME UP & DOWN Buttons: These increase and decrease the output
level. Note: the volume knob is motorized and rotates when these buttons
are pressed. The knob also has a dimple to more easily indicate the current
setting from a distance.
USB Input Button
the included driver on the PC.
COAX Button: This selects the
coaxial digital audio input and
lights the button blue. Note: the
COAX Input is capable of accepting
MUTE: This mutes and un-mutes
all of the audio outputs.
TUBE: This engages/disengages
the tube buffer in the
section. Notes: when engaged
the tube window will light blue.
When disengaged, the tube is
completely removed from the
audio signal path. The amber
back lighting remains on regardless
of the setting.
AUX Button: This selects the
analog audio input and lights the
button blue. Note: when using a
turntable please be sure it has a
built-in or connected phono pre-
line-level
signal into the unit.
OPT1 & OPT2 Buttons: These
select the Optical 1 or Optical 2
digital audio inputs and light the
corresponding front panel input
button blue. Note: these inputs are
capable of accepting digital audio
B
C
D
1
2
3
4
5
6
7
8
E
F
G
H
I
*If you misplace the remote control while muted, you can un-mute the unit by cycling it
through standby mode.