PeakTech® 9020A Bedienungsanleitung / Operation Manual DVB-Tester
Inhaltsverzeichnis (English contents from page 61) G e n e r e l l e S i c h er h e i ts i n fo r m at i o n e n … … … … … … … … … . . … . … … … 2 Zubehör…………………………..……………………….………....3 Menübedienung A. Ansicht der Funktionselemente…………………..………………….....5 B. Tastenkürzel der Bedienung.……………...…....…….……….9 C. Gerät ein- und ausschalten...............................................10 D. Menü Bedienung.......................................................1 2 1. DVB-S/S2 Setup..............................
GENERELLE SICHERHEIT: Zu berücksichtigende Themen: Bitte befolgen Sie die unten aufgeführten Anweisungen genau, um Schäden zu vermeiden, die Ihnen oder Ihrem Gerät passieren können. Bevor Sie Ihr Gerät reinigen, ziehen Sie das Netzkabel und schalten Sie es mit der Ein- / Ausschalttaste aus und reinigen Sie es mit einem trockenen Tuch. Verwenden Sie keine Zubehörteile oder zusätzliche Geräte, die nicht vom Hersteller empfohlen werden, da diese das Gerät beschädigen und die Garantie ungültig machen können.
Hinweis Bitte lesen Sie diese Anleitung sorgfältig durch, bevor Sie das Messgerät zum ersten Mal benutzen. Die in diesem Handbuch enthaltenen technischen Daten und Betriebsverfahren können ohne vorherige Ankündigung geändert werden. Bei Fragen nach einer bestimmten Nutzungsdauer wenden Sie sich bitte an den Hersteller. Bitte laden Sie den Akku bevor Sie das Messgerät zum ersten Mal benutzen. (Empfohlen sind min.
Aufgrund der verschiedenen elektrischen Ladegerätadapter können Sie sicherstellen, dass das Gerät kontinuierlich geladen bleibt. Dadurch können Sie Ihr Gerät auch in Umgebungen verwenden, in denen keine externe Spannungsquelle zur Verfügung steht. Sie können das Gerät auch während Ihrer Anfahrt dank Ihres Zigarettenanzünderadapters im Auto leicht aufladen. Halten Sie den leichteren Ladeadapter von Situationen wie Druck, Stoß und Überlastung fern.
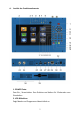
A. Ansicht der Funktionselemente 1. POWER-Taste: Zum Ein- / Ausschalten. Zum Drücken und Halten für 3 Sekunden zum Einschalten 2.
3. Power Licht: Zeigt den Energiestatus an Normalerweise: Grün: Das Messgerät ist eingeschaltet Aus: Das Messgerät ist ausgeschaltet 4. Batterielicht: Licht ist rot zeigt an, dass das Messgerät gerade geladen wird. Licht ist grün zeigt an, dass das Messgerät vollgeladen ist 5. 5V-T / 12V-T / 24V-T Licht: Zeigt ANT 5V an / 12V an / 24V an / aus 6. LOCK-T / C: Dieses Licht leuchtet, wenn das terrestrische Signal oder das Kabelsignal gefunden ist. 7.
15. H / V: Eine schnelle Taste zum Umschalten des 13 / 18V-Ausgangs im DISH SETUP-Menü 16. 0 / 22K / AV EIN / AUS: Eine schnelle Taste zum Umschalten des 22K-Ausgangs im DISH SETUP-Menü Oder AV IN / OUT-Schalter 17. Stummschalten: Deaktivieren Sie den Piepton-Alarm, wenn das Signal gefunden wurde. 18. Screenshot Speichern Sie das angezeigte Bild beim Anschließen eines USB-Speichers. 19. AHD Zum Aufrufen des CCTV-Modus, um das AHD-Signal zu empfangen. 20.
27. USB-Anschluss: Verbindet sich mit USB-Festplatte für das Upgrade. Backup-Kanalliste 28. WLAN-Anschluss Zum Empfang des WIFI-Signals 29. Ethernet-Anschluss Zum Verbinden des Netzwerks zum Empfangen von IPTV 30. AV EIN / AUS: Audio- und Video-Ein- / Ausgangsbuchse AV IN Audio L + Video AV OUT Audio L + Audio R + Video 31. Ladeanschluss Verbindet mit dem Ladekabel. 32. HW AUS Zurücksetzen. Schalten Sie das Gerät als Hardware Reset aus. 33. Ci-Slot 1.0 Sockel. Common Interface-Steckplatz 34.
B. Tastenkürzel-Bedienung 1) 0 / 22K Eine schnelle Taste zum Umschalten von AV IN / OUT auf der Kanalanzeige.
► Wählen Sie den Satelliten, dann werden die Satelliteninformationen angezeigt. ► Wählen Sie den Sound, indem Sie die LINKS / RECHTS-Taste drücken, um den Sound auszuwählen ► Wählen Sie die Batterieanzeige durch Drücken der LINKS / RECHTS-Taste, um die Batterieinformationen in der rechten oberen Ecke des Bildschirms anzuzeigen ► Wählen Sie den Schlafmodus, indem Sie die LINKS / RECHTS-Taste drücken, um die Abschaltung einzustellen.
C. Schalten Sie das Gerät EIN / AUS Dieses DVB-Messgerät ist für die Verwendung als tragbares Gerät konzipiert und erfordert keine vorherige Installation. Ein: ► Halten Sie den roten Ein- / Ausschalter drei Sekunden lang gedrückt. ► Wenn das Boot-up-Logo auf dem Bildschirm angezeigt wird, lassen Sie den Netzschalter los. ► Das Boot-Up-Bild wird angezeigt. ► Nach dem Laden des Systems erscheint das Sprachauswahlmenü. ► Drücken Sie ggf. die Menütaste um in das Hauptmenü zu gelangen.
► Menü Bedienung Drücken Sie die Menü-Taste auf der Tastatur, um das Hauptmenü anzuzeigen. Das Hauptmenü besteht aus 9 Menüoptionen, wie unten gezeigt. ► DVB-S / S2 ► DVB-T / T2 ► DVB-C / C2 ► SPECTRUM ► KONSTELLATION ► CCTV ► NETZWERK ► SONSTIGE ► SYSTEM Verwenden Sie die Pfeiltasten, um den Cursor im Menü zu bewegen. Verwenden Sie die OK-Taste, um die Auswahl zu bestätigen. Um das Menüsystem jederzeit zu verlassen, drücken Sie die EXIT-Taste.
1. DVB-S / S2-SETUP Drücken Sie OK bei DVB-S / S2 Setup, dann erscheint das folgende Menü. 1) Satellit: Drücken Sie die Taste , um die Satellitenliste anzuzeigen. Suchen Sie den Satelliten durch Drücken der -Taste und drücken Sie , um den Satelliten auszuwählen. Drücken Sie , um Ihre Auswahl zu bestätigen. 1) LNB: Drücken Sie , um den richtigen LNB-Typ entsprechend Ihrem physischen LNB-Typ auszuwählen.
Drücken Sie die Taste , um die LNB-Konfiguration wie unten abgebildet einzustellen a. LNB: Wählen Sie mit den LNB aus b. L.O. Frequenz: Geben Sie die richtige LNB-Frequenz für Ihren LNB mit der Zifferntaste auf der Tastatur ein. c. LNB-Spannung: Verwenden Sie die -Taste, um die LNB-Spannung auszuwählen. d. LNB Dish: Wählen Sie mit der Taste den Dish-Typ Fixed oder Moved e.
1) Dish Position: Drücken Sie zuerst die OK-Taste am LNB, um die LNB-KONFIGURATION aufzurufen. Wählen Sie LNB Dish als Moved mit Hilfe der LINKS / RECHTS Taste wie unten gezeigt. Kehren Sie dann zum DVB-S / S2 SETUP-Menü zurück und drücken Sie die OK-Taste an der Dish Position, um DiSEqC 1.2 / USALS wie unten abgebildet einzurichten.
Satellite: Transponder: Continuously Move: Move Steps: Step Size: Limit Set: Other Commands: USALS: Wählen Sie mit der Taste den Satelliten aus oder drücken Sie die Taste OK, um den Satelliten auszuwählen Wählen Sie mit den Transponder aus. Drücken Sie die OK-Taste, um die TP-Liste anzuzeigen. Verwenden Sie die -Taste, um den Positionierer zu bewegen, und drücken Sie die OK-Taste, um die aktuelle Position zu speichern.
2) Frequenz: Drücken Sie , um die Frequenzliste anzuzeigen. Wählen Sie die gewünschte Frequenz durch Drücken der LINKS / RECHTS-Taste oder der AUF/AB-Taste. Drücken Sie , um Ihre Auswahl zu bestätigen. Sie können die gespeicherte Frequenz auch sehr einfach editieren, hinzufügen, löschen und PID programmieren, wie folgendes Bild zeigt. Edit: Drücken Sie , um die Frequenz mit den Zifferntasten zu bearbeiten. Drücken Sie die AUF/AB-Taste, um "Pol" auszuwählen.
Add: Drücken Sie die Taste , um Frequenz mit den Zifferntasten hinzuzufügen. Drücken Sie die Taste AUF/AB, um "Pol" auszuwählen. Drücken Sie , um den Vorgang zu bestätigen und das Ergebnis zu speichern Delete: Drücken Sie die LINKS/RECHTS- oder AUF/AB-Taste, um die Option Löschen zu wählen. Drücken Sie , um den Löschstatus einzustellen. Sie sehen eine Bestätigungs-Massage, bitte zum Löschen oder , um den Vorgang abzubrechen und das Ergebnis zu speichern.
PID: Drücken Sie die Taste , um die PID-Informationen für die Frequenz anzuzeigen. 3) Network search: Wählen Sie mit der Taste EIN / AUS 4) TP SCAN: Scannen Sie die Transponder nacheinander. Drücken Sie OK, um den Scan-Kanal zu starten.
Drücken Sie erneut F1, um die Signalstärlke und den C / N-Wert anzuzeigen.
1) Drücken Sie die , um zwischen 13 / 18V zu wechseln. 3) Drücken Sie die -Taste, um die Frequenz zu verschieben.
1) Drücken Sie die Taste F1, um die Informationen des Signals anzuzeigen 2) Drücken Sie die Taste F2, um die Spektrumanzeige wie folgt zu füllen oder zu leeren. Drücken Sie die Taste , um die Konstellation anzuzeigen.
2. DVB-T/T2 SETUP Drücken Sie OK bei DVB-T / T2 Setup, dann erscheint das folgende Fenster. 1) Frequenz: Drücken Sie die Taste , um die Frequenz und die entsprechende Bandbreite auszuwählen. Die entsprechende Bandbreite wird auf dem Bildschirm angezeigt. Drücken Sie die Taste , um die Frequenzliste aufzurufen. Drücken Sie die -Taste, um die Frequenz nacheinander auszuwählen, und drücken Sie die -Taste, um Seite für Seite auszuwählen.
Frequenz Bearbeiten: Drücken Sie , um die Frequenz mit numerischen Zahlen zu bearbeiten. Drücken Sie die -Taste, um die Bandbreite auszuwählen. Und dann drücken Sie , um den Vorgang zu bestätigen und das Ergebnis zu speichern. Oder drücken Sie die Taste , um den Vorgang abzubrechen. Frequenz hinzufügen: Drücken Sie die Taste , um die Frequenz mit numerischen Zahlen einzugeben. Drücken Sie die -Taste, um die Bandbreite auszuwählen.
Frequenz Löschen: Drücken Sie die Taste , um eine Option auszuwählen, und drücken Sie dann die Taste , um die Bestätigungsmeldung anzuzeigen. Drücken Sie die Taste , um diesen Vorgang zu löschen oder abzubrechen. PID-Information: Drücken Sie , um die PID-Information der Frequenz zu überprüfen.
3) Netzwerksuche: Drücken Sie die -Taste, um den Netzwerk-Scan-Modus EIN / AUS auszuwählen. 4) Scannen Sie die mögliche Frequenz und Bandbreite, um die entsprechenden Programme zu empfangen, und drücken Sie dann die -Taste, um TP Scan (einzelne Frequenz) oder Auto Scan (alle Frequenzen) zu starten. Hinweis: Während der Signalsuche können Sie die Balkenanzeige von LEVEL und C/N gleichzeitig sehen, während die LOCK-LED mit der Lautsprecherbenachrichtigung aufleuchtet.
Drücken Sie die Taste , um das vorhandene Programm zu löschen und den TP-Scan zu starten. Oder drücken Sie , um das bestehende Programm zu speichern und den TP Scan zu starten. Auto Scan: Scannen Sie alle Frequenzen und Bandbreite. Es kostet Zeit, Auto Scan zu machen, Benutzer kann drücken, um zu überspringen oder , um jederzeit zu beenden. Drücken Sie die -Taste, um den Auto-Scan zu starten.
Drücken Sie die Taste , um das vorhandene Programm zu löschen und den TP-Scan zu starten. Oder drücken Sie , um das bestehende Programm zu speichern und den Auto Scan zu starten. 5) Signal Information: Drücken Sie F1, um die Signalinformationen anzuzeigen. Sie können die Balkenanzeige von LEVEL und C/N sehen. Drücken Sie die Taste , um die Lautstärke zu ändern, und die Taste T/R, um sie stummzuschalten.
6) Spektrum: Drücken Sie F2, um die Spektruminformationen anzuzeigen.
Drücken Sie die Taste F2, um das Spektrum wie folgt zu füllen oder zu leeren.
3. DVB-C/C2 Einstellungen Drücken Sie OK im DVB-C / C2 Setup, die folgende Abbildung erscheint. 1) Frequenz: Drücken Sie die Taste , um die Frequenz auszuwählen, und die entsprechende Symbolrate und Constellation werden automatisch auf dem Bildschirm angezeigt. Drücken Sie die Taste , um die Frequenzliste aufzurufen. Drücken Sie die -Taste, um die Frequenz nacheinander auszuwählen, und drücken Sie die -Taste, um Seite für Seite auszuwählen.
Frequenz bearbeiten: Drücken Sie , um die Frequenz mit numerischen Zahlen zu bearbeiten. Drücken Sie die -Taste, um die Bandbreite auszuwählen. Und dann drücken Sie , um den Vorgang zu bestätigen und das Ergebnis zu speichern. Oder drücken Sie die Taste , um den Vorgang abzubrechen. Frequenz hinzufügen: Drücken Sie die Taste , um die Frequenz durch numerische Zahlen hinzuzufügen. Drücken Sie die -Taste, um die Bandbreite auszuwählen.
Frequenz löschen: Drücken Sie die Taste , um eine Option auszuwählen, und drücken Sie dann die Taste , um die Bestätigungsmeldung anzuzeigen. Drücken Sie die Taste , um diesen Vorgang zu löschen oder abzubrechen. Drücken Sie , um die Informationen der Frequenz zu prüfen. 2) Netzwerksuche: Drücken Sie die -Taste, um den Netzwerk-Scan-Modus EIN / AUS auszuwählen.
3) TP Scan: Scannen Sie die Transponder einzeln auf eingestellter Frequenz und Bandbreite. Drücken Sie , um zu scannen. Drücken SIe , um den TP Scan Modus zu wählen. Drücken Sie und es erscheint folgende Meldung: Drücken Sie die Taste , um das vorhandene Programm zu löschen und den TP-Scan zu starten. Oder drücken Sie , um das bestehende Programm zu speichern und den TP Scan zu starten.
4) Auto Scan: Scannen Sie alle Frequenzen und Bandbreite. Es kostet Zeit, die automatische Suche durchzuführen. Sie können drücken, um zu überspringen, oder , um die Suche jederzeit zu beenden. Drücke für Auto Scan. Drücke um Auto Scan Modus zu wechseln. Drücke und folgende Meldung wird angezeigt Drücken Sie die Taste , um das vorhandene Programm zu löschen und den TP-Scan zu starten.
5) Signal Information: Drücken Sie F1, um die Signalinformationen anzuzeigen. Sie können die Balkenanzeige von LEVEL und C / N sehen. Drücken Sie die Taste , um die Lautstärke zu ändern, und die Taste , um sie stummzuschalten.
Drücken Sie , um die Frequenz wie folgt zu vergrößern / verkleinern Drücken Sie F2 um die Anzeige zu füllen oder zu leeren.
7) Konstellationsdiagramm: Drücken Sie die Taste , um das Konstellationsdiagramm wie folgt anzuzeigen.
4. SPECTRUM Satelliten - Spektrum Terrestrisches - Spektrum Kabel - Spektrum Verweis auf die Spektrumfunktion im DVB-S / S2-, DVB-T / T2- und DVB-C / C2-SETUP-Menü. 5. CONSTELLATION Satelliten - Konstellation Terrestrische - Konstellation Kabel - Konstellation Verweis auf die Constellation-Funktion im DVB-S / S2-, DVB-T / T2- und DVB-C / C2-SETUP-Menü.
6. CCTV MONITOR CCTV = Closed Circuit TeleVision - Überwachungskameras Drücken Sie die AV IN / OUT-Taste, um die CCTV-Überwachungsfunktion zu aktivieren, wenn die Kamera mit dem Messgerät verbunden wird. Das folgende Diagramm ist die Verbindungsanweisung. HINWEIS: Diese Funktion kann nur funktionieren, wenn die Kamera angeschlossen ist.
7. NETZWERK Drücken Sie OK bei dem NETZWERK Symbol im Hauptmenü, um die Netzwerkeinstellung einzugeben. Das Ethernet-Kabel muss angeschlossen sein, wenn Sie den kabelgebundenen LAN-Modus verwenden. 8. OTHERS Drücken Sie OK bei dem OTHERS Symbol, dann erscheint das folgende Fenster. Das Menü besteht aus 9 Menüoptionen wie folgt: Hinweis: Einige Menüoptionen beziehen sich auf die USB- und PVR-Funktion. Ein externer USB-Speicher muss hierfür angeschlossen sein.
8.1 MEDIA PLAYER Überprüfen Sie die Informationen von der externen Festplatte, die Sie an das Messgerät angeschlossen haben. Wählen Sie mit den Tasten und OK das aufgenommene Programm für die Wiedergabe oder die Bilder auf ihrem USB Speicher aus. 8.2 HDD MANAGE Wählen Sie die HDD MANAGE im Hauptmenü und drücken Sie OK. Das folgende Bild wird angezeigt.
1) Drücken Sie die Taste , um die externe Festplatte zu deaktivieren. 2) Drücken Sie die Taste , um die externe Festplatte erneut zu mounten. 3) Drücken Sie die Taste , um die externe Festplatte zu formatieren (HDD Format). Eine Warnleiste wird als Bild angezeigt. 4) Nachdem Sie die externe Festplatte deaktiviert haben, drücken Sie zum Formatieren erneut die GELBE Taste. 5) Drücken Sie die Taste , um die Informationen zur Festplatte anzuzeigen.
8.3 UPGRADE Diese Funktion kann verwendet werden, um Programminformation und Transponderlisten zu speichern und zu aktualisieren. Sie kann auch verwendet werden, um die Firmware des Messgerätes zu aktualisieren. 8.3.1 Satelliteninformation Update Verbinden Sie einen USB-Stick mit dem Messgerät, und Sie können die UPGRADE-Funktion aufrufen. Das folgende Bild wird angezeigt. 1) Drücken Sie die Taste , um die Satelliteninformationen, die Satellitenliste, die Kanaldaten usw. zu sichern.
8.3.2 Firmware Update Nachdem Sie die Hauptsoftware vom Anbieter erhalten haben, legen Sie die Software (IMX-Format) auf die USB-Festplatte und verbinden Sie sie mit dem Gerät. Wählen Sie das UPGRADE im Menü, folgendes Bild wird angezeigt: Bewegen Sie den Cursor auf die IMX-Datei und drücken Sie OK. Das Gerät beginnt mit dem Upgrade. Nach dem Upgrade wird das Gerät automatisch ausgeschaltet. Sie können das Gerät erneut einschalten.
8.4 Kanallisten Editor Es gibt zwei Arten von Programmen: Fernseh- und Radioprogramme. Die Bedienung von List und Guide bei TV und Radio ist hierbei gleich. Drücken Sie die Menü-Taste, um das Hauptmenü anzuzeigen. Wählen Sie die Senderliste bearbeiten und drücken Sie OK, wenn auf dem Gerät einige Programme gespeichert sind. Der Benutzer sieht das TV-Listenmenü wie folgt: Sie können die gespeicherten Kanäle, Fernseh- und Radiokanäle verwalten.
1) Kanäle sortieren: ① Suchen Sie den Kanal, den Sie sortieren möchten. Drücken Sie die Taste. Sie erhalten vier Möglichkeiten, um den Kanal nach Name, Tabelle, LCN oder Manuell zu sortieren. ② Drücken Sie die Taste, ein Nachrichtenfeld wird angezeigt. ③ Geben Sie die gewünschte Nummer mit den Zifferntasten ein. Drücken Sie die Taste . Der Kanal wechselt die Reihenfolge.
3) Kanäle bearbeiten: Drücken Sie die Taste , um Kanäle durch Sperren, Überspringen, Umbenennen und Ändern der PID zu bearbeiten. 4) Kanal löschen: Drücken Sie , um den Kanal zu löschen. Das folgende Bild wird angezeigt: ① Drücken Sie die Links / Rechts-Taste, um die Seiten auszuwählen. Drücken Sie die Oben / Unten-Taste, um den Kanal auszuwählen.
②Suchen Sie den Kanal, den Sie löschen möchten, und drücken Sie die Taste , der Kanal wird mit dem Symbol "X" markiert. ③Wiederholen Sie Schritt 2 mit den Kanälen, die Sie löschen möchten. ④Um den Löschvorgang zu bestätigen, drücken Sie zweimal EXIT, Sie erhalten eine Bestätigungsmeldung. ⑤Drücken Sie die OK-Taste, um das Löschen zu bestätigen. Oder Drücken Sie EXIT, um abzubrechen. Drücken Sie , um alle Kanäle zu löschen. Sie erhalten eine Bestätigungsmeldung.
5) Kanal Information Bewegen Sie den Cursor mit den Tasten oder . In der Zwischenzeit werden Kanalinformationen: Satellitenname, Transponderinformationen auf der linken Seite angezeigt. 8.5 TS RECORD Verbinden Sie den USB-Datenträger mit dem Gerät und wählen Sie das Menü TS RECORD. Drücken Sie die 0 / 22k-Taste, um das Programm im TS-Format zu speichern.
2. Drücken Sie dann , um die Aufnahmezeit auszuwählen. Drücken Sie dann die OK-Taste, um die Aufnahmezeit zu bestätigen. 3. When Wenn das Programm aufgenommen wird, drücken Sie die Taste H / V, Sie sehen das Bild wie folgt. 4. Drücken Sie dann die OK-Taste, um die Aufnahme zu stoppen. Das aufgenommene Programm wird automatisch auf dem USB-Speicher gespeichert. 5. Drücken Sie die Taste AN / DG, um das aufgezeichnete Programmmenü aufzurufen. Das folgende Bild wird angezeigt.
HINWEIS: Während der Aufnahme haben Sie die Möglichkeit, sich einen anderen Kanal anzuschauen, der jedoch auf demselben TP bereitgestellt werden muss. Andernfalls wird das folgende Bild angezeigt. Die Aufnahme wird gestoppt, wenn Sie die OK-Taste drücken. ACHTUNG: Trennen Sie die externe USB-Festplatte nicht während der Aufnahme. Dies kann zu Schäden an den aufgenommenen Programmen führen. Der Finder zeigt nichts an, während sich die Aufnahme im Terrestrial- und Kabelprogramm befindet. 8.
8.7 Winkelberechnung Drücken Sie OK bei Winkelberechnung, dann erscheint folgendes Fenster. 1) Satellit: Verwenden Sie die LINKS / RECHTS-Taste, um den Satelliten anzuwählen, oder Drücken Sie die OK-Taste, um den Satelliten auszuwählen. 2) Sat longitude: Verwenden Sie die Zifferntaste, um die Satellitenposition einzugeben. 3) Ost / West: Verwenden Sie die LINKS / RECHTS-Taste, um die Satellitenposition Ost oder West auszuwählen.
8.8 DVB-CI Das Produkt ist mit einem Steckplatz für Common Interface (CI 1.0) ausgestattet. Überprüfen Sie die Unterseite des Produkts. Setzen Sie die Smartcard in das CI-Modul und das CI-Modul in den Steckplatz ein. Drücken Sie OK bei dem Menüpunkt „DVB CI“, dann erscheint folgendes Fenster. Dann können Sie die Informationen des CI-Moduls mit diesem Element überprüfen. Außerdem können Sie die CI-Modulleistung in 3V / 5V / Auto mit der roten Taste (0 / 22k) ändern. 8.
Sie können diesen Bericht zur Bearbeitung über den USB-Stick auf dem PC speichern. Gehen Sie in das UPGRADE-Menü, sehen Sie den Bericht wie folgt : Wählen Sie den Bericht an und drücken Sie die blaue Taste, um den Bericht auf einem angeschlossenen USB-Stick zu speichern. 9. SYSTEM SETUP Drücken Sie OK auf SYSTEM und das folgende Fenster erscheint.
1) Menu language: Drücken Sie die Taste , um die gewünschte Sprache für das Menü auszuwählen. 2) Transparency: Drücken Sie die Taste , um die OSD-Transparenz aller Menüs des Empfängers einzustellen. 3) Aspect Ratio: Wählen Sie 4: 3, 16: 9 (Breitbild) und Auto.
E. Technische Spezifikationen SystemVoll DVB-konform funktionen Anschluß Frequenzbereich Signal Pegel LNB/TUNER Eingang LNB Versorgung LNB Umschatung DiSEqC Front End S/S2 Demodulator RF T2/T/C2/C TUNER Eingang T/T2/C/C2 Demodulator System Informationen Video Decoder Symbol Rate SCPC und MCPC Spektrale Inversion Anschluß Frequenzbereich Signal Pegel Antennenversorgung Front End Kanalbandbreite Symbol Rate Prozessor SDRAM FLASH JA F-Stecker 950MHz-2150 MHz -65dBm~~-25dBm 13/18V.,max500mA 22KHz Ver 1.
F. Allgemeine Spezifikationen Abmessungen (Gerät) Gewicht (Gerät) Betriebstemperatur Luftfeuchtigkeit Lagerung Ca. 210 x 130 x 48mm Ca. 0.75 kg 0 bis 45℃ 5 bis 90% Die Lebensdauer der Batterie wird verkürzt, wenn sie bei extrem kaltem oder heißem Wetter verwendet wird. Vorsichtsmaßnahmen bei der Handhabung und Verbote der Batterie im Sat-Meter Warnung: Das Messgerät verwendet Lithium-Ionen-Batterien. Arbeiten Sie daher nicht unter hohen Temperaturen oder hohen Drücken.
Hinweise zum Batteriegesetz Im Lieferumfang vieler Geräte befinden sich Batterien, die. z. B. zum Betrieb von Fernbedienungen dienen. Auch in den Geräten selbst können Batterien oder Akkus fest eingebaut sein.
Alle Rechte, auch die der Übersetzung, des Nachdruckes und der Vervielfältigung dieser Anleitung oder Teilen daraus, vorbehalten. Reproduktionen jeder Art (Fotokopie, Mikrofilm oder ein anderes Verfahren) nur mit schriftlicher Genehmigung des Herausgebers gestattet. Letzter Stand bei Drucklegung. Technische Änderungen des Gerätes, welche dem Fortschritt dienen, vorbehalten. Hiermit bestätigen wir, dass alle Geräte, die in unseren Unterlagen genannten Spezifikationen erfüllen.
Precautions Please read this manual carefully before using your meter for the first time. The technical specifications and operating methods included in this manual are subject to changes without notice. In case of any inquires after a period of usage, please contact the manufacturer. Please charge the battery before using your meter for the first time.
Table of Contents General Safety and Introduction ………………………..…. ……… 63 Accessories……………………..……………………….………....64 Menu Operation G. F r o n t p a n e l … … … … … … … … … . . … … … … … … … . . . . . 6 5 H. Shortcut key operation....……………...…....…….………. 68 I. Power ON/OFF equipment............................................... 70 J. Menu Operation Guide.......................................................71 1. DVB-S/S2 Setup................................ ……....…….…72 2. D V B - T/ T 2 S e t u p . . . .
GENERAL SAFETY: Topics to be considered: Please strictly follow the below mentioned instructions so as to prevent damage that can happen to you or your device. Before cleaning your device, pull the power cord and turn it off via Key of Power on/off and clean it with dry cloth. Do not use accessories or additional apparatus that are not recommended by manufacturer as they may damage the device and may void the guarantee.
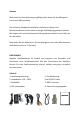
Accessories 1. User’s manual 5. Remote control 2. Power Adapter 6. AV IN/OUT cable 3. Power Cable 7. BNC connector (Female) 4. In-vehicle lighter charger adapter 8. Power convert cable Due to your electrical charger adapter with 14 volt of output, you can ensure device to remain charged continuously and thanks to that, you can use your device in environments that do not have electricity. You can easily charge your device during your travel due to your lighter charger adapter in car.
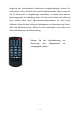
G. Front panel 1. POWER key : For turn-on/ turn-off. To press and hold for 3 seconds to power 2. LCD Screen Shows menus and programs clearly 3.
Green: the meter is power on Dim: the meter is power off 4. Battery Light: Light is Red indicates the meter is being charged now. Light is Green indicates the meter is full charged 5. 5V-T/ 12V-T/ 24V-T Light: Indicates ANT 5V ON/12V ON / 24V ON/OFF 6. LOCK-T/C: This light will be on when Terrestrial signal or cable signal is locked. 7. LOCK-S: This light will be on when Satellite signal is locked. 8. 22k/13v/18v light: Indicates the mode of 22k/13v/18v 9.
20. IPTV For watching IPTV programs by connecting the Ethernet. (Depends on the local service available or not.) 21. T/R: Selects and plays TV/RADIO channel in playing mode. 22. Function key: F1: Changes the signal bar on DISH SETUP menu F2: Actives DiSEqC 1.2 function on the DISH SETUP menu 23. LNB INPUT: Satellite signal input port; connect directly to satellite antenna with coaxial cable 24. RF IN: Antenna input connection port 25. 12V OUT 12 Voltage output, can be used for CCTV camera 26.
H. Shortcut key operation 1) 0/22K A quick key to switch AV IN/OUT on the channel display. A quick key to switch 22K output on the DVB-S/S2 Setup menu 2) H/V A quick key to switch 13V/18V output on the DVB-S/S2 Setup menu 3) Spectrum A quick key to display the spectrum information 4) FIND A quick key to enter the S/S2 setup menu 5) T/R Press TV/RADIO key in the playing mode to shift 6) F1: Press button to check the signal information when broadcasting program.
Select the satellite, then the satellite information will be displayed. Select the Sound by pressing LEFT/RIGHT button to choose the sound Select the battery indicator by pressing LEFT/RIGHT button to display the battery information on the right top corner of the screen Select the Sleep by pressing LEFT/RIGHT button to setup the sleeping time. 8) Volume: Press the button to adjust the volume.
I. Power ON/OFF the equipment This finder meter is designed for using as a portable equipment, it does not require any previous installation. Power on: Press and hold the Red power button for three seconds. When the boot-up logo displayed on the screen, then release the power button. The boot-up image will be keeping displayed. After the system loading, the language selecting menu appears. Power off: Press and hold the Red power button for three seconds.
J. Menu Operation Guide Press Menu key on the Keypad to display the main menu. The Main menu consists of 9 menu options as shown below . DVB-S/S2 DVB-T/T2 DVB-C/C2 SPECTRUM CONSTELLATION CCTV NETWORK OTHERS SYSTEM Use the arrow keys to move the cursor in the menu. Use OK key to confirm the selection. To escape the menu system at anytime, press EXIT key.
10. DVB-S/S2 SETUP Press OK on DVB-S/S2 setup, then the following menu appears. 8) Satellite: Press button to display the satellite list. Search the satellite by pressing button and press to select the satellite. Press to confirm your selection.
9) LNB: Press button to select proper LNB type according to your physical LNB type. Press button to setup LNB configuration as below picture a. LNB: Use button to select the LNB b. L.O. Frequency: Enter the proper LNB frequency referring to your LNB by using the numeric key on the keypad. c. LNB Voltage: Use button to select the LNB power. d. LNB Dish: Use button to select the dish type, Fixed or Moved e.
10) Dish Position: First press OK button on LNB to enter LNB CONFIGURATION. Select LNB Dish to Moved by using LEFT/RIGHT button as below picture. And then return to DVB-S/S2 SETUP menu, press OK button on Dish Position to setup DiSEqC 1.
Satellite: Transponder: Continuously Move: Move Steps: Step Size: Use < Left/Right> button to select the satellite or Press OK button to select the Satellite Use< Left/Right> button to select the transponder. Press OK button to display TP list. Use < Left/Right> button to move positioner and press OK button to save current position. Use< Left/Right> button to move positioner by step and press OK button to save current position. Use< Left/Right>button to setup one step size.
11) Frequency : Press button to display the Frequency list .Select the Frequency you want by pressing LEFT/RIGHT button or UP/DOWN button. Press to confirm your selection . You also can Edit, Add, Delete and PID the stored frequency very easily, as following picture shows. ① Edit: Press button to edit Frequency using the numeric keys. Press UP/DOWN key to select “Pol”.
② Add: Press button to add Frequency using the numeric keys .Press UP/DOWN key to select “Pol”. Press button to confirm the operation and save the result ③ Delete: Press LEFT/RIGHT or UP/DOWN button to select Delete option. Press button to set delete status. You will see a confirmation massage ,Please to delete or to cancel the operation and save the result.
12) Network search: Use button to choose ON/OFF 13) TP SCAN: Scan transponders one by one. Press OK to start scan channel. 14) SAT SCAN: Scan all the transponders in one satellite (these transponders have been set) Note: In the course of signal searching, you can see the bar meter of the LEVEL and QUALITY, at the same time the LOCK light will come on with the speaker notification. DiSEqC will indicate which port is connected to the DiSEqC 1.
Press F1 again to display the Level and C/N value. Press F2 to display the spectrum information 1) Press button to shift between 13/18V.
You can change parameters such as Start frequency and end frequency by using the numeric keys 5) Press button to zoom in/out the frequency as following picture: 6) Press F1 button to display the info of the signal 7) Press F2 button to fill or unfill the spectrum display as following picture.
Press button to display the constellation 16) MULTI TP: Press the button to display multi TP 81
11. DVB-T/T2 SETUP Press OK on DVB-T/T2 setup then the following window appears. 8) Frequency: Press button to select the frequency and the corresponding bandwidth will be showed on the screen. Press button to enter the Frequency list. Press button to select frequency one by one, press button to select page by page.
Edit frequency: Press button to edit the frequency by numeric numbers. Press button to select the Band Width. And then Press button to confirm the operation and save the result. Or press< EXIT> button to cancel the operation. Add frequency: Press button to add the frequency by numeric numbers. Press button to select the Band Width. And then Press button to confirm the operation and save the result.
Delete frequency: Press button to select option, and then press button, you will see the confirm message. Press button to delete or cancel this operation. PID infomation: Press button to check the PID information of the Frequency.
10) Network Search: Press button to select Network Scan mode ON/OFF. 11) Scan the possible frequency and bandwidth to receive the programs, then Press button to TP Scan or Auto Scan. Note: In the course of signal searching, you can see the bar meter of the LEVEL and C/N, at the same time the LOCK light will come on with the speaker notification TP Scan: Scan transponders one by one on default frequency and bandwidth. Press button to TP Scan.
Auto Scan: Scan all range of frequency and bandwidth. It costs time to do Auto Scan, user can press to skip or to exit at anytime Press button to Auto Scan. Press button to select Auto Scan mode. Press button, one message box will be displayed Press button to delete the existing program and start the TP Scan. Or press button to save the existing program and start the Auto Scan.
12) Signal information: Press F1 to display the signal information. You can see the bar meter of the LEVEL and C/N. Press button to change volume, T/R button to mute.
Press button to zoom in/out the frequency Press F2 button to fill or unfill the spectrum as following picture.
14) Constellation: Press button to display the constellation as below 12. DVB-C/C2 SETUP Press OK on the DVB-C/C2 setup, the following figure appears. 8) Frequency: Press button to select the frequency and the corresponding Symbol rate and Constellation will be showed on the screen automatically.
Press button to enter the Frequency list. Press button to select frequency one by one, press button to select page by page Edit frequency: Press button to edit the frequency by numeric numbers. Press button to select the Band Width. And then Press button to confirm the operation and save the result. Or press< EXIT> button to cancel the operation. Add frequency: Press button to add the frequency by numeric numbers.
select the Band Width. And then Press button to confirm the operation and save the result. Or press button to cancel this operation. Delete frequency: Press button to select option, and then press button, you will see the confirm message. Press button to delete or cancel this operation. Press button to check the PID information of the Frequency.
9) Network Search: Press button to select Network Scan mode ON/OFF. 10) TP Scan: Scan transponders one by one on default frequency and bandwidth. Press button to TP Scan. Press button to select TP Scan mode. Press button, one message box will be displayed Press button to delete the existing program and start the TP Scan. Or press button to save the existing program and start the TP Scan.
11) Auto Scan: Scan all range of frequency and bandwidth. It costs time to do Auto Scan, user can press to skip or to exit at anytime Press button to Auto Scan. Press button to select Auto Scan mode.
Press button to delete the existing program and start the TP Scan. Or press button to save the existing program and start the TP Scan. 12) Signal information: Press F1 to display the signal information. You can see the bar meter of the LEVEL and C/N. Press button to change volume, T/R button to mute.
13) Spectrum: Press F2 to display the spectrum information Press button to zoom in/out the frequency as following picture 95
Press F2 button to fill or unfill the spectrum as following picture. 14) Constellation: Press button to display the constellation diagram as following picture.
13. SPECTRUM Satellite - Spectrum Terrestrial - Spectrum Cable - Spectrum Reference the spectrum function in the DVB-S/S2, DVB-T/T2 and DVB-C/C2 SETUP menu. 14. CONSTELLATION Satellite - Constellation Terrestrial - Constellation Cable - Constellation Reference the Constellation function in the DVB-S/S2, DVB-T/T2 and DVB-C/C2 SETUP menu.
15. CCTV MONITOR Press AV IN/OUT button to activate the CCTV monitor function when the camera is connecting with the meter. The following diagram is the connecting instruction. NOTE: This function just can be working when the camera is connecting.
16. NETWORK Press OK on NETWORK to enter the network setting. Ethernet cable must be connected when using Wired Ethernet mode 17. OTHERS Press OK on OTHERS then the following window appears. The menu consists of 9 menu options as shown below: Note: Some menu options relate to the USB and PVR function, external Hard-Disk-Drive must be connected to the USB port of the device.
8.1 MEDIA PLAYER Check the information from the external hard drive which you connected to the meter. Use and OK button to select the recorded program for playing back and view the pictures. 8.2 HDD MANAGE Select the HDD MANAGE in main menu and press OK. The following picture will be displayed.
1) Press the button to unmount the external hard drive 2) Press the button to mount the external hard drive again. 3) Press the button to format the external hard drive. A warning bar will be displayed as following picture. 4) After unmount the external hard drive, press the YELLOW button again to format. 5) Press the button to display the information of the hard drive. As following picture shown.
8.3 UPGRADE This function can be used to store and update satellite data, Also can be used to upgrade main program of the meter. 8.3.1 Satellite information update Connect a USB disk to the meter first, then you can enter the UPGRADE function. The following picture will be displayed. 1) Press the button to backup the satellite information, satellite list, channel data and so on.
8.3.2 Main Program upgrade After receiving the main software from supplier, put the software (IMX format) into the USB disk and connect to the device. Select the UPGRADE in the menu, following picture will be shown Move the cursor to the IMX file and press OK, then the device starting to upgrade. After upgrading, the device will be power off automatically. You can power on the device again. Also, there is another way to upgrade the main software. Upgrade Software via USB port automatically.
You can manage the stored channels ,TV and Radio Channels. Sort, Fav, Edit and Delete them very easily. 6) To sort a channel: ① Locate the channel you want to sort. Press the button. You will get four ways to sort the channel by Name, Table, LCN and Manual .
② Press button, one message box will be displayed. ③ Input the serial number by using the numeric keys . Press the button .The channel will change sequence.
8) To Edit Channels: Press button to edit channels by Lock, Skip, Rename and Modify PID. 9) To delete channel: Press Button to delete the channel, the following picture will be displayed. ①Press Left /Right button to select page turning, Press Up/Down button to select the channel . ②Locate the channel you want to delete, and press button, the channel will be marked with the symbol “X” . ③Repeat step 2 with those channels you want to delete.
④To confirm the deletion .Press EXIT twice, You will see a confirmation message . ⑤ Press OK key to confirm the deletion .or Press EXIT to cancel. Press button to delete all of the channels,You will see a confirmation message . Press OK key to confirm the deletion .or Press EXIT to cancel. 10) Channel Information Use or keys to move the cursor. In the meantime, Channel information: Satellite name, transponder information will be displayed on the left side .
8.5 TS RECORD Connect the USB disk to the device, select the TS RECORD menu. Press 0/22k red button start to record the program in TS format. Press H/V green button to stop the recording and the program will be saved to the USB disk automatically. 8.5.1 PVR function. With the same function as the receiver, this Finder also has time shift and program recording function. USB memory device must be connected before using this function. 2. Press 0/22K button ,you will see the picture as below. 2.
4. Then press the OK button to stop the recording. The recorded program will be saved to USB memory automatically. 5. Press AN/DG button to enter the recorded program menu. The following picture will be displayed. Use and OK button to select the recorded program for playing back. NOTE: During recording you have the option to watch another channel, but it must be provided on the same TP. Otherwise, the following picture will be displayed.
The recording will be stopped when press OK button. CAUTION: Do not disconnect the external hard drive while recording . It may cause damage to the recorded programs. The Finder will not display anything while the recording is on Terrestrial and Cable Program. 8.
8.7 ANGLE CALCULATION Press OK on Angle Calculation then following window appears. 1) Satellite: Use LEFT/RIGHT button to select the satellite or Press OK button to select the Satellite. 2) Sat longitude: Use numerical button to enter satellite position. 3) East/West:Use LEFT/RIGHT button to select satellite position is East or West. 4) User latitude: Use numerical button to enter latitude of your position. 5) North/South: Indicate if latitude is North or South.
8.8 DVB-CI The product is equipped with a slot for Common Interface (CI). Check the bottom of the product Insert the Smartcard into the CI module, and CI module into the Slot. Press OK on DVB CI then following window appears. Then you can check the information of CI module using this item Also you can change the CI module power in 3V/5V/Auto by using Red button (0/22k). 8.
Then you can put this report to PC via USB disk for editing. Go into the UPGRADE menu, you will see the report as following picture. And then press blue button to back up the report to the USB disk. 18. SYSTEM SETUP Press OK on SYSTEM then the following window appears.
transparency of all the menu of the receiver. 3) Aspect Ratio: Select 4:3, 16:9 (wide screen) and auto. 4) Display Format: If you select the display aspect ratio as “4:3”, then also the preferred aspect ratio conversion scheme for cases in which the transmitted Programme is in “16:9” format can be chosen. The options are: ④ Pan & Scan: The receiver interprets pan & scan vectors encoded in the Programme and crops the 16:9 input signal for display on 4:3 TV.
K. Technical Specifications System Fully DVB compliant capabilities Connector Frequency Range Signal Level LNB/TUNER Input LNB supply LNB Switch control DiSEqC Front End S/S2 Demodulator RF T2/T/C2/C TUNER Input T/T2/C/C2 Demodulator System resource Video Decoder Symbol Rate SCPC and MCPC Spectral inversion Connector Frequency Range Signal Level ANT supply Front End Channel Bandwidth Symbol Rate Processor SDRAM FLASH Yes F type 950MHz-2150 MHz -65dBm~~-25dBm 13/18V.,max500mA 22KHz Ver 1.0 / Ver 1.
L. Physical Specifications Size 210 x 130 x 48mm Weight 0.75 kg Operating temperature 0 to 45℃ Storage relative humidity 5 to 90% Weight and dimensions are not absolutely exact values. The battery life will be shorten if using in the extremely cold or hot weather. Handling Precautions and Prohibitions of Battery in Sat Meter Warning: You are using Lithium ion batteries or Nickel metal hydride batteries in the machine now, so please don't work under high temperature or high pressure conditions.
Notification about the Battery Regulation The delivery of many devices includes batteries, which for example serve to operate the remote control. There also could be batteries or accumulators built into the device itself. In connection with the sale of these batteries or accumulators, we are obliged under the Battery Regulations to notify our customers of the following: Please dispose of old batteries at a council collection point or return them to a local shop at no cost.