Outdoor Tilting Wall Mount 32" - 75" (81 - 191 cm) MAX 100 lb (45 kg) ENG ESP FRN 1 2020-09-02 #:204-9114-3 (2020-11-10)
WARNING ENG - This product is designed to be installed on wood stud, solid concrete or cinder block walls. Hardware is included for wood stud, solid concrete and cinder block installation. Before installing make sure the supporting surface will support the combined load of the equipment and hardware. Screws must be tightly secured. Do not overtighten screws or damage can occur and product may fail. Never exceed the Maximum Load Capacity.
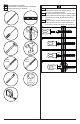
ENG Symbols ESP Símbolos FRN Symboles ENG WARNING ESP ADVERTENCIA FRN ADVERTISSEMENT # ENG Skip to step. ESP Continúe con el paso. FRN Passez à l’étape. ENG Do not overtighten screws. ESP No apriete de más los tornillos. FRN Ne pas trop serrer les vis. 3 x3 ENG Screws must get at least three full turns and fit snug. ESP Los tornillos tienen que dar, por lo menos, tres vueltas completas y quedar ajustados. FRN Il faut effectuer au moins trois tours de vis complets et bien serrer les vis.
ENG Tools Needed for Assembly. ESP Herramientas necesarias para el ensamblaje. FRN Outils nécessaires au montage. ENG To properly tighten screws: Tighten until screw head makes contact, then tighten another 1/2 turn. Do not overtighten screws. ESP Apriete adecuado de los tornillos: Apriete hasta que la cabeza del tornillo haga contacto y luego apriete otra 1/2 vuelta. No apriete de más los tornillos.
ENG Parts (Before beginning, make sure you have all parts shown below). ESP Piezas (antes de iniciar, asegúrese de tener todas las piezas siguientes). FRN Pièces (avant de commencer, assurez-vous d’avoir toutes les pièces illustrées ci-dessous).
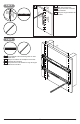
1 ENG Wood stud wall. ESP Pared de madera. FRN Mur en bois. ENG Concrete/Cinder block. ESP Concreto/Bloques de hormigón. FRN Béton plein/Bloc de parpaing. 1a 1b 1a WARNING ENG - When installing Peerless wall mounts on a wood stud wall covered with gypsum board (drywall), verify that the wood studs are a minimum of 2" x 4" nominal size. Do not install over gypsum board thicker than 5/8".
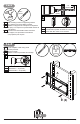
1a-1 ENG Use stud finder to locate and mark stud center lines. ESP Marque las líneas centrales del montante. FRN Marquez la ligne médiane du montant. 1a-2 1 (40 6" 6m m) ENG Level wallplate. Mark mounting holes on stud center lines. ESP Marque los orificios de montaje en las líneas centrales del montante. FRN Marquez les trous de fixation le long de la ligne médiane du montant.
1a-3 2.5" (64mm) 5/32" (4mm) 5/32" (4mm) ENG Drill mounting holes into supporting surface (2.5" (64mm) minimum depth required). ESP Taladre los agujeros de montaje en la superficie de apoyo; se requiere una profundidad mínima de 2.5" (64mm). FRN Percez les trous de fixation dans la surface de support, une profondeur minimale de 2,5 po (64mm) est requise. ENG Mounting hole must center on stud. ESP El orificio debe quedar centrado en el montante. FRN Le trou doit être centré sur le montant.
1b WARNING ENG - When installing Peerless wall mounts on a concrete wall, the wall must be at least 8" thick with a minimum compressive strength of 2000 psi. When installing Peerless wall mounts on a cinder block wall, the cinder blocks must meet ASTM C-90 specifications and have a minimum nominal width of 8". Do not drill into mortar joints! Be sure to mount in a solid part of the block, generally 1" (25 mm) minimum from the side of the block.
1b-1 ENG Level wallplate. Mark mounting holes. ESP Marque los orificios de montaje. FRN Marquez les trous de fixation. 8" (20cm) 8" (20cm) A 1b-2 2.5" (64mm) 5/16" (8mm) 5/16" (8mm) ENG Drill mounting holes into supporting surface (2.5" (64mm) minimum depth required). ESP Taladre los agujeros de montaje en la superficie de apoyo; se requiere una profundidad mínima de 2.5" (64mm). FRN Percez les trous de fixation dans la surface de support, une profondeur minimale de 2,5 po (64mm) est requise.
1b-3 D ENG Insert anchor flush to concrete. ESP Inserte el anclaje a ras con el concreto. FRN Insérez la cheville d’ancrage au ras du béton. D (4) 1b-4 ENG Level wallplate. Install using concrete anchors and wood screws provided. ESP Nivele e instale. FRN Mettez à niveau et procédez au montage. 3/8" (10mm) ENG Maximum 80 in. • lb (9 N.M.). ESP Máxima 80 in. • lb (9 N.M.). FRN Maximum 80 in. • lb (9 N.M.).
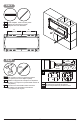
X 2 ENG Center adaptor brackets vertically on back of screen. ESP Centre verticalmente los soportes en la pantalla. FRN Centrez les supports à la verticale de l’écran. C B X 3 x3 ENG Use of spacers is optional. ESP Uso de espaciadores opcional. FRN Facultatif utilisation d’entretoises.
4 5 6 I ENG Tighten. ESP Apretar. FRN Serrer.
7 ENG Tilt Adjustment. ESP Ajuste de la inclinación. FRN Réglage de l'inclinaison. -5°, +15° Pre-set tilt positions of -5°, 0°, 5°, 10° or 15°. ENG Ángulos de inclinación predeterminados de -5°,0°,5°,10° o 15°. ESP Angles d’inclinaison préréglés de -5°, 0°, 5°, 10° ou 15°. FRN 14 ENG Tighten. ESP Apretar. FRN Serrer.
ENG This page intentionally left blank. ESP Página en blanco. FRN Cette page a été laissée en blanc intentionnellement.
ENG Warranty ITL Garanzia ESP Garantía ČEŠ Záruka FRN Garantie SLK Záruka DEU Garantie POR Garantia NEL Garantie TÜR Garanti̇ www.neptuneTV.com Peerless-AV 2300 White Oak Circle Aurora, IL 60502 Email: tech@peerlessmounts.com Ph: (800) 865-2112 Fax: (800) 359-6500 www.peerless-av.com Peerless-AV América Latina Av. de las Industrias 413 Parque Industrial Escobedo General Escobedo N.L., México 66062 Servicio al Cliente 01-800-849-65-77 www.peerless-av.com © 2020, Peerless Industries, Inc.