
Installation Manual

ISSUED: 05-29-14 SHEET #: 202-9605-1
Visit the Peerless Web Site at www.peerlessmounts.com For customer care call 1-800-729-0307 or 630-375-5100.
1 of 1
Installation and Assembly - Adapter Bracket for VESA
®
600 x 600 Screens
Model: PLP-V6X6
Before you start make sure all parts listed are included with your product.
IMPORTANT! Read instruction sheet before you start installation and assembly.
• Do not overtighten. Overtightening may cause permanent damage to the screen. Torque to 26-35 in • lb (30-40 kg • cm).
WARNING
A
H
1
© 2014 Peerless Industries, Inc. All rights reserved.
All other brand and product names are trademarks or registered trademarks of their respective owners.
Some parts may appear slightly different than illustrated.
I
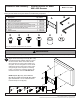
Parts List
Part #Description Qty
A adapter bracket 1 202-1674
B 5/32" (4mm) allen wrench 1 560-9646
C 1/4" (6mm) allen wrench 1 560-9716
D M10 x 15 mm security socket pin screw 4 520-9262
E M6 x 20 mm serrated washer head socket pin screw 4 510-9554
F M6 x 12 mm serrated washer head socket pin screw 4 510-1050
G M8 x 25 mm security socket pin screw 4 520-1101
H spacer 4 540-1015
I #10 at washer 4 540-9400
A
F
E
F
D
I
G
OR
OR OR
H
B
C
E G
Begin with shortest length screw (D, E, F or G),
hand thread through adapter plate into screen
as shown below. Screw must make at least
three full turns into screen insert and t snug
into place. Do not overtighten. If screw cannot
make three full turns into screen insert, select
a longer length screw. Repeat for remaining
holes. If you have any questions, please call
Peerless customer care at 1-800-865-2112.
NOTE: Spacer (H) is only to be used with
M8 x 25 mm socket pin screw (G). #10 washer
(I) is used with M6 x 12 mm serrated washer
head socket pin screw (F) only.
D