PSTK-600 PSTK-1200 PSTK-1600 MAX 25 lb (11 kg) ENG ESP FRN DEU NEL ITL ČEŠ SLK POR TÜR 1 2013-07-29 #:056-9068-3 (2013-10-30)
WARNING ENG - This product is designed to be installed on wood stud, solid concrete or cinder block walls. Hardware is included for wood stud, solid concrete and cinder block installation. Before installing make sure the supporting surface will support the combined load of the equipment and hardware. Screws must be tightly secured. Do not overtighten screws or damage can occur and product may fail. Never exceed the Maximum Load Capacity.
AVVERTENZA ITL - Questo prodotto deve essere installato su pareti con montanti di legno, o in calcestruzzo solido o a mattoni di cemento. Sono inclusi i dispositivi di fissaggio per l’installazione su montanti di legno, calcestruzzo solido e mattoni di cemento. Prima di iniziare l’installazione, verificare che la superficie destinata all’installazione sia in grado di sostenere il carico totale del prodotto e dei dispositivi di fissaggio. Le viti devono essere serrate in modo stretto.
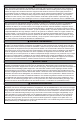
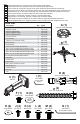
ENG ESP FRN DEU NEL ITL ČEŠ SLK POR TÜR Symbols Símbolos Symboles Symbole Symbolen Simboli Symboly Symboly Símbolos Semboller ENG ESP FRN DEU NEL ITL ČEŠ SLK POR TÜR Do not overtighten screws. No apriete de más los tornillos. Ne pas trop serrer les vis. Ziehen Sie die Schrauben nicht zu fest an. Draai de schroeven niet te strak aan. Non stringere troppo le viti. Šrouby neutahujte příliš silně. Skrutky neuťahujte príliš silno. Não apertar demasiado os parafusos. Vidaları gereğinden fazla sıkmayın.
ENG ESP FRN DEU NEL ITL ČEŠ SLK POR TÜR Tools Needed for Assembly. Herramientas necesarias para el ensamblaje. Outils nécessaires au montage. Für den Zusammenbau erforderliche Werkzeuge. Voor montage benodigd gereedschap. Attrezzi necessari per l’assemblaggio. Nástroje potřebné k montáži. Nástroje potrebné na montáž. Ferramentas necessárias para a montagem. Montaj İçin Gerekli Aletler. 3/16" (5mm) ENG To properly tighten screws: Tighten until screw head makes contact, then tighten another 1/2 turn.
ENG ESP FRN DEU NEL ITL ČEŠ SLK POR TÜR Parts (Before beginning, make sure you have all parts shown below). Piezas (antes de iniciar, asegúrese de tener todas las piezas siguientes). Pièces (avant de commencer, assurez-vous d’avoir toutes les pièces illustrées ci-dessous). Teile (Achten Sie vor Beginn der Arbeiten darauf, dass alle unten abgebildeten Teile vorhanden sind). Onderdelen (hoort u zich ervan te overtuigen dat u alle onderdelen hebt, die hieronder te zien zijn).
O (4) wall plate R (4 ) M8 x 12mm S (4) square nut Q (1 ) P (4) cable cover screw cover T (4) U (2) plastic fastener end cap 7 V (1) cap 2013-07-29 #:056-9068-3 (2013-10-30)
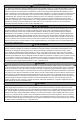
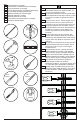
1 C V 2 ENG ESP FRN DEU NEL ITL ČEŠ SLK POR TÜR ENG ESP FRN DEU NEL ITL ČEŠ SLK POR TÜR Wood stud wall. Pared de madera. Mur en bois. Holzwand. Houten muur. Parete di legno. Dřevěná stěna. Drevená stena. Parede de madeira. Ahşap duvar. 2a Concrete/Cinder block. Concreto/Bloque de hormigón. Béton/bloc de béton. Beton/Porenbetonstein. Beton/B2-blokken. Calcestruzzo solido/forato. Betonový/škvárový blok. Betónový/škvarový blok. Betão/bloco de cimento. Beton/Briket.
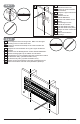
2a WARNING ENG - When installing Peerless wall mounts on a wood stud wall covered with gypsum board (drywall), verify that the woods studs are a minimum of 2" x 4" nominal size. When installing to more than one stud, ensure the spacing between studs is at least 16" but does not exceed 24". Do not install over gypsum board thicker than 5/8".
2a-1 ENG Use stud finder to locate and mark stud center lines. ESP Marque las líneas centrales del montante. FRN Marquez la ligne médiane du montant. DEU Markieren Sie die Ständer-Mittellinien. NEL Markeer het midden van de balken. ITL Contrassegna le linee centrali dei montanti. ČEŠ Vyznačte střední linii stěny. SLK Vyznačte stredné čiary steny. POR Marque as linhas centrais da escora. TÜR Direk merkez hatlarını işaretleyin. 2a-2 ENG Level wallplate. Mark mounting holes.
2a-3 3" (76mm) 3/16" (5mm) 3/16" (5mm) ENG Drill mounting holes into supporting surface (3" (76 mm) minimum depth required). ESP Taladre los agujeros de montaje en la superficie de apoyo; se requiere una profundidad mínima de 3" (76 mm). FRN Percez les trous de fixation dans la surface de support, une profondeur minimale de 3 po (76 mm) est requise. DEU Bohren Sie Montagelöcher in die Montagefläche; Mindesttiefe von 76 mm (3 Zoll) erforderlich.
2b WARNING ENG • When installing Peerless wall mounts on a concrete wall, the wall must be at least 8" thick with a minimum compressive strength of 2000 psi. • When installing Peerless wall mounts on a cinder block wall, the cinder blocks must meet ASTM C-90 specifications and have a minimum nominal width of 8". Do not drill into mortar joints! Be sure to mount in a solid part of the block, generally 1" (25 mm) minimum from the side of the block.
VÝSTRAHA SLK • Pri inštalácii nástenného držiaka Peerless na betónovú stenu musí mať táto stena hrúbku minimálne 20 cm a minimálnu pevnosť v tlaku 2000 psi (13,8 tisíc kPa). • Pri inštalácii nástenného držiaka Peerless na stenu zo škvarových tvárnic musia tieto tvárnice spĺňať špecifikácie ASTM C-90 a musia mať minimálnu nominálnu šírku 20 cm (8 palcov). Nevŕtajte do škár vyplnených maltou! Vždy musíte montovať do pevnej časti tvárnice, všeobecne najmenej 25 mm (1 palec) od okraja tvárnice.
2b-1 ENG ESP FRN DEU NEL ITL ČEŠ SLK POR TÜR Mark mounting holes. Marque los orificios de montaje. Marquez les trous de fixation. Markieren Sie die Montagelöcher. Markeer montagegaten. Contrassegna I fori di montaggio. Vyznačte montážní otvory. Vyznačte montážne otvory. Marque os furos de montagem. Montaj deliklerini işaretleyin. C 2b-2 3" (76mm) 3/8" (10mm) 3/8" (10mm) ENG Drill mounting holes into supporting surface (3" (76 mm) minimum depth required).
2b-3 D ENG ESP FRN DEU NEL ITL ČEŠ SLK POR TÜR Insert anchor flush to concrete. Inserte el anclaje a ras con el concreto. Insérez la cheville d’ancrage au ras du béton. Setzen Sie den Dübel bündig mit dem Beton abschließend ein. Breng anker aan gelijk met beton. Inserire il fermo a paro col calcestruzzo. Přestrčte ukotvenia priamo do betónu. Prestrčte ukotvenia priamo do betónu. Introduza a bucha encastrada no betão. Tespit demirini betona takın. D (4) 2b-4 ENG Level wallplate.
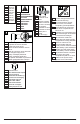
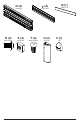
3-1 P (4) O 3-2 C G R N 4mm wrench C S 1/8" 3-3 S O C 16 2013-07-29 R #:056-9068-3 (2013-10-30)
4-1 ENG ESP FRN DEU NEL ITL ČEŠ SLK POR TÜR N 4mm wrench 4-2 C ENG ESP FRN DEU NEL ITL ČEŠ SLK POR TÜR Loosen. Afloje. Desserrez. Lösen. Losdraaien. Allentare. Uvolnit. Uvoľniť. Desaperte. Gevşetin. Rotate mount at least three full turns. Rote la unidad, por lo menos, tres vueltas completas. Faites effectuer au support au moins trois tours complets. Schrauben Sie die Halterung mindestens drei volle Umdrehungen. Draai de bevestiging ten minste drie hele slagen.
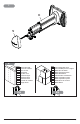
5-1 B N 4mm wrench ENG ESP FRN DEU NEL ITL ČEŠ SLK POR TÜR Loosen. Afloje. Desserrez. Lösen. Losdraaien. Allentare. Uvolnit. Uvoľniť. Desaperte. Gevşetin. 5-2 ENG ESP FRN DEU NEL ITL ČEŠ SLK POR TÜR Position feet of adapter bracket over mounting holes. Coloque las patas del soporte adaptador sobre los agujeros de montaje. Placez les pattes du support adaptateur sur les trous de fixation. Positionieren Sie die Füße der Adapterhalterung über den Montagelöchern.
5-3 x3 ENG Screws must get at least three full turns and fit snug. ESP Los tornillos tienen que dar, por lo menos, tres vueltas completas y quedar ajustados. FRN Il faut effectuer au moins trois tours de vis complets et bien serrer les vis. DEU Schrauben sind mindestens drei volle Umdrehungen einzudrehen und müssen fest anliegen. NEL De schroeven moeten ten minste drie hele slagen worden aangedraaid en stevig vastzitten. ITL Girare tre volte le viti che devono risultare aderenti.
ENG It is the responsibility of the installer to ensure that the projector is properly ventilated per manufacturer's requirements. ESP El instalador es responsable de asegurarse de que el proyector tenga una ventilación adecuada. FRN Il incombe à l'installateur de s'assurer que le projecteur est correctement ventilé. DEU Die für die Montage zuständige Person ist dafür verantwortlich, dass der Projektor ausreichend belüftet ist.
6-1 F F 6-2 ENG ESP FRN DEU NEL ITL ČEŠ SLK POR TÜR Tighten. Apretar. Serrer. Anziehen. Aandraaien. Stringere. Utáhněte. Utiahnite. Apertar. Sıkmak. ENG ESP FRN DEU NEL ITL ČEŠ SLK POR TÜR Optional security screw. Tornillo de seguridad opcional. Vis de sécurité en option. Optional Sicherheitsschraube. Optioneel beveiliging schroef. Vite di sicurezza opzionale. Volitelné bezpečnostní šroub. Voliteľné bezpečnostné skrutku. Parafuso de segurança opcional. İsteğe bağlı güvenlik vida.
7 ENG Loosen, adjust, tighten. ESP Afloje, ajuste, apriete. FRN Desserrez, réglez, puis serrez. DEU Lösen, einstellen, anziehen. NEL Losdraaien, aanpassen, aandraaien. ITL Allentare, regolare, stringere. ČEŠ Uvolnit, nastavit, přitáhnout. SLK Uvoľniť, nastaviť, pritiahnuť. POR Desaperte, ajuste, aperte. TÜR Gevşetin, ayarlayın, sıkın.
9a-1 9b-1 O Q 1/8" (3mm) O Q 1/8" (3mm) T (4) U T (4) U 10 ENG Loosen, adjust, tighten. ESP Afloje, ajuste, apriete. FRN Desserrez, réglez, puis serrez. DEU Lösen, einstellen, anziehen. NEL Losdraaien, aanpassen, aandraaien. ITL Allentare, regolare, stringere. ČEŠ Uvolnit, nastavit, přitáhnout. SLK Uvoľniť, nastaviť, pritiahnuť. POR Desaperte, ajuste, aperte. TÜR Gevşetin, ayarlayın, sıkın. 11-1 N 4mm wrench ENG Loosen, adjust, tighten. ESP Afloje, ajuste, apriete.
11-2 N 4mm wrench ENG Loosen, adjust, tighten. ESP Afloje, ajuste, apriete. FRN Desserrez, réglez, puis serrez. DEU Lösen, einstellen, anziehen. NEL Losdraaien, aanpassen, aandraaien. ITL Allentare, regolare, stringere. ČEŠ Uvolnit, nastavit, přitáhnout. SLK Uvoľniť, nastaviť, pritiahnuť. POR Desaperte, ajuste, aperte. TÜR Gevşetin, ayarlayın, sıkın. F F +15° +20° -20° -15° 11-3 ENG Loosen, adjust, tighten. ESP Afloje, ajuste, apriete. FRN Desserrez, réglez, puis serrez.
LIMITED FIVE-YEAR WARRANTY Peerless Industries, Inc. (“Peerless”) warrants to original end-users of Peerless® products will be free from defects in material and workmanship, under normal use, for a period of five years from the date of purchase by the original end-user (but in no case longer than six years after the date of the product's manufacture). At its option, Peerless will repair or replace, or refund the purchase price of, any product which fails to conform with this warranty.
BESCHRÄNKTEN FÜNFJÄHRIGEN GARANTIE Peerless Industries, Inc. („Peerless”) übernimmt gegenüber den ursprünglichen Endnutzern von Peerless®-Produkten die Gewährleistung, dass diese unter normalen Einsatzbedingungen für fünf Jahre ab Datum des Kaufs durch den ursprünglichen Endnutzer (aber in keinem Fall länger als sechs Jahre nach Herstellungsdatum des Produkts) frei von Material- und Verarbeitungsfehlern sind.
OMEZENÁ PĚTILETÁ ZÁRUKA Peerless Industries, Inc. (“Peerless”) zaručuje původním koncovým uživatelům výrobků Peerless®, že budou bez vad na materiálu a provedení, za podmínky běžného používání, po dobu pěti let od data nákupu původním koncovým uživatelem (ale v žádném případě ne déle než šest let po datu výroby výrobku). Společnost Peerless dle své volby opraví nebo vymění, anebo proplatí cenu nákupu jakéhokoliv výrobku, který nebude v pořádku ve stavu, který tato záruka pokrývá.
BEŞ YILLIK SINIRLI GARANTİ Peerless Industries, Inc. (bundan sonra “Peerless” olarak anılacaktır) Peerless® ürünlerinde normal kullanım koşulları altında orijinal son kullanıcının satın alma tarihinden itibaren beş yıl süreyle (ama her halükarda ürünün üretim tarihinden itibaren en fazla altı yıl süreyle) malzeme ve işçilik arızaları olmayacağını orijinal son kullanıcılara garanti eder.