FIUS0801G130 EN USE AND CARE ES EMPLEO Y MANUTENCION FR UTILISATION ET ENTRETIEN See separate insert sheet for more information Voir la feuille séparée d'insertion pour plus d'information Vea la hoja separada del separador de millares para más información For more information see Step 43 Para más informacíon vea el paso de progresión 43 Pour plus d’information voir l’étape 43 12V Model Number IGOD0051 SE
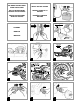
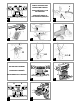
SEE VERBAL INSTRUCTIONS AFTER THE PICTURES INITIAL BATTERY CHARGE VER LAS INSTRUCCIONES DESPUÉS DE LOS DISEÑOS PRIMERA CARGA DE LA BATERÍA VOIR LES INSTRUCTIONS APRÈS LES DESSINS PREMIÈRE CHARGE DE BATTERIE ! apply decal #22 first ASSEMBLY MONTAJE MONTAGE 1 2 apply decal #6 first 3 4 5 x4 6 9 10 11
12 13 16 17 A B 18 19 20 21 22 23 24
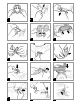
x2 27 x2 28 2 3 1 2 3 29 4 1/4 30 31 32 34 35 36 37 39 40 x2 33 BATTERY INSTALLATION INSTALACIÓN DE LA BATERÍA INSTALLATION DE LA BATTERIE 38
VEHICLE FEATURES AND INSTRUCTIONS FOR USE B CARACTERÍSTICAS Y USO DEL VEHÍCULO CARACTERÍSTIQUES ET UTILISATION DU VEHICULE 41 42 43 A 45 44 2 1 R 1-R 46 2-1-R 47 48 49 50 BATTERY REPLACEMENT CAMBIO DE LA BATERÍA REPLACEMENT DE LA BATTERIE B 51 A 52
A B C B BATTERY RECHARGE CARGA DE LA BATERÍA CHARGE DE LA BATTERIE 53 C 54 B 55 ELECTRICAL DIAGRAM DIAGRAMA ELÉCTRICO DIAGRAMME ÉLECTRIQUE THERMO PROTECTOR MEIE0468 b b bk w MOTOR RIGHT SAGI9993 52033 r r MOTOR LEFT MEPU0005 b w SAGI9993 r MEIE0486 MEPU0005 b r b b = blue bk = black r = red w = white GATOR b = azul bk = negro r = rojo w = blanco b = bleu bk = noir r = rouge w = blanc
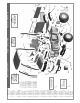
1• 2• 3• 4• 5• 6• 7• 8• 9• 10R • 10L • 11 • 12 • 13 • 14 • 15 • 16 • 17 • 18R • 18L • 19 • 20R • 20L • 21R • 21L • 22 • 23 • 24 • 25 • 26 • 27 • 28R • 28L • 29 • 30 • 31 • 32R • 32L • 33 • 34R • 34L • 35 • 36 • 37 • 38 • 39 • 40 • 41 • 42 • 43 • 44 • 45 • 46 • 47 • 48 • SPST8091JVB SPST8092JVB SPST8211Y ASGI0111N SARP8093Y SPST8095JVB SPST9028N SPST0132 SPST9033A SAGI8122DVB SAGI8122SVB SPMV8120N SPST8121R ASGI0016Y SPST3963N SAGI8139N ASGI0113VBN SPST8116A SPST8101DN SPST8101SN SPST8099VB SPST8107DR SPST8
ENGLISH •PEG PEREGO® thanks you for choosing this product. For over 50 years, PEG PEREGO has been taking children for an outing: first with its famous baby carriages and strollers, later with its pedal and battery operated toy vehicles. •Read this instruction manual carefully to learn the use of this vehicle and to teach your child safe and enjoyable driving. Please keep this manual for use as a reference in the future.
Do not mix alkaline, standard (carbon-zinc), or rechargeable (nickel-cadmium) batteries. CHARGING THE BATTERY • Charge the batteries no longer than 24 hours, following the instructions enclosed with the battery charger. • Charge the battery, as the vehicle shows low power, in this way you will avoid damage to the battery. • If you don’t use your vehicle for a long period of time unplug the battery from the main wire harness of the vehicle. Remember to charge the battery at least every three months.
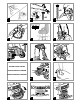
wheel, press down on the accelerator pedal; the vehicle goes forward at 4 1/2 mph. • REVERSE: Place the left hand on the steering wheel. With the right hand holding the gearshift in reverse, press your foot down on the accelerator; the vehicle reverses at 2 1/4 mph. (Reverse is spring-loaded for safety). • BRAKE: The electric braking system stops the vehicle automatically when your child lifts his foot off the pedal. Teach your child the proper use of this vehicle for a safe and fun play time.
ENSAMBLADOS PODRÍAN TENER PARTES PEQUEÑAS/RIESGO POR BORDES CONTANTES. MONTAJE 1 • Unir las dos partes del volante. 2 • Aplicar el adhesivo n° 22. Introducir el volante en la barra-volante tal y como muestra la figura. 3 • Fijar el volante con el tornillo relativo y la tuerca poniendo atención en introducir el tornillo en el agujero circular y la tuerca en el hexagonal. 4 • Introducir la llave-juego en el relativo agujero del salpicadero. 5 • Aplicar el adhesivo n°6.
entre los terminales de la batería, riesgo de explosión o incendio. • Mientras se están cargando, las baterías producen gas explosivos. Cárguelas en un lugar bien ventilado, lejos de fuentes de calor y materiales inflamables. • Las baterías agotadas se deben sacar del vehículo. •No coloque las baterías sobre prendas porque se podrían dañar. SI HAY UNA PÉRDIDA Protéjase los ojos. Evite el contacto directo con el electrolito: proteja sus manos.
• FRENO: El sistema eléctrico de frenado bloquea automáticamente el vehículo cuando se levanta el pie del pedal del acelerador. Enseñe a su niño el uso correcto del vehículo para que maneje en condiciones de seguridad y se divierta. • Antes de partir, verifique que el recorrido esté libre de personas o cosas. • Manejar con las manos sobre el volante y mirar siempre el camino. • Frenar a tiempo para evitar choques.
REQUIS. PRENDRE GARDE AU MOMENT DE DEBALLER CAR LES COMPOSANTES À ASSEMBLER PEUVENT COMPORTER UN DANGER DE PETITES PIÈCES OU DE BORDS TRANCHANTS. MONTAGE 1 • Unir las dos partes del volante. 2 • Appliquer l'adhésif n° 22. Introduire le volant sur la tige du volant comme montré dans la figure. 3 • Fixer le volant avec la vis et l'écrou fournis. ATTENTION : insérer la vis dans le trou circulaire et l'écrou dans le trou hexagonal. 4 • Introduire la clé-jeu dans le trou correspondant du tableau de bord.
• Pendant le rechargement, la batterie produit des gaz. Recharger la batterie dans un lieu bien aéré, loin de toute source de chaleur et de matériaux inflammables. • Les batteries déchargées doivent être enlevées du véhicule. • Eviter que les batteries entrent en contact avec les vêtements: ceux-ci pourraient s'abîmer. EN CAS DE FUITE Se protéger les yeux. Eviter tout contact direct avec le électrolyte et se protéger les mains.
appuyer avec le pied sur l’accélérateur. Le véhicule part en arrière à une vitesse d'environ 2 1/4 mph. • FREIN: Le système électrique de freinage bloque automatiquement le véhicule quand on lève le pied de la pédale d’accélérateur. Enseigner à l’enfant à utiliser le véhicule correctement pour conduire en sécurité tout en s’amusant. • Avant de partir, s’assurer que le parcours est libre de personnes ou de choses. • Conduire avec les mains sur le volant et toujours regarder la route.
STOP! Do not return your vehicle to the store! We’re a toll-free phone call away and we can help. If you are missing parts or need assistance, please see the contact information below. ¡ALTO! ¡No vuelva su vehículo al almacén! Somos una llamada telefónica gratis lejos y podemos ayudar. Si usted es piezas que falta o necesita ayuda, vea por favor la información del contacto abajo.