
User manual


Blower Kit
If you are installing the blower kit in conjunction with a heater kit, skip this section and refer to
Blower and Heater Kits (Dual Installation).
To install a blower kit, perform the following steps:
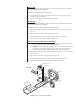
1. Attach the blower assembly onto the bracket at the rear of the camera sled using the
hardware provided (see Figure 1).
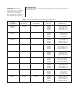
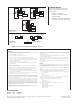
2. Wire as shown in Figure 2. Refer to Table A for cable size.
Heater Kit
If you are installing the heater kit in conjunction with a blower kit, skip this section and refer to
Blower and Heater Kits (Dual Installation).
Perform the following steps to complete the heater kit installation:
1. Attach the PC board assembly onto the bracket at the rear of the camera sled (refer to
Figure 1).
2. Attach the heater assembly onto the front of the camera sled.
3. Route the wiring from the heater assembly along the side of the camera sled.
4. Wire the heater to power. Refer to Figure 2 and Table A.
Blower and Heater Kits (Dual Installation)
1. a. BK4000 and BK4024 - Remove the PC board from the heater assembly. Attach
the PC board to the top bracket of the blower assembly.
b. BK4220 - The blower and heater assemblies are both factory assembled with a PC
board. Only one PC board assembly is required. Remove the PC board from the
blower assembly and replace it with the PC board from the heater assembly.
2. Attach the PC board and blower assembly onto the bracket at the rear of the camera sled
(refer to Figure 1).
3. Attach the heater assembly onto the front of the camera sled.
4. Route the wiring from the heater assembly along the side of the camera sled.
5. Wire the fan and power to the PC board. Refer to Figure 2 and Table A.
Figure 1. Blower/Heater Kit Installation
EH4000 SLED
HEATER ASSEMBLY
BLOWER ASSEMBLY
(24 VAC ONLY)
BRACKET
BLOWER ASSEMBLY
GROUND CLIP
PC BOARD (HEATER ONLY)
BLOWER ASSEMBLY
(230 VAC ONLY)