
Installation Guide


1
CONTEMPORARY FLOOR MOUNT TUB FAUCET
Notes:
1.
Faucet is not for use on concrete floors.
2.
Please ensure all local plumbing codes are observed during installation
3.
Water supply lines must be roughed in on 8” centers.
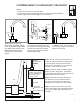
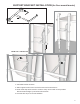
Step 1 Install #1 spout into
faucet body by pushing straight
down. Align spout facing forward
then tighten with #3 Allen screw
(Packaged separately with #7
Allen wrench). Do Not Over
Tighten.
Step 2 Screw #16 handle hub
on to hot/cold cartridges #9 & #17.
Disassemble handle by unscrewing
spokes and install onto cartridge
by securing with screw included.
Reassemble handle.
Step 3 Attach hot and cold risers
C-FRSR to union nuts on back of
faucet body using one #10 rubber
gasket on each riser.
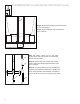
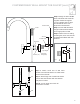
Step 4- Drill (2) 1-1/8” holes into floor on 8”
centers for hot and cold water supplies (see
fig. 5 next page). Supply holes should be
drilled at 3 ¾” minimum to 5 ½” maximum
from drain outlet (center to center).
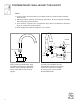
Step 5- If desired, attach U-SBRC support
bracket to risers. See page 4. (Tub model
LCAT-167 does not have an exposed drain so
support brace will not be used)
Step 6- Slide #25 decorative escutcheon
onto bottom of risers C-FRSR and push
part way up. Screw #26 floor flange onto
threaded portion of each riser until it stops.
Step 7- Insert risers into hole in floor and
secure floor flanges with appropriate screws/
bolts for your flooring type. (Hardware not
included)
NSF /ANSI 61
1
Union Nut
10
C-FRSR
C-HLVR
17
16
Screw
Spokes
Spokes
9
16
C-HCRS
1
7
(Allen Wrench)
3
NOTE: When using the
U-SBRC support brace
it must be installed onto
faucet risers prior to
securing to floor
Drain
Optional
Support Brace
U-SBRC
Tub
C-FRSR
Decorative
Escutcheon (25)
Floor Flange (26)
MIN. 3-3/4"
MAX. 5-1/2"