
Door User Manual
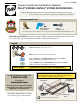

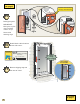


Screen
Glass
Glass/Screen
Retainer Strips
Screw Cover Strips
Latch Mounting Frame
Door
Hinge
Mounting
Frame
Top
Mounting
Frame
Header
Frame
Hardware Kit
Door Closers
Includes mounting
screws and some
handle components
Handle Kit
Includes handle
hardware with
seperate instruction
sheet
Installation
Instructions
Bottom
Expander
Registration
Number
This is your door’s
identification number.
Leave this sticker on
your door.
2
Storm Door Components
NOTE: Actual door styles may vary from illustrations, however, the installation steps will be the same.
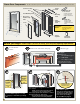
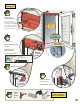
Before you begin Follow steps a, b and c to verify your entryway opening requirements.
b
c
a
Measure gap.
Gap
Slide Tight
If this gap is ...
LESS than 1/4”,
Go to START on page 3
1/4” or GREATER,
Go to Step d, to shim
Note: if this gap is over 9/16”,
a custom storm door is required.
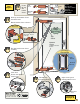
Locate header
frame.
Slide to one side of the entryway.
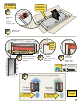
d
e
LEFT
HINGE
doors,
shim this
side
Hinge
Shim
f
Shim
Shim must not
extend beyond
entryway face
RIGHT
HINGE
doors,
shim this
side
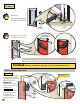
Shim on YOUR hinge side - see Step
6 on Page 3, to determine your hinge
side.
Shim may be one long piece or small 8” to
12” sections.
NOTE: small sections must fully support
the hinges on the mounting frame.
Use an appropriate shim thickness to reduce
the gap in step C, to 1/4” or less.
Household shim materials may include
paint stir sticks or wooden yardsticks.
Nail shims in place.
Note: If you removed an old
storm door, you may wish to
paint and coverany existing
holes before proceeding.
Go to START on page 3.