
Door User Manual


Continued
from
Hardware
Instruction
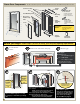
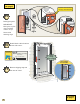
Top
Closer
Location
(Right Hinge)
Approx
1-1/2”
Right
Hinge
Illustration
Left Hinge
Illustration
Top
Closer
Location
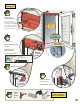
R
e
m
o
v
e
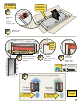
Align Arrow
with Notch on
Mounting Frame
Rest Against
Back of
Mounting
Frame
GNITNUOM
EMA
RF
Right Hinge
Illustrated
Align
Arrow
with
Notch on
Mounting
Frame
Interior
Side
of the
Door
RIGHT HINGE Install Closers
on This Side.
LEFT HINGE Install Closers
on This Side.
25
26
24
27
Hole Plugs
Break off of closer base
Qty.
2
23
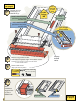
Rest Against Back of
Mounting Frame
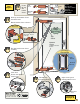
Bottom
Closer
Location
(Right Hinge)
Bottom
Closer
Location
Approx
1-1/2”
“Closer Screw Bag”
Unpainted
#10 x 1 1/2” Pan Head
Qty.
4 each
Drill 3/32”
Pilot Holes
8
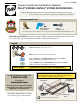
Remove the two hole plugs
from the closer bases.
Insert into the factory
drilled holes near the top
corners of the door.
Determine which
side to install
the closers.
[Right versus Left].
Align closer base arrow with
small notch on mounting frame
(install both top and bottom).
Predrill holes(3/32” bit).
Secure with screws.
Break off alignment tabs.
Continued
on page 9