
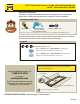
Installation Guide


9
10
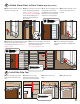
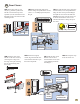
Finishing Touches continued Door Closers
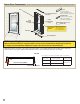
10A On the hinge side of your
entryway, position a jamb closer
bracket even with the top of the
expander (see the dotted line in the
illustration) and 1/4" back from the
mounting frame.
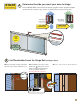
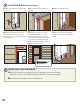
10D Attach the door closer
bracket to the door closer by
removing the O-ring from
the long closer pin, inserting
the pin, and securing with
the O-ring.
10B Install the bottom jamb closer
bracket using four jamb bracket screws
(#10 x 1-1/2" Phillips pan head) from
Bag E.
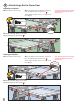
10E With the door tightly
closed, align the bottom door
closer bracket with the top of
the bottom expander.
10C Attach the bottom closer (with One-
Touch
®
button) rod to the jamb bracket
using the short closer pin from Bag E,
then pull the door closer and slide the
SHORT spacer clip onto the closer rod
as shown. Position the closer so the
One-Touch
®
button is along the top of
the closer.
10F Install the door closer
bracket with two door
closer bracket screws (#10
x 5/8" Phillips pan head)
from Bag E.
1/4"
back
poT htiw nevE
Expander
Jamb
Closer
Bracket
OTS MR
O
OD
R
Short Closer Pin
Jamb Closer
Bracket Screws
Jamb
Closer
Bracket
Door Closer
Door Closer Rod
Door
Closer
Bracket
Adjustment Screw
Short Spacer Clip
Long Closer Pin
One-Touch
®
Button
Long Closer Pin
I
Remove
Insert
Door Closer
Bracket Screw
Door
Closer
Bracket
Long Closer Pin
Bottom
Expander
Short Spacer Clip Short Closer Pin
Painted #10x5/8 in.
#10x1-1/2 in.Painted
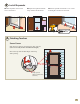
10G Discard spacer clip
from the closer rod.
ROOD MROTS
evomeR
dna
dracsiD
Spacer Clip