
Door User Manual


YOU WILL NEED TO SUPPLY:
Ř Cedar or Impervious shims/spacers (12 to 20)
Ř 2" galvanized roofing nails (1/4 lb.)
Ř Closed cell foam backer rod/sealant backer
(24 to 32 ft.)
Ř Pella® SmartFlash™ foil backed butyl window
and door flashing tape or equivalent
Ř Pella Window and Door Installation Sealant or
equivalent high quality, multi-purpose sealant
(2 to 3 tubes per door)
Ř Low expansion, low pressure polyurethane
insulating window and door foam sealant
- DO NOT use high pressure or latex foams
Ř Pella aluminum sill support or 2 x 4 wood blocking
Ř Interior trim and/or jamb extensions (15 to 40 ft.)
FOR MULLION APPLICATIONS:
Ř I bar joining connector
Ř Pella silicone foam tape
Ř Mullion end plug (2)
Ř Field applied fins (4 pcs. per unit)
Ř Head drip fin (Vertical Mullion applications only)
TOOLS REQUIRED:
Ř Tape measure
Ř Level
Ř Square
Ř Hammer
Ř Stapler
Ř Hacksaw
Ř Sealant gun
Ř Scissors or Utility knife
Ř Screwdrivers
Ř (#2 Phillips with 8" shaft and small
flat blade)
Ř Rubber mallet
Ř Drill
Installation will require two or more
persons for safety reasons.
4&"-"/5
4&"-"/5
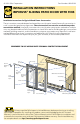
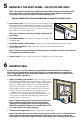
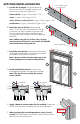
A. Confirm the opening is plumb and level.
Ensure the bottom of the rough opening does
not slope towards the interior.
Note: It is critical the bottom is level.
*OUFSJPS
"
*OUFSJPS
#
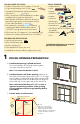
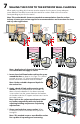
4th cut:
Make a 6" cut up from
each top corner at a 45
o
angle to allow the water
resistive barrier to be lapped
over the fin at the head of
the door.
1st cut
2nd cut
3rd cut
Water Resistive Barrier
1C
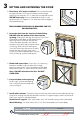
B. Confirm the door will fit the opening. Measure all
four sides of the opening to make sure it is 1/2" larger
than the door in width and height. Measure the width
at the top, bottom and center. Measure the height at
the far left side, the far right side and in the center.
Note: Solid wood blocking of 1-1/2" or more is
required around the perimeter of the opening.
Fix any problems with the rough opening before
proceeding.
C. Cut the water resistive barrier.
1
ROUGH OPENING PREPARATION
1A
1B
1C