
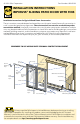
Door User Manual
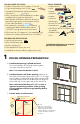

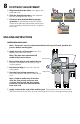

A. Place three 3/8" beads of sealant. The first bead should
be approximately 3/4" from the exterior of the rough
opening, the second 2-1/2" in from the first bead of sealant.
OX/XO doors only: Place a third bead of sealant in the
groove of the sill support or 1/4" from the exterior edge of
the wood blocking.
"
TWO OR MORE PEOPLE WILL BE REQUIRED FOR THE
FOLLOWING STEPS.
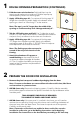
&YUFSJPS
#
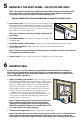
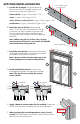
B. Insert the door from the exterior of the building.
DO NOT slide the bottom of the door into the
opening. Sliding will damage the sealant lines. Place
the bottom of the door at the bottom of the
opening, then tilt the top into position.
Center the door between the sides of
the opening to allow equal clearance for
shimming, and insert one roofing nail
in the first hole from the corner on each
end of the top nailing fin (see inset).
These are used to hold the door in place
while shimming it plumb and square.
#
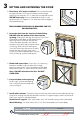
C. Plumb and square door. Insert shims, as necessary,
between the door and the sides of the rough
opening starting up 6" from the bottom of the door.
Keep shims back 1/2" from interior face of window.
Note: DO NOT shim above the door. DO NOT
OVER SHIM.
Interior
3C
'JYFE1BOFM
1SFESJMMFEQBOFMSFUBJOFSIPMFT
5ISFTIPME
&
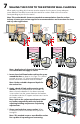
D. Fasten the door to the opening
by driving 2" galvanized roofing
nails into each pre-punched hole
in the nailing fin.
E. Install roller retainers. Position and secure the two roller retainers provided by drilling
pilot holes through the pre-drilled holes into the sill support. Apply sealant to the holes
and insert screws as specified below:
Aluminum sill support: 9/64" pilot holes, # 8 x 3/4" thread-cutting screws (provided).
Wood blocking: 1/8" pilot holes, #8 x 2-1/2" flat-head wood screws (provided).
3
SETTING AND FASTENING THE DOOR
3A
3B
3B
3C
%
3D
3E