
Installation Guide


Page 3
Pergo Multi-Layered T&G Installation Instructions 02162016
Concrete Sub-floor
Lightweight concrete
Engineered wood flooring is not recommended over lightweight concrete subfloors. To
test for lightweight or acoustical concrete, scrape a coin or key across the surface of the
sub-floor. If the surface powders easily or has a dry density of l00 pounds or less per
cubic foot, the engineered flooring should not be installed.
Sub-floors other than wood or concrete:
Perimeter glued resilient vinyl and rubber tiles are unacceptable underlayment’s and
must be removed. Terrazzo, Vinyl, Resilient Tile, Cork and Linoleum or hard surfaces
that are dry, structurally sound and level are suitable as a sub-floor. As above, the
surface must be sound, tight and free of paint, oil, existing adhesives, wax, grease and
dirt. Terrazzo and ceramic tile must be scuffed to assure adhesion.
Warning! Do not sand existing resilient tile, sheet flooring, backing, or felt linings. These
products may contain asbestos fibers that are not readily identifiable. Inhalation of
asbestos dust can cause asbestosis or other serious bodily harm. Check with local, state
and federal laws for handling hazardous material before attempting the removal of these
floors.
Direct Glue Installation: Make sure the floor covering materials are well bonded
to the sub-floor/underlayment with full spread adhesive and no more than two layers
thick, not to exceed 3/16″ (5 mm). With approved wood/wood composite sub-floors, if
vinyl or tiles are loose, broken, or in poor condition, install a 3/8″ (9.5 mm) approved sub-
floor panel directly over the flooring materials. Clean the flooring materials as necessary
to remove waxes, sealers or cleaning residues to allow a good adhesive bond. Cork floor
sealers and surface treatments must be removed. Always perform a bond test prior to
beginning direct glue installation.
Before You Start
Adhesive Selection:
Pergo recommends using only premium grade Urethane or Acrylic Wood Flooring
Adhesives. It is critical to the success of the installation to strictly adhere to the adhesive
manufactures guidelines.
Always thoroughly read the adhesive label for manufacture’s optimum guidance on
environmental conditions, substrate conditions, moisture testing, bond testing, pH
testing, alkali testing (if applicable) and trowel size. Be especially attentive to clean
adhesive from the face of the floor during installation because some adhesives will etch
the wood flooring finish.
The sub-floor moisture requirement and tests for glue down application are outlined
below.
Any claims related to adhesives should be filed with the appropriate adhesive
manufacture. Be sure to retain pail and warranty information.
To correct any sub-floor conditions concerning moisture, either wait until the
sub- floor dries to meet specifications or use an appropriate moisture barrier.
For more information concerning moisture conditions, contact Technical Service
Department at 1- 800-33-PERGO
DO NOT INSTALL FLOORING IF MOISTURE TESTS RESULTS EXCEED
RECOMMENDED LIMITS.
• Plan your layout and determine the direction of the installation in the room. Planks
installed parallel to windows accent the hardwood best.
• Blending of Cartons: To achieve a uniform installation appearance, preselect and set
aside hardwood planks that blend best with all trims and moldings. Install these planks
next to best blended moldings.
• Remove all wall mounted moldings such as base and quarter round.
• Floor should be installed blending planks from several cartons to ensure good color
and shade mixture throughout the installation.
• Be attentive to staggering the ends of the boards at least 4″-6″ (10-15 cm) when
possible, in adjacent rows.
• Do not install in areas of high moisture such as full bathrooms.
NOTE: DO NOT USE A RUBBER MALLET TO INSTALL FLOORING. STRIKING THE
SURFACE WITH A RUBBER MALLET MAY “BURN” THE FINISH CAUSING
IRREPARABLE DAMAGE.
APPLICATION
1. Regulate temperature and humidity 72 hours before, during and after installation.
2. Spread adhesive using recommended trowel, ensuring 95 – 100%
adhesive contact.
3. Remove any adhesive smudges or drops immediately as adhesive is very difficult
to remove once allowed to dry. Clean tools while adhesive is fresh using a urethane
adhesive remover or mineral spirits.
4. Avoid light/regular foot traffic for at least 12 hours. Avoid heavy foot traffic for at least
24 hours.
Use clean white terry cloth towels with mineral spirits to clean as you go. It is easy and
convenient to use. Adhesive that has cured on the surface of the flooring can be difficult
to remove.
Getting Started Direct Glue:
There are two ways to install when using a moisture cured urethane wood flooring
adhesive (wet lay meaning to lay directly into wet adhesive and dry-lay method
meaning to allow the adhesive to flash or to tack up.)
Caution: Whether you choose to install using the dry or wet method, follow all
guidelines set by the adhesive manufacturer as well as the flooring manufacturer. By
not adhering to the guidelines you can void your flooring warranties.
General Information for Glue-Down Installations
1. Use cement-based patch, skim coat leveling products to correct substrate
imperfections.
2. Regulate temperature and humidity 72 hours before, during and after installation.
3. At least 48 hours before installation, place cartons of wood flooring in the
installation area.
4. Install and secure starter row.
5. Spread adhesive using recommended trowel, ensuring 95 to 100% adhesive
contact. Wet Lay method: press flooring firmly into adhesive immediately after
troweling. After the flooring is place, roll the entire installation with a 75 lb. smooth
roller.
6. Inspect the installation and remove any adhesive smudges or drops immediately
using mineral spirits. NOTE: Urethane adhesive is very difficult to remove once
dry and cured. Make every effort to prevent adhesive from getting on the flooring
surface. For best results, keep a urethane adhesive cleaner or mineral spirits
nearby to remove any adhesive smudges or drops during installation.
Pergo warranties do not cover damage to the finish caused by adhesive
etching.
7. Clean tools while adhesive is fresh using a urethane adhesive cleaner or mineral
spirits.
8. Avoid light/regular traffic for at least 12 hours. Avoid heavy traffic for at least 24
hours.
9. See adhesive manufacture guidelines for OPEN TIME on the adhesive container.
10. Proper ventilation within the room must be provided. An electric fan is helpful.
Step 1 (Wet Lay Method)
Select a starter wall. It is recommended to start the installation along an exterior wall.
It’s more likely to be straight and square with the room. Measure out from the wall the
width of two planks plus 3/8” expansion and mark each end of the room and snap your
chalk line.
Step 2
Spread adhesive from the chalk line to the starter wall using the recommended trowel
size. It is important to use the correct trowel at a 45° to get the proper spread of adhesive
applied to the sub-floor, which will produce a proper and permanent bond. Improper
bonding can cause loose or hollow spots.
Note: Change the trowel every 2000 to 3000 square feet (or sooner as needed) due to
wear down of the dimples. This assures you always get the proper spread of adhesive.
Step 3
Install the first row of starter planks with the tongue facing the starter wall and secure
into position. Alignment is critical and can be achieved by securing a straight edge along
the chalk line (2x4’s work well), or by top nailing the first row with finishing nails (wood
sub-floor), or adjustable spacers (concrete sub-floor). This prevents slippage of the
planks that can cause misalignment.
Note: The planks along the wall may have to be scribed and cut to fit in order to maintain
a consistent expansion space since most walls are not straight .Try to maintain at least
2” on the scribed plank.
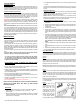
Step 4
Once the starter rows are
secure spread 2 ½ to 3 feet of
adhesive the length of the
room. (Never lay more
adhesive than can be covered
in approximately 1 hr.) Place
tongue into groove of plank or
strips and press firmly into
adhesive. Never slide planks
or strips through adhesive.
Use Tapping Block if necessary to fit planks snug together at side and butt ends. Clean