
installation guide


PERLICK RESIDENTIAL INSTALLATION MANUAL
8
perlick.com
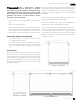
SHELVING/DRAWER ADJUSTMENTS
Completely empty shelf or drawer
before removing.
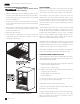
1. Pull the shelf/drawer out to its furthest position. Locate
the tabs in the middle of both extenders. Lift one tab up
while pushing the opposite tab down, and pull shelf/
drawer out (Figure 6).
2. Position each bracket separately. Grasp the middle of
the bracket, pull the front end up and out, then forward
to remove it.
3. Place bracket at desired location. Push the bracket rear
hook into the rear mounting slot, then set front of the
bracket in the front slot.
4. Repeat for other brackets.
5. Push extenders completely into brackets. Align the
shelf/drawer grooves with the extenders and slide
completely into the unit.
CAUTION
DOOR OPTIONS
Perlick residential units oer a variety of door panel design
alternatives; solid stainless steel, solid wood overlay, glass
with stainless steel trim and glass with wood overlay trim.
Solid stainless steel and stainless steel glass doors are
shipped from the factory with decorative stainless steel
panels and handles in place on the unit. Solid wood overlay
and glass wood overlay doors are designed to accept a
decorative front panel to match surrounding cabinetry
and door handles.
NOTE: Wood overlay models are designed to accept wood
overlay panels from your cabinetry supplier. They do not
include a wood overlay. Templates are available on www.
perlick.com/residential-products.Click on Service & Support,
and then choose Wood Overlay Templates from the menu.
Take care in choosing the correct template for your specic
model.Thehandleissuppliedbythecustomer.
All Perlick units (excluding beer dispenser and ice maker
models) accept any of the above door congurations and
are fully interchangeable. Glass door congurations are not
available on beer dispenser or ice maker models.
NOTE:Glasswithstainlesssteeltrimandglasswithwoodtrim
maysweatinconditionswithrelativehumidityover75%.
CHANGING DOOR SWING DIRECTION
NOTE:Changingthedoormountisnotadvisableifthedooris
equippedwithacustomwoodoverlay.Doingsomayresultin
anundesirablehandleposition.
To change the door swing direction, a hinge kit is required:
• Part No. 67439R - Right hinge kit
• Part No. 67439L - Left hinge kit
In addition to the hinge kit, the following tools are required:
• Large at head screwdriver
• Regular Phillips head screwdriver
• Plastic putty knife
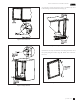
1). Support the door in the open position as shown in
Fig. 7 on page 9. Remove the hinge pin.
2.) Pull door to the side and then lower door.
3.) Remove top and bottom hinge brackets. Retain screws
for later use. See Fig. 8 on page 9.
4). Remove the hole plugs from the top and bottom hinge
bracket mounting holes (see Fig. 8 on page 9). Place the
plugs in the holes on the opposite side made vacant by
removing the hinges in step 3.
Figure 5. Shelving/Drawer Adjustment