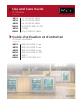
Use and Care Guide All Models (page 2-11) HP15 HP24 HP48 HH24 HC24 HA24 15” SIGNATURE SERIES 24” SIGNATURE SERIES 48” SIGNATURE SERIES SIGNATURE SERIES SOTTILE C-SERIES ADA-COMPLIANT SERIES Guide d'utilisation et d'entretien Tous les modèles (page 12-22) HP15 HP24 HP48 HH24 HC24 HA24 SÉRIE SÉRIE SÉRIE SÉRIE SÉRIE SÉRIE SIGNATURE 15 po SIGNATURE 24 po SIGNATURE 48 po SIGNATURE SOTTILE C CONFORME ADA Form No. Z2344-C Rev. 05.16.
PERLICK RESIDENTIAL INSTALLATION MANUAL TABLE OF CONTENTS Warranty Information ..................................................................2 Outdoor Model Start-Up/Winterizing................................7 Safety Information..........................................................................4 LED/Light Bulb Replacement..................................................7 Operation.............................................................................................
PERLICK RESIDENTIAL INSTALLATION MANUAL to be defective in materials or workmanship during the Extended Warranty Period. The cost of freight to ship the replacement parts will be paid by Perlick. Replacement parts are warranted for the remainder of the original warranty period, or ninety (90) days, whichever is longer. REGISTRATION: Your Perlick product can be registered via the online Warranty Registration form at http://www.perlick.com/residentialproducts/service-support/warranty-registration/.
PERLICK RESIDENTIAL INSTALLATION MANUAL OPERATION MASTER SWITCH Signature Series products come equipped with a master power switch located behind the louvered toe kick. Remove the toe kick to turn power on or off to the unit. INTERIOR LIGHT Door units are equipped with an interior light that illuminate when the door is opened. All HP24 and HH24 models come standard with adjustable blue and white LED lighting.
PERLICK RESIDENTIAL INSTALLATION MANUAL 3. Use the UP or DOWN arrow key to scroll to the desired temperature. The controller will memorize the new temperature. NOTE: Dependent on the model and configuration, the controllers have been programmed to only allow a lower compartment temperature adjustment range as specified within the chart below. The upper compartment range is not limited, but should always be kept within the specified range shown in the table for the upper compartment.
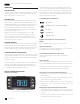
PERLICK RESIDENTIAL INSTALLATION MANUAL DIGITAL TEMPERATURE CONTROL C-Series Models C-Series Models Model Temp Range HC24RB 33° - 42° F HC24BB 33° - 48° F HC24WB 45° - 65° F LED Functions The following table describes LED Funtions Perlick C-Series units come standard with digital control. Programming Button Definitions: STAND-BY (ESC) Press and release • Returns to the previous menu level • Confirms parameter value Press for at least 5 sec.
PERLICK RESIDENTIAL INSTALLATION MANUAL Adjust the temperature as follows: Colder Temperature: Turn the adjusting screw clockwise (to the right). Warmer Temperature: Turn the adjusting screw counterclockwise (to the left). Temperature Control OFF: Turn the adjusting screw completely counterclockwise to the OFF position until a click is heard. CAUTION Operating the unit at temperatures lower than those recommended will void the warranty.
PERLICK RESIDENTIAL INSTALLATION MANUAL STAINLESS STEEL CARE & CLEANING General Stainless steel is a “passive” metal because it contains other metals like chromium, nickel and manganese that stabilize the atoms. Chromium provides an invisible passive film that covers the steel surface, acting as a shield against corrosion. As long as the film is intact and not contaminated, the metal is passive and stainless. If the passive film of stainless steel has been broken, equipment can start to corrode and rust.
PERLICK RESIDENTIAL INSTALLATION MANUAL Recommended Cleaners for Specific Situations Job Cleaning Agent Comments Routine cleaning Soap, ammonia, detergent Apply with sponge or soft cloth Fingerprints and smears Areal 20, Lac-O-Nu, Lumin Wash, O-Cedar Cream Polish Provides barrier film to minimize fingerprints. Can be used on all finishes. Rub the surface with a cloth as directed on the package.
PERLICK RESIDENTIAL INSTALLATION MANUAL TROUBLESHOOTING DANGER Never attempt to repair or perform maintenance on the unit until the main electrical power to the unit has been disconnected! If the unit appears to be malfunctioning, read through the OPERATION section of this manual first. If the problem persists, check this troubleshooting section to see if you can refer to the cause and remedy of the problem and resolve it without a service call.
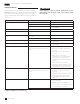
PERLICK RESIDENTIAL INSTALLATION MANUAL Problem Compartments are warmer than usual Cause Solution Control preset is set to warm • Lower the setpoint temperature. Refer to changing the set point for the specific model Light is staying on • Turn the manual light switch off. Condenser is dirty or obstructed • Clean the condenser and clear obstruction. The door is open or has been opened more frequently lately. • Wait 24 hours and recheck the temperature.
MANUEL D’INSTALLATION RÉSIDENTIELLE PERLICK TABLE DES MATIÈRES Informations sur la garantie .....................................................2 Démarrage/hivernage du modèle pour l'extérieur...7 Informations sur la sécurité.......................................................4 Remplacement des DEL/ampoules.....................................7 Utilisation..............................................................................................4 Entretien et nettoyage de l'acier...............
MANUEL D’INSTALLATION RÉSIDENTIELLE PERLICK RECOURS : Perlick fournira les pièces et la main-d'œuvre nécessaires pour réparer ou remplacer (au choix de Perlick) toutes les pièces présentant des vices de matériaux ou de fabrication pendant la période de garantie de base. Perlick fournira les pièces de rechange, mais pas la main-d'œuvre, pour toutes les pièces du système de réfrigération scellé hermétiquement présentant des vices de matériaux ou de fabrication pendant la période de garantie prolongée.
MANUEL D’INSTALLATION RÉSIDENTIELLE PERLICK SÉCURITÉ VEUILLEZ LIRE complètement toutes les instructions avant d'installer ou d'utiliser l'unité. Prenez note en particulier des informations signalées avec DANGER, AVERTISSEMENT et ATTENTION dans ce manuel. Ces informations sont importantes pour une installation, un fonctionnement et un entretien sécuritaires et efficaces de votre unité Perlick.
MANUEL D’INSTALLATION RÉSIDENTIELLE PERLICK Série Signature à deux zones Instructions de commande Marche/Arrêt: Appuyez sur le bouton ON/OFF (marche/arrêt) pour allumer ou éteindre l’unité. Compartiment supérieur : Pour afficher la température du compartiment supérieur, appuyez et relâchez le bouton DEFROST (dégivrage) (flocon de neige fondant). Compartiment inférieur (doit être la zone la plus froide) : L'affichage indique toujours la température du compartiment inférieur.
MANUEL D’INSTALLATION RÉSIDENTIELLE PERLICK Série Signature – Modèles HP15 Modèle Consigne temp min Consigne temp max HP15R 33° F 42° F HP15B 33° F 48° F HP15W 45° F 65° F HP15T 33° F 42° F RÉGLAGE NUMÉRIQUE DE LA TEMPÉRATURE Modèles de la série C Série Signature – Modèles HP24 Modèle Consigne temp min Consigne temp max HP24R 33° F 42° F HP24F -10° F 10° F HP24B 33° F 48° F HP24W 45° F 65° F HP24T 33° F 42° F Série Signature – Modèles HP48 Modèle Consigne temp min Consig
MANUEL D’INSTALLATION RÉSIDENTIELLE PERLICK HC24RB 33° - 42° F HC24BB 33° - 48° F HC24WB 45° - 65° F Fonctions des voyants Le tableau suivant décrit les fonctions des voyants Voyant de dégivrage Allumé en permanence : dégivrage actif Clignotant : dégivrage manuel actif Éteint : autrement Voyant d'alarme Allumé en permanence : alarme active Clignotant : alarme acquittée Éteint : autrement Voyant de l'évaporateur Allumé en permanence : ventilateurs actifs Éteint : autrement Voyant du compresseur All
MANUEL D’INSTALLATION RÉSIDENTIELLE PERLICK ENTRETIEN ENTRETIEN SAISONNIER POUR LES MODÈLES EXTÉRIEURS HOMOLOGUÉS UL Hivernage Ce processus doit avoir lieu lorsque les basses températures quotidiennes sont égales ou inférieures aux températures indiquées ci-dessous : Modèles de congélateur 32° F Modèles de réfrigérateur : 38° F Centre de boissons : 42° F Réserve de vin : 45° F Il est préférable d'hivériser votre unité avant les basses températures indiquées ci-dessus.
MANUEL D’INSTALLATION RÉSIDENTIELLE PERLICK ENTRETIEN ET NETTOYAGE DE L'INOX Généralités L'inox est un métal « passif », car il contient d'autres métaux, comme le chrome, le nickel et le manganèse, qui stabilisent les atomes. Le chrome fournit une pellicule passive invisible qui recouvre la surface de l'acier, agissant comme un bouclier contre la corrosion. Tant que la pellicule est intacte et non contaminée, le métal est passif et inoxydable.
MANUEL D’INSTALLATION RÉSIDENTIELLE PERLICK Détergents recommandés pour des situations spécifiques Tâche Détergent Commentaires Nettoyage de routine Savon, ammoniaque, détergent Appliquez avec une éponge ou un chiffon doux Empreintes et taches Areal 20, Lac-O-Nu, Lumin Wash, O-Cedar Cream Polish Fournit film barrière pour minimiser les empreintes. Peut être utilisé sur toutes les finitions. Frottez la surface avec un chiffon, tel qu'indiqué sur l'emballage.
MANUEL D’INSTALLATION RÉSIDENTIELLE PERLICK DÉPANNAGE DANGER Si l'unité semble défectueuse, lisez d'abord la section FONCTIONNEMENT de ce manuel. Si le problème persiste, consultez cette section de dépannage pour voir si vous pouvez trouver la cause et la solution du problème et le résoudre sans appeler le service technique.
Problème Les compartiments sont plus chauds que d'habitude Cause Solution La commande est préréglée sur chaud • Abaissez la température de consigne. Voir les instructions de changement de la consigne pour le modèle spécifique La lumière reste allumée • Éteignez l'interrupteur d'éclairage manuel. Le condensateur est sale ou obstrué • Nettoyez le condenseur et dégagez l'obstruction. La porte est ouverte ou a été ouverte plus souvent récemment. • Attendez 24 heures et revérifiez la température.