Remote Trainers with Vibration operating and training guide Remote Trainer with Vibration PDT00-12892 Remote Trainer with Vibration PLUS PDT00-12894 ADD-A-DOG Collar with Vibration ADD-A-DOG Collar with Vibration PLUS PAC00-12893 PAC00-12914 ® ® Please read this entire guide before beginning
Important Safety Information Explanation of Attention Words and Symbols used in this guide This is the safety alert symbol. It is used to alert you to potential personal injury hazards. Obey all safety messages that follow this symbol to avoid possible injury or death. WARNING indicates a hazardous situation which, if not avoided, could result in death or serious injury.
Thank you for choosing the PetSafe brand. You and your pet deserve a companionship that includes memorable moments and a shared understanding together. Our products and training tools promote a lifestyle of protection, teaching, and love—essentials that influence memories for a lifetime. If you have any questions about our products or training your pet, please visit our website at www.petsafe.net or contact our Customer Care Center at 1-800-732-2677.
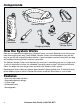
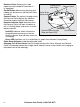
Components Wrist Strap Receiver Collar Test Light Tool Handheld Transmitter Antenna Operating and Training Guide Charging Adapter How the System Works Now you can experience the difference a Remote Trainer can make. Spend less time training and more time enjoying your dog. These PetSafe Remote Trainers are comfortable for your pet and easy to use with our unique adjustable vibration. A great method of communicating with your dog and capable of teaching all the customary commands.
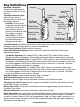
Key Definitions Handheld Transmitter: Antenna Transmits the radio signal to Level Select the Receiver Collar. It is water Switch resistant. Transmitter Indicator Lights: Dog Select Level Select Button Indicate that a button is Indicator pressed and also serves as a Transmitter Top Button low-battery indicator. Indicator Lights: (light blue) Red LED: Factory set for Red LED single dog training.
Receiver Collar: Receives the radio Charging Jack signal from the Handheld Transmitter. It Contact Points (with cover) is waterproof. On/Off Button: Momentarily pressing and holding this button turns the Receiver Collar Collar Strap on and off. Retainers Contact Points: The contacts through which the Receiver Collar delivers the Vibration Correction and/or the Static Stimulation.
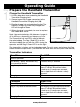
Operating Guide Step Prepare the Handheld Transmitter 1 Charge the Handheld Transmitter 1. Lift the rubber dust cover protecting the Handheld Transmitter Charging Jack. 2. Connect one of the charger connectors to the Handheld Transmitter Charging Jack (1A). 3. Plug the charger into a standard wall outlet. The Red LED will light up. When fully charged, the LED will change to Green. 4. When charging is complete, be sure to replace the rubber dust cover.
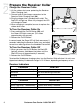
Step Prepare the Receiver Collar 2 Charge the Receiver Collar 2A 1. Lift the rubber dust cover protecting the Receiver Collar Charging Jack. 2. Connect one of the charger connectors to the Receiver Collar Charging Jack (2A). 3. Plug the charger into a standard wall outlet. The Red LED will light up. When fully charged, the LED will change to Green. 4. When charging is complete, be sure to replace the rubber dust cover. To Turn the Receiver Collar On 1.
Rechargeable Batteries • The rechargeable Nickel Metal Hydride (NiMH) batteries are not memory sensitive and do not require depletion before charging. • The batteries come partially charged from the factory, but will require a full charge (up to 12 hours) before the first use. • If your equipment has not been charged for an extended period, you may experience a decrease in battery life the first few uses. Afterwards, the battery life will return to previous capacity levels.
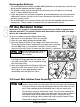
Step Pairing the Receiver Collar for One 4 Dog Operation To pair the Receiver Collar to work with a new Handheld Transmitter or to pair a new Receiver Collar to work with your existing Handheld Transmitter: 1. Turn the Receiver Collar off. 2. Press and release the Transmitter’s Dog Select Button and ensure the Red LED flashes one time to indicate Dog 1 is set. 3. Press and hold the On/Off Button on the Receiver Collar continuously for 5 seconds, then release the button.
Clear 2 Dog Programming and Return to 1 Dog Mode 1. Set the Level Select Switch to 1. 2. Press and hold the Transmitter’s Dog Select Button continuously for 5 seconds, then release the button. (The Red LED will blink 3 times when it is complete.) Accessories To purchase additional accessories for your PetSafe Remote Trainer, contact the Customer Care Center at 1-800-732-2677 or visit our website at www.petsafe.net to locate a retailer near you. ® www.petsafe.
Training Guide Testing the Remote Trainer We recommend you experience first-hand how the PetSafe Remote Trainers with Vibration function. Always begin at the lowest level and increase the intensity up to your personal comfort level. ® 1. Place your fingers on both Contact Points of the Receiver Collar. 2. Hold the Transmitter approximately 2 feet from the Receiver and position the Level Select Switch to 1. Press the Bottom Button (dark blue) if applicable.
2. If your pet shows no reaction, repeat the Vibration or Static Stimulation level several times before moving up to the next level. 3. YOUR PET SHOULD NOT VOCALIZE OR PANIC WHEN RECEIVING VIBRATION OR STATIC STIMULATION. IF THIS HAPPENS, THE STIMULATION LEVEL IS TOO HIGH AND YOU NEED TO GO BACK TO THE PREVIOUS LEVEL AND REPEAT THE PROCESS. 4. Move up through the Vibration or Static Stimulation levels until your pet reliably responds to Vibration or Static Stimulation. 5.
immediately take your dog outside or do something he enjoys; don’t activate the Receiver. Let the dog wear it during non-training sessions. Your dog should believe wearing the Receiver Collar can also result in having fun. It should not be perceived as punishment. Place the Receiver Collar on and off the dog at various times for short or longer periods to make wearing it a normal routine. Similarly, don’t let the dog learn to obey only when he sees the Transmitter.
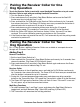
The “Come” Command 1. Put a separate, non-metallic collar on your pet’s neck ABOVE the Receiver Collar, and attach a long leash. Note: Be sure the extra collar does not put pressure on the Contact Points. 2. Hold your leash in one hand and the Handheld Transmitter in the other. 3. Wait for your pet to walk away from you. 4. To start with Vibration, press and hold the Top Button (light blue), while saying “Come” and if necessary use the leash to guide your pet toward you. 5.
The “Stay” Command 1. Put a separate, non-metallic collar on your pet’s neck ABOVE the Receiver Collar, and attach a long leash. Note: Be sure the extra collar does not put pressure on the Contact Points. 2. Visibly identify where you want your pet to sit by placing his bed or a large piece of cloth on the ground. 3. Put your pet on his bed. Hold your leash in one hand and the Handheld Transmitter in the other. 4. Staying at approximately 1 yard, walk around the perimeter of the bed.
1. Choose the Stimulation Level one step higher than your pet’s Recognition Level. 2.
5. If your pet ignores the Vibration or Static Stimulation, use a higher level of Stimulation. 6. Continue to watch your pet, as he may choose another area to dig. 7. Do not allow your pet in the yard unsupervised until he has completely stopped digging. Chasing Chasing is an instinctive behavior stimulated by moving objects. Some dogs have a particularly strong desire to chase that can put them in harm’s way and leave you helpless.
Excessive Barking Barking is an instinctive behavior for dogs. It is impossible to keep your dog from barking entirely, but you can teach him be quiet when you give him a command. Note: This will only be effective when you are at home with your dog. 1. Choose your dog’s Recognition Level. 2. Put your dog in a situation that will tempt him to bark. 3.
Frequently Asked Questions How old does a pet have to be before using the PetSafe Remote Trainer? • Introduce your PetSafe Remote Trainer when your dog graduates from puppy state—usually 6 months old. The Receiver Collar may be too large for dogs under 8 lbs. Once my pet is trained and has been obeying my commands, will he have to continue to wear the Receiver Collar? • Probably not. He may need to wear the Receiver Collar from time to time for reinforcement. Is the Receiver Collar waterproof? • Yes.
Troubleshooting The answers to these questions should help you solve any problem you have with this system. If they do not, please contact the Customer Care Center or visit our website at www.petsafe.net. My pet is not responding when I press a button. • Check to see if the Receiver Collar has been turned on. • If your range has reduced from the first time you have used it, please check to see if the battery is low in either the Handheld Transmitter or Receiver Collar. • Increase the Level Select Switch.
Terms of Use and Limitation of Liability 1. Terms of Use This Product is offered to you conditioned upon your acceptance without modification of the terms, conditions and notices contained herein. Usage of this product implies acceptance of all such terms, conditions, and notices. 2. Proper Use This Product is designed for use with pets where training is desired. The specific temperament of your pet may not work with this product. We recommend that you not use this product if your pet is less than 8 lbs.
Customer Care International USA & Canada - Tel: 800-732-2677 Monday - Friday 8 AM - 8 PM / Saturday 9 AM – 5 PM Australia - Tel: 1800 786 608 Monday - Friday 7:30 AM - 5 PM New Zealand - Tel: 0800 543 054 Monday - Friday 10:30 PM - 7 PM This product has the benefit of a limited manufacturer’s warranty. Details of the warranty applicable to this product and its terms can be found at www.petsafe.net and/or are available by sending a stamped addressed envelope to PetSafe Ltd.
Radio Systems Corporation 10427 PetSafe Way Knoxville, TN 37932 1-800-732-2677 www.petsafe.