
Installation Guide


ENGLISH
ENGLISH
18
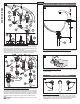
MAINTENANCE & CARE
16
17
CAUTION: Maintenance
DISASSEMBLY
1. Replacement parts may be available at the store where you purchased
your faucet.
2. When replacement parts are not available, please write or call Pster
Consumer Service.
3. Always turn off water and relieve pressure before working on your
faucet.
NOTE: Trim Care
Cleaning Instructions:
For all Handles and decorative nishes, use only a soft damp cloth
to clean and shine. Use of polish, detergents, abrasive cleaners,
organic solvents or acid may cause damage. Use of other than
a soft damp cloth will nullify our warranty!
Special Trim:
Trim products which contain Porcelain or other similar substance
are not acceptable for public areas or Commercial use. Installation
of Said Trim is at Users Risk!
1–800–PFAUCET (1–800–732–8238)
For Toll-Free Pfaucet information call
1–800–PFAUCET (1–800–732–8238)
or visit www.psterfaucets.com
• Installation Support
• Care and Warranty Information
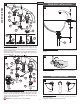
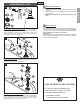
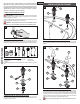
16 FLUSHING & AERATOR CLEANING
After installation is complete, remove Aerator Housing (16A). Turn Valves (16B) on
and allow both hot and cold water to run for at least one minute each. While water is
running, check for leaks. To clean the aerator, disassemble Aerator Housing (16A) by
separating the Aerator Shell (16C), Basket (16D), and Washer (16E). Once parts have
been cleaned, reassemble by reversing steps.
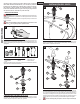
17 HANDLE REMOVAL
Turn off water before proceeding! With Valves in “Closed” position, unscrew Fastener
(17A) and remove Handle (17B) from Valve Stem (17C).
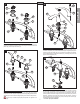
18 VALVE CARTRIDGE REMOVAL
Turn off water supplies and relieve pressure before working on your faucet (see
step 2). Remove Handles (see step 17), Valve Flange (18A) and Plastic Nut (18B)
unscrew Retainer Nut (18C) by turning it counter-clockwise and lift out Cartridge
Assembly (18D) and inspect. Replace parts as necessary.
5
16A
16E
16D
16C
16B
17A
17B
17C
18A
18C
18D
18B