
Manual with Timer 2016


10
PROPANE CYLINDER CONNECTION
L.P. cylinder is connected to grill
via a hand wheel. When full,
cylinder weighs nearly 42 pounds
to handle with care. Place
cylinder in retaining ring and
tighten screw on ring to secure
tank. Place LP Regulator hand
wheel in LP tank outlet, tighten
hand wheel.
NOTE, in not sufficiently tightened, fuel will not flow from tank to grill.
TEST connection with soapy solution to insure no leak.
If removing tank, reverse procedure being certain to use care.
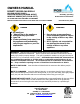
GAS LEAK TEST
After grill is fully assembled, tighten all connections,
fittings and screws. Please note that during transport,
connections and screws may become loose… check all.
BEFORE ATTEMPTING TO LIGHT GRILL, BE
CERTAIN THE GAS VALVE KNOBS ARE IN THE OFF
POSITION. TURN GAS SUPPLY ON CHECK ALL
CONNECTIONS WITH A SOLUTION OF 50%
LIQUID SOAP, 50% WATER. SOLUTION CAN BE
SPRAYED ON WITH A SPRAY BOTTLE OR PAINTED
ON ALL CONNECTIONS WITH A BRUSH. IF
BUBBLES APPEAR THERE IS A LEAK, TURN OFF GAS,
TIGHTEN FITTINGS AND REPEAT THIS CHECK,
NEVER CHECK FOR LEAK WITH OPEN FLAME.
PLEASE NOTE!!! ABOVE PROCEDURE IS IMPERATIVE
FOR SAFE OPERATION ON YOUR GRILL.
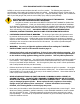
LIGHTING YOUR GRILL
ALWAYS OPEN THE LID COMPLETELY BEFORE LIGHTING THE
BURNER. This is to avoid trapping gas fumes, which could explode.
Do not stand with your head over the grill when lighting the burner.
Please note: Grills equipped with Rear Infrared Burner have a
control knob located to the far right of the control panel.
NEVER use Rear Burner and Bottom Burners at the same time.
Be sure new AA battery is installed below black rubber cover on control
panel. With any burner valve turned to high, gently depress ignition
button. If ignition do not immediately occur, turn controls OFF to
prevent gas build-up. Wait five minutes for gas to clear and try the
above procedure again. If the burner does not light with the electronic
ignition, light the burner with a match or other hand held ignitor. DO
NOT TOSS A LIT MATCH INTO THE UNIT AND TURN THE GAS
ON!
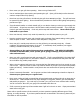
IF YOUR GRILL FAILS TO LIGHT
At the right hand side of the lower grill housing; near the top of the
cooking grid, there is a match lighting port. Raise the grill lid. Light a
match (or other ignitor) and turn the LOWER BURNER RIGHT hand
control knob to HI. Hold the lit match (or ignitor) just above the
ignition port and light the grill, you should hear the grill ignite within five
seconds. IF THE GRILL STILL FAILS TO LIGHT, CHECK THE GAS SUPPLY.
YOU COULD BE OUT OF LP GAS OR THE MAIN GAS SUPPLY FOR
NATURAL GAS MAY HAVE BEEN TURNED OFF. The lower lighting port
will not light the rear burner. This must be lit with the ignition system
or a hand held ignitor.
Manual Lighting of Grill
NOTE: If grill is hot, manual lighting tube may not work.
Allow grill to fully cool before relighting.
ELECTRODE ADJUSTMENT
The electrode and ground wire is fixed and checked at the factory for
optimum spark. The tip from the electrode is 1/8" away from the
grounding wire. Spark may get “hotter” by SLIGHTLY increasing or
decreasing the distance between these two wires. Please note, you
should not increase the distance between these two wires to more that
3/8”. In the event that this spacing cannot be corrected or the ceramic
insulator is cracked and needs replacement, the entire assembly is easily
changed by removing the grease tray, remove the screw and nut holding
assembly, unplugging from ignition module and reinstalling new.
NOTE GAP ON ELECTRODE AND GROUND WIRE
SHOULD BE APPROXIMATELY ¼”
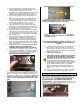
GREASE TRAY LINING & CLEAN OUT
Before using grill, we suggest you LINE YOUR GREASE TRAY WITH
HEAVY-DUTY ALUMINUM FOIL. We also recommend periodic
inspection and clean out of the grease tray provided with your PGS gas
grill. You will find this very easy. The foil should be replaced at least
every ten grill uses or more often if you are cooking fatty meats.
If you have left your grill out in rain without covering, grease
tray may accumulate water. Please empty prior to use.
Please note that cooking especially juicy meats may require replacement
of foil more often. Regular replacement will add life to grease tray.
Foil should be cool to the touch before replacement.
PERIODIC CLEANING
Knowing how to remove and replace the burner allows you to easily and
thoroughly clean your grill. Even though "Burning Off" the grill after
every cookout will keep it ready for use, once a year you should perform
basic maintenance to keep it in top operating condition.
BE SURE THAT YOUR GAS SUPPLY IS OFF AND THAT YOUR
FEEDLINE IS BLED OF ANY GAS.
Remove your burner assembly by first removing cooking grids and then
rock grates with rock on them, then gently pull up on the back of the
burner assembly. Remove the burner/venturi assembly; cover the
valve orifices with a small piece of aluminum foil to keep out dirt.
Brush both sides and bottom of the inside of the burner with a stiff wire
brush. Any clogged flame holes may be opened using a thin wire.
Use a bottlebrush, pipe cleaner or long flexible wire to clean out the
venturis. (See Flashback Section). Since the grill housing is heavy
rust-free stainless steel, you are only trying to remove built up grease
and debris. DO NOT BEND OR DAMAGE THE IGNITION PROBE.