
Manual with Timer 2016


9
5. Place the 2 locking casters on the same end of the cart
(makes no difference which) and attach to cart by inserting
screw/flat washer/lock washer in each of the four
pre-attached nuts. DO NOT TIGHTEN UNTIL ALL FOUR ARE
STARTED. DO NOT CROSS THREAD. Screws can be
tightened with an Allen-wrench, vice grips on channel locks.
6. Attach the two non-locking wheels to the other side of the
cart.
7. Flip cart back upright and attach two right-hand side shelf
brackets to the right-hand side of the cart, and the two
left-hand to the left-hand side with the angled edge at the
bottom and the straight edge on the top. Attach each
bracket with Philips head screws that are provided.
8. Attach side shelf kits. Note side of shelf with an opening.
Other side (no opening) should be placed over peg on side
shelf bracket first. With the shelf level, push opening in side
shelf through other peg on opposite bracket.
9. If you purchased a 36” cart, 4 threaded pegs were provided.
Choose location of cart inner shelf (high, medium or low) and
screw pegs through all four corners to secure shelf. Shelf
then sits upon four pegs. DO NOT REINSTALL CART DOORS
YET, SEE STEP #18.
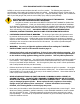
10. WITH TWO PEOPLE, CAREFULLY LIFT GRILL HEAD ONTO
ASSEMBLED CART. LIFT GRILL HEAD ONTO CART,
PLACING ON BACK OF CART FIRST, THEN LOWER FRONT
EDGE. IF PROPERLY INSTALLED, GRILL HEAD WILL BE
LEVEL WITH NO GAPS BETWEEN THE CART AND THE GRILL
HEAD. Remove the transport brace and two screws holding
it in place and dispose.
11. REMOVE GREASE TRAY AND NOTE TYPE OF FUEL USED.
IF WRONG TYPE OF FUEL IS MARKED, STOP
ASSEMBLY AND CHECK WITH YOUR LOCAL DEALER.
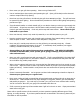
12. Unscrew ignitor cap by turning it counter clockwise. Insert a
fresh AA Battery with + side out. Screw ignitor cap back on
being careful not to over-tighten. Push button, if properly
installed should hear sparking at all ignitor electrodes.
CHANGE BATTERY EVERY SIX MONTHS!
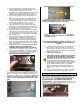
13. If your PGS grill is L.P., it comes standard with a 16” heavy
duty steel lined hose that is shown attached (see image below for
location). Be certain hose is sufficiently tightened prior to
connecting to propane cylinder. Be sure to check the
connection from the LP hose to the manifold with a soapy
solution if you see bubbles tighten this fitting and check
again.
LP HOSE AND REGULATOR CONNECTION TO MANIFOLD
NATURAL GAS CONNECTION TO GRILL MANIFOLD
NATURAL GAS REGULATOR ASSEMBLY INCLUDED (4.5” W.C.
1/2psig) Use with Natural Gas only, pictured above
LP Cylinder mounted to cart retention ring and LP Hose
and regulator. Note hose needs to be positioned away
from bottom of grill.
NOTE: FITTINGS ARE MADE OF BRASS, A SOFT METAL. USE
CAUTION WHEN CONNECTING DO NOT CROSS THREAD
FITTINGS
14. If Natural Gas attach Natural Gas Regulator assembly (gas
inlet connection, natural gas regulator, 3-way brass tee,
optional accessory gas supply cap, and swivel connector) to
the 3/8” male flare found below the knobs on the right hand
side of the control panel.
15. Tighten all gas connections.
16. TURN YOUR GAS SUPPLY ON AND TEST ALL FITTINGS
FOR LEAKS. BEFORE ATTEMPTING TO LIGHT GRILL,
BE CERTAIN ALL VALVE'S ARE IN THE OFF POSITION.
TURN GAS SUPPLY ON (leaving all control knobs to the
"OFF" position) AND CHECK ALL CONNECTIONS WITH A
SOLUTION OF 50% LIQUID SOAP, 50% WATER. SOLUTION
CAN BE SPRAYED ON WITH A SPRAY BOTTLE OR PAINTED
ON ALL CONNECTIONS WITH A BRUSH. IF BUBBLES
APPEAR, TURN OFF GAS, TIGHTEN FITTINGS AND TRY
AGAIN. NEVER CHECK FOR LEAKS WITH A MATCH OR
FLAME.
17. Line grease tray with aluminum foil. Change one a month.
18. If purchased a portable cart, reinstall doors on cart frame.
ORIFICE ENGAGEMENT
At the end of each valve there is a tiny gas opening known as an orifice.
Gas exits the orifice and enters a venturi where it mixes with air. The
proper mixture of gas and air produces a clean blue flame with slight
yellow tips at the burner. BE CERTAIN THAT ORIFICES ARE
FULLY ENGAGED INTO THE BURNER VENTURI TUBES AS
PICTURED BELOW. Proper orifice engagement should be 1/4" to
3/8" into the venturi's. Failure to insure this connection may cause fire
and result in serious damage to your grill.