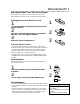
Video Cassette Recorder VRA451 VRA651 Owner’s Manual Important! R e t u r n y o u r Wa r r a n t y R e g i s t r a t i o n C a rd w i t h i n 1 0 d ay s . S e e w hy i n s i d e .
Return your Warranty Registration card today to ensure you receive all the benefits you’re entitled to. Once your PHILIPS MAGNAVOX purchase is registered, you’re eligible to receive all the privileges of owning a PHILIPS MAGNAVOX product. So complete and return the Warranty Registration Card enclosed with your purchase at once. And take advantage of these important benefits.
Introduction 3 Welcome to your VCR owner’s manual. This manual describes the VRA451 and the VRA651. The VRA451 is a monaural (single sound source) system, while the VRA651 is a stereo system. Otherwise, the two models are exactly the same. In this manual, the VRA651 is illustrated. (The VRA451 has single AUDIO IN/OUT Jacks. Otherwise, the VRA451 looks exactly like the VRA651.
Table of Contents Setting Up Your VCR Introduction . . . . . . . . . . . . . . . . . . . . . . . . . . . . . . . . . . . . . . . . . . . . . . . . . . . . . . . . . .3 Table of Contents . . . . . . . . . . . . . . . . . . . . . . . . . . . . . . . . . . . . . . . . . . . . . . . . . . . . .4 Before Using Your VCR . . . . . . . . . . . . . . . . . . . . . . . . . . . . . . . . . . . . . . . . . . . . . . . . .5 Hookups without a Cable Box . . . . . . . . . . . . . . . . . . . . . . . . . . . . . . . . . .
Before Using Your VCR 5 Removing the Plastic Cover from the Front Panel A thin, plastic cover may protect the front panel of your VCR. Before using the VCR, lift a corner of the plastic, then peel it off. Putting Batteries in the Remote Control 1 1 2 3 2 To remove the battery compartment lid, push in the tab, then pull up the lid. Place two AA batteries inside the battery compartment with their + and – ends aligned as indicated. Replace the battery compartment lid.
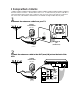
Hookups without a Cable Box The basic VCR/TV connection – antenna/cable to VCR to TV – is shown below. If you have a Cable Box or a Direct Broadcast System, please refer to pages 8-9. After you hook up the VCR, please go to page 10 to turn on the VCR. (The VRA651 is illustrated here. The VRA451 has single AUDIO IN/OUT Jacks.) 1 Disconnect the antenna or cable from your TV.
Hookups without a Cable Box (cont’d) 7 3 Connect the RF coaxial cable (supplied) to the RF OUT Jack on the back of the VCR and to the ANTENNA IN Jack on the TV. (You may use either a snap-on type or screw-on type of coaxial cable, whichever you prefer. A snap-on type is supplied.) IN OUT ANT.IN R AUDIO L VIDEO RF OUT CH3 CH4 Antenna or Cable IN OUT 75V ANT CAB / LE ANT.
Hookups with a Cable Box/Direct Broadcast System There are two ways to connect your Cable Box/DBS to the VCR. With this connection: • You may view any channel. • You must select channels at the Cable Box/DBS. Channels cannot be changed at the VCR. • You may not view a channel other than the one you are recording. • You may not set up channels at the VCR. • You can only program a timer recording for one channel at a time.
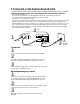
Hookups with a Cable Box/Direct Broadcast System (cont’d) 9 With this connection: • You may watch one channel while recording another. • You may not record scrambled channels. 1 VCR 2 IN OUT Cable Box/DBS R IN AUDIO L VIDEO 75Ω ANT CAB / LE ANT.IN OUT RF OUT CH3 CH4 Cable signal RF coaxial cable RF coaxial cable 3 TV’s ANTENNA IN jack Connections 1 2 Connect a Cable signal to the VCR’s ANT(enna) IN jack.
Turning on Your VCR Before turning on your VCR, make sure batteries are in the remote control and the VCR, TV, and Cable Box/DBS (if applicable) are connected. 1 2 2 6 Turn on the TV. Wait for the VCR to set up channels. Press the VCR button, then press the POWER button.
Automatic Channel Setup 11 Although your VCR may automatically memorize the channels you receive when you turn it on for the first time, this function lets you set up channels again. Make each entry within one minute of the previous entry. 5 Wait for the VCR to set up channels. 1 1 Press the VCR button, then press the MENU button.
Automatic Channel Setup (cont’d) Adding/Deleting Channels 1 Press the VCR button, then press the MENU button. SELECT , 9 CHOOSE >/OK → VCR SET UP TUNER SET UP INITIAL SET UP CBL / DBS TV VCR VCR/TV POWER EJECT 1 QUICK PROGRAMMING START 2 4 DBS 7 Press the PLAY 8 or STOP 9 button to select TUNER SET UP, then press the FF :/OK button. CABLE/ANTENNA CABLE AUTO CH. PROGRAMMING ADD/DELETE CH. TO END PUSH EXIT 3 Press the PLAY 8 or STOP 9 button to select ADD/DELETE CH.
Setting the Clock 13 1 CBL / DBS TV VCR VCR/TV POWER EJECT QUICK PROGRAMMING START 4 Manual Clock Setting 1 7 - 2 STOP 5 DAILY 8 + 3 DATE - 6 WEEKLY 0 SPEED 9 CLEAR STILL/SLOW ........ CHOOSE >/OK - ........ Press the VCR button, then press the MENU button. SELECT , 9 DBS + ............. 1 ............. There are four ways to set the VCR’s clock: Manually, with Time Zone Selection, with Manual PBS Channel Selection, or with Automatic PBS Channel Selection.
Setting the Clock (cont’d) 4 Press the PLAY 8 or STOP 9 button repeatedly to set the TIME. Every time you press the PLAY 8 or STOP 9 button, the time changes in one-minute increments. If you press and hold the PLAY 8 or STOP 9 button, the time changes in 30-minute increments. When the time is correct, press the FF :/OK button.
Setting the Clock (cont’d) 15 Time Zone Selection 1 2 1 Press the VCR button, then press the MENU button. Press the PLAY 8 or STOP 9 button to select INITIAL SET UP, then press the FF :/OK button. CBL / DBS TV VCR VCR/TV POWER EJECT 7 QUICK PROGRAMMING START 4 ENGLISH DBS 7 + - - 6 WEEKLY 9 CLEAR + ........ REW FF PLAY Press the PLAY 8 or STOP 9 button to select CLOCK, then press the FF :/OK button. (If AUTO CLOCK is set to OFF, TIME ZONE will not be available in the menu.
Setting the Clock (cont’d) Manual PBS Channel Selection 1 2 3 1 Press the VCR button, then press the MENU button. Press the PLAY 8 or STOP 9 button to select INITIAL SET UP, then press the FF :/OK button. CBL / DBS TV VCR VCR/TV POWER EJECT 7 QUICK PROGRAMMING 4 DBS 7 + - 2 STOP 5 DAILY 8 + ............. Press the PLAY 8 or STOP 9 button to select CLOCK, then press the FF :/OK button. (If AUTO CLOCK is set to OFF, PBS CH. will not be available in the menu.
Setting the Clock (cont’d) 17 Automatic PBS Channel Selection 1 2 3 1 Press the VCR button, then press the MENU button. TV VCR VCR/TV POWER EJECT ............. - 4 DBS 7 2 STOP 5 DAILY 8 + ............. + START 3 DATE - 6 WEEKLY 0 SPEED 9 CLEAR STILL/SLOW - ........ Press the PLAY 8 or STOP 9 button to select CLOCK, then press the FF :/OK button. (If AUTO CLOCK is set to OFF, PBS CH. will not be available in the menu.
Daylight-Savings Time Follow the steps below to program the VCR so its clock will automatically move forward one hour in April and turn back one hour in October. CBL / DBS TV VCR VCR/TV POWER EJECT Press the PLAY 8 or STOP 9 button to select INITIAL SET UP, then press the FF :/OK button. SELECT , 9 START CHOOSE >/OK → CLOCK LANGUAGE VCR PLUS+ CH. 7 QUICK PROGRAMMING 1 4 DBS ENGLISH 7 + - 2 STOP 5 DAILY 8 + ............. Press the VCR button, then press the MENU button. .............
Language Selection 19 Follow the steps below to change the language of the on-screen displays and menus. 1 1 Press the VCR button, then press the MENU button. TV VCR VCR/TV POWER EJECT CHOOSE >/OK → VCR SET UP TUNER SET UP INITIAL SET UP QUICK PROGRAMMING 4 TO END PUSH EXIT DBS 7 2 - 5 DAILY 8 + 3 DATE - 6 WEEKLY 9 CLEAR STILL/SLOW - + ........ REW FF PLAY CHOOSE >/OK → CLOCK LANGUAGE VCR PLUS+ CH.
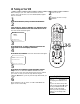
Remote Control Buttons TV Button Press this button before pressing other TV operation buttons. VCR Button Press this button before pressing VCR operation buttons. CBL/DBS Button Press this button before pressing Cable Box/DBS operation buttons. POWER Button After pressing the CBL/DBS, VCR, or TV button, press to turn on or off the Cable Box/DBS, VCR, or TV. TV VCR VCR/TV POWER EJECT QUICK PROGRAMMING 4 DBS 7 + - 2 STOP 5 DAILY 8 + ............. START .............
Remote Control Buttons (cont’d) 21 CBL / DBS TV VCR VCR/TV POWER EJECT 7 - 2 STOP 5 DAILY 8 + ............. 4 DBS + ............. START 3 DATE - 6 WEEKLY 0 SPEED 9 CLEAR STILL/SLOW - + ........ REW FF TIMER Button Press to access the timer recording menu. Details are on pages 34-39. PLAY /OK STOP VOL SPEED Button Press to select the recording speed (SP or SLP). Details are on pages 37 and 52. EXIT/STATUS Button Press to exit the on-screen menus.
Display Panel VCR Display Panel Information about VCR operations appears here. Different information appears at different times. The display is brighter when the VCR power is on. The display dims automatically when you turn off the VCR power. Remote Sensor Receives a signal from your remote control so you can operate your VCR from a distance. Press the VCR button on the remote control before pressing other VCR operation buttons. Cassette Compartment Insert a tape here.
Front Panel 23 FF (Fast Forward) Button When tape playback is stopped, press to fast forward the tape at high speed. During tape playback, press to fast forward the tape while the picture stays on the screen. Details are on page 48. STOP/EJECT Button Press once to stop the tape. When tape playback is stopped, press to eject the tape. POWER Button Press to turn the VCR power on and off. STILL/PAUSE Button During tape playback, press once to freeze the picture.
Rear Panel ANT(enna) IN Jack Connect your antenna or cable here. Details are on pages 6-9. AUDIO OUT Jacks Connect cables going to the AUDIO IN jacks of a camcorder, another VCR, or an audio system here. Details are on pages 41 and 44. The VRA451 has a single AUDIO OUT Jack. The VRA651 (pictured) has Right and Left AUDIO OUT Jacks. AUDIO IN Jacks Connect cables coming from the AUDIO OUT jacks of a camcorder, another VCR, or an audio source here. Details are on page 41.
On-Screen Status Displays 25 An on-screen status display, which includes the current VCR operation and other information (see illustration), will appear when you press the EXIT/STATUS button or certain function buttons. The contents of the status display will vary. ON SCREEN MODE ON: • Whenever you press the PLAY 8 button or the STOP 9 button to stop playback, some of the contents of the status display will appear for five seconds.
Setting the Remote Control to Operate a TV 2 1,4 Point the remote control at your TV. Press the TV button, then press the POWER button. If your TV turns on or off, try the CH(annel) 8/9 button. If your remote control operates the TV, you’re finished. If your TV doesn’t turn on or off, or if the CH(annel) 8/9 button doesn’t work, go to step 2. 2 CBL / DBS TV VCR VCR/TV POWER EJECT Find the brand of your TV on the list below, and remember the two-digit number beside it.
Setting the Remote Control to Operate a Cable Box/DBS 27 Your VCR remote control may operate your Cable Box/DBS. Follow these steps to set the remote control code. 1 2 Find the code for your Cable Box/DBS. Turn on your Cable Box/DBS. Point the remote control at your Cable Box/DBS. Press the CBL/DBS button, then press the POWER button. If your Cable Box/DBS turns off, turn on the power again and try the CH(annel) 8/9 button. If the remote control operates the Cable Box/DBS, you’re finished.
Playing Read and follow the steps below to play a tape. Insert a tape in the VCR. The power will come on. The VCR will place itself in VCR position automatically (the VCR light will appear on the display panel of the VCR). If the VCR light does not appear, press the VCR/TV button once. If the tape’s record tab has been removed, playback will start automatically.
Recording 29 Read and follow the steps below to record a television program. 1 Turn on the TV and set it to channel 3 or 4, whichever channel the CH3/CH4 switch on the back of the VCR is set to. 2 1 2 Turn on the TV. Insert a tape. Insert a tape with its record tab intact (details are on page 5) in the VCR. The power will come on. 5 Press the SPEED button until the desired tape speed appears on the screen. The VCR will only record in SP or SLP. Details about tape speed are on pages 37 and 52.
One-Touch Recording The One-Touch Recording (OTR) function allows you to start an immediate timed recording 30 minutes to six hours long of the channel you are watching. Before you begin, make sure: • Channels are set up. Details are on pages 11-12. • The desired recording speed (SP or SLP) has been selected with the SPEED button. Details are on pages 37 and 52. • There is a tape in the VCR. Make sure the tape’s record tab is intact (see page 5) and the tape is long enough to record the program(s).
Recording One Channel/Watching Another 31 3,7 Press the REC(ord)/OTR button to start a recording of the current channel. Details are on page 29. CBL / DBS TV VCR VCR/TV POWER EJECT 4 DBS 7 + - 2 STOP 5 DAILY 8 + ............. 1 START 4 3 DATE - 6 WEEKLY 0 SPEED 9 CLEAR STILL/SLOW - ........ 5 4,5 QUICK PROGRAMMING Press the VCR/TV button to put the VCR in TV position. The VCR light will disappear from the display panel.
Setting Up the VCR Plus+ Programming System 1 First, fill in the boxes on this page. It will only take a few minutes, and you must do it if you want the VCR Plus+ programming system to work properly. Since the channel numbers of the stations you receive may not be the same as the station numbers, and since channel numbers differ from area to area, you must program the VCR with your local channel information.
Setting Up the VCR Plus+ Programming System (cont’d) 33 Press the VCR button, then press the MENU button. 3 CBL / DBS TV VCR VCR/TV POWER EJECT QUICK PROGRAMMING 1 START 4 Press the PLAY 8 or STOP 9 button to select INITIAL SET UP, then press the FF :/OK button. Press the PLAY 8 or STOP 9 button to select VCR PLUS+ CH., then press the FF :/OK button. SET VCR PLUS+ CH. VCR PLUS+ CABLE/TV 99 ––– 01 ––– – – – –> 02 ––– 03 ––– 04 ––– SELECT ,9 OR ENTER VCR+ CH. NO.
Timer Recording with the VCR Plus+ Programming System 1 2 TV VCR VCR/TV POWER EJECT 1 QUICK PROGRAMMING START 4 DBS 7 + - 2 STOP 5 DAILY 8 + ............. 1 3 DATE - 4 6 WEEKLY 0 SPEED 9 CLEAR STILL/SLOW ........ - ........ Press the VCR button. + REW FF PLAY /OK STOP Press the TIMER button. SELECT , 9 → CBL / DBS ............. Follow the steps below to program a timer recording using PlusCode programming numbers. Before you begin make sure: • Channels are set up.
Timer Recording with the VCR Plus+ Programming System (cont’d) 35 5 DAILY PROGRAM (MON-FRI) PROGRAM 1 CHANNEL +/– 12 START +/– 08:00 PM STOP +/– 10:00 PM REC SPEED SLP DATE +/– 07/31/99 SATURDAY SET DAILY=8 OR WEEKLY=9 TO END PUSH EXIT 7 8 Press the SPEED button to select the tape speed. The selected tape speed, SP or SLP, will appear beside REC SPEED. Press the EXIT/STATUS button. PROGRAM WAS COMPLETED/PLEASE TURN OFF VCR FOR TIMER RECORDING should appear on the screen.
Quick Programming Follow the steps below to program your VCR to record TV programs while you’re away from home. The VCR will turn itself on, record, and turn itself off automatically. Before you begin make sure: • Channels are programmed. Details are on pages 11-12. • The clock is set. Details are on pages 13-17. If the clock is not set, CLOCK MUST BE SET appears on the screen, followed by the menu. • There is a tape in the VCR.
Quick Programming (cont’d) 37 4 SET DAILY=8 OR WEEKLY=9 TO END PUSH EXIT 5 Press the Number 2/STOP+ or Number 5/STOP– button to set the recording’s stop time. Every time you press a button, the stop time changes in one-minute increments. If you press and hold a button, the stop time changes in 30-minute increments.
Quick Programming (cont’d) TV VCR VCR/TV POWER EJECT QUICK PROGRAMMING 1 START 4 ONE TIME PROGRAM PROGRAM 1 CHANNEL +/– 12 START +/– 08:00 PM STOP +/– 10:00 PM REC SPEED SLP DATE +/– 07/31/99 SATURDAY SET DAILY=8 OR WEEKLY=9 TO END PUSH EXIT DBS 7 + - 2 STOP 5 DAILY 8 + ............. 10 CBL / DBS - 6 WEEKLY 0 SPEED 7 8 3 DATE 9 CLEAR STILL/SLOW - ........ Press the Number 3/DATE+ or Number 6/DATE– button to set the recording date.
Quick Programming (cont’d) 39 Checking, Editing, or Clearing Timer Recordings 1 Press the VCR button, then press the TIMER button. CHOOSE >/OK → VCR PLUS+ QUICK PROGRAMMING PROGRAM REVIEW CBL / DBS TV VCR VCR/TV POWER EJECT TO END PUSH EXIT 4 START 08:00P 10:00A 11:30P 03:00P STOP DATE 10:00D07/31 10:45 08/01 01:00 08/10 03:15W10/15 D indicates a Daily recording. 7 - 2-4 2 STOP 5 DAILY 8 + 3 DATE - 6 WEEKLY 0 SPEED 9 6 CLEAR STILL/SLOW - ........
Timer Recording Speed Setting SP TV VCR VCR/TV POWER EJECT SLP QUICK PROGRAMMING 1 START Follow the steps below to set TIMER REC SPEED to AUTO. 4 DBS 1 7 - 5 DAILY 8 + 3 DATE - 6 WEEKLY 9 CLEAR STILL/SLOW - ........ CHOOSE >/OK 2 STOP 0 SPEED Press the VCR button, then press the MENU button. SELECT , 9 + ............. Approximately 30 minutes CBL / DBS ............. Approximately 110 minutes 1 ........
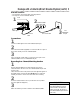
Rerecording (Tape Duplication) 41 The instructions on this page show you how to copy tapes. The illustration uses two VRA651 VCRs. Different VCRs may operate differently. To duplicate a tape, make the connections shown, then follow steps 1-6. (You may use the AUDIO and VIDEO In jacks on the front of VCR 2 instead if you prefer.) VCR 2 Recording VCR VCR 1 Playing VCR IN OUT 3) Use an RF coaxial cable to connect the RF OUT Jack on VCR 2 to the TV’s ANTENNA IN Jack. IN ANT.
Index Search When you make a recording, the VCR automatically places an index code at the beginning of the recording. Essentially, an index code is a type of “bookmark” for your tape. This feature is useful if you have several different programs recorded on a single tape. 3 Insert a tape. 1 Fast forward or rewind to the next or previous index code on the tape by following the steps below. 1 2 CBL / DBS TV VCR VCR/TV POWER EJECT Press the VCR button. Insert a tape in the VCR.
Multi-Channel Television Sound System (VRA651 only) 43 The VRA651 can receive and record programs broadcast in stereo or second audio. It can also play back tapes recorded in stereo or second audio. These features are not available with the VRA451. • Second Audio You can program your VCR so you can hear a program that is being broadcast in second audio or a tape that was recorded in second audio. A second audio broadcast is usually a program in a second language.
Multi-Channel Television Sound System (VRA651 only) (cont’d) To receive and record programs broadcast in second audio, follow steps 1-6. To receive and record a program broadcast in stereo, make one of the connections shown, then follow steps 1-6. IN OUT ANT.IN R AUDIO L VIDEO RF OUT CH3 CH4 IN OUT ANT.IN R AUDIO L If you have a Stereo and a Monitor TV, use a video cable to connect the VCR’s VIDEO OUT Jack to the TV’s VIDEO IN Jack.
Hi-Fi Stereo Tape Playback (VRA651 only) 45 If a tape is recorded in Hi-Fi stereo, follow the steps below to play the tape in Hi-Fi stereo. 1 1 Press the VCR button, then press the MENU button. SELECT , 9 CHOOSE >/OK → VCR SET UP TUNER SET UP INITIAL SET UP CBL / DBS TV VCR VCR/TV POWER EJECT QUICK PROGRAMMING .............
Video Stabilizer You can correct vertical vibration when playing back tapes. When VIDEO STABILIZER is set to ON, vertical vibration will be corrected automatically. VIDEO STABILIZER is set to OFF when you receive the VCR. Follow the steps below to set VIDEO STABILIZER to ON. 1 1 CBL / DBS TV VCR VCR/TV POWER EJECT Press the VCR button, then press the MENU button.
SmartPicture 47 You can make the tape playback picture softer, sharper, more natural, or more distinct by adjusting the SmartPicture setting. SmartPicture is set to NATURAL when you receive the VCR. Follow the steps below to adjust the SmartPicture setting. 1 Press the VCR button, then press the SMARTPICTURE button. The current setting will appear on the screen for about five seconds.
Playback Options Forward and Reverse Searching 1 During tape playback, press and release the FF :/OK button or the REW(ind) ; button. A fast forward or reverse picture search will begin. 2 CBL / DBS TV VCR VCR/TV POWER EJECT QUICK PROGRAMMING START Viewing a Still Picture To advance the still picture frame by frame, press the STILL/SLOW button repeatedly.
Child Lock 49 The Child Lock feature disables the buttons on the VCR and remote control. 1 1-2 When the VCR is on, press and hold the POWER button on the remote control for more than seven seconds until a dash (-) appears to the right of the clock on the display panel. The power will turn off. 2 To cancel Child Lock, press and hold the POWER button on the remote control for more than seven seconds until the VCR power comes on. The dash (-) will disappear from the display panel.
Blue Background If you want the TV screen to be solid blue when a weak signal is received, set BLUE BACKGROUND to ON. The screen will be blue and the sound will be muted. Or, if you want to receive the weak signal, set BLUE BACKGROUND to OFF. When you select a channel that is receiving a weak signal, you will see and hear the static in the TV programming. When you receive your VCR, BLUE BACKGROUND is set to ON. To set BLUE BACKGROUND to ON or OFF, follow these steps.
Automatic Operation Features 51 Automatic Playback When you put a tape in the VCR, the power will come on automatically. If the tape’s record tab is missing, playback will begin. Automatic Rewind When a tape is played, fast forwarded, or recorded to its end, the VCR will rewind the tape to the beginning, then stop. The VCR will not rewind the tape if the end of the tape is reached during a One-Touch Recording. Details are on page 30.
Glossary AUDIO IN/OUT Jacks: jacks located on the front and back of the VCR which are used to record audio from another source (IN) or to send audio to another source (OUT). The VRA451 has single AUDIO IN/OUT Jacks on the front and back of the VCR. The VRA651 has Right and Left AUDIO IN/OUT Jacks on the front and back of the VCR. Automatic Channel Programming: process in which the VCR scans all available channels and places the ones you receive in its memory.
Specifications 53 Video Heads Four heads (VRA451) Four heads with Hi-Fi stereo (VRA651) Video Signal EIA standards; NTSC color Antenna VHF/UHF – 75 ohm external antenna terminal VHF Output Signal Channel 3 or 4 (switchable) 75 ohms unbalanced Power Requirement 120V AC; 60 Hz Power Consumption 17 W (VRA451) 19 W (VRA651) Operating Temperature 41°F (5°C) to 104°F (40°C) Relative Humidity 10% to 80% Weight 7.1 lbs. (3.2 kg.) Dimensions 14-3/16" (W) x 3-3/4" (H) x 11-1/8" (D) (360 mm x 94.
Helpful Hints If you are having problems with your VCR, check the following list of problems and possible solutions before requesting service. You may be able to solve the problem yourself. If you need to call a customer service representative, please know the model number and serial number of your product before you call. This information is displayed on the back of the product. Also, please take a moment to identify the problem you are having, and be prepared to explain this to the representative.
Helpful Hints (cont’d) 55 Tape can’t be removed. • Make sure the power plug is completely connected to an AC (alternating current) outlet. The motor (cylinder) rotates even when the VCR is in Stop mode. • To enable the quick play mechanism, the cylinder will rotate for about five minutes. This is normal. The quick play mechanism enables the tape mechanism to switch from Stop mode to Play mode in one second. There is no playback picture, or the playback picture is noisy or contains streaks.
Limited Warranty VIDEO CASSETTE RECORDER 90 Days Free Labor/One Year Parts Exchange. This product must be carried in for repair. WHO IS COVERED? You must have proof of purchase to receive warranty service. A sales receipt or other document showing that you purchased the product is considered proof of purchase. WHAT IS COVERED? Warranty coverage begins the day you buy your product. For 90 days thereafter, all parts will be repaired or replaced, and labor is free.
Index 57 ac power cord 24 accessories 60 ant(enna) in jack 6-9, 24 audio in/out jacks 23-24, 41, 44,52 audio/mute button 21 automatic playback 51 rewind 51 helpful hints 54-55 hi-fi stereo playback 45 hookups with a cable box/dbs 8-9 without a cable box/dbs 6-7 index buttons index search 21, 42 42 batteries blue background language selection limited warranty line input mode long play lp 19 56 22, 41 37, 52 37, 52 maintenance menu button menu/exit button mts broadcast 5 20 23 43-44 5 50 cable box co
SUPPLIED ACCESSORIES The following items are supplied with your VCR; they are provided to help you use or set up your VCR. BL C /D R VC BS V TV /T Q PO R VC T EC EJ c ...... .. – 8 ILY .. DA ......