TV/DVD Directions for Use Need help? Call us! Philips representatives are ready to help you with any questions about your new product. We can guide you through Connections, First-time Setup, or any of the Features. We want you to start enjoying your new product right away! CALL US BEFORE YOU CONSIDER RETURNING THE PRODUCT. 1-800-531-0039 or Visit us on the web at www.philips.com 3139 125 31441 Important! Return your Warranty Registration Card within 10 days. See why inside.
Return your Warranty Registration card today to ensure you receive all the benefits you’re entitled to. Once your PHILIPS purchase is registered, you’re eligible to receive all the privileges of owning a PHILIPS product. So complete and return the Warranty Registration Card enclosed with your purchase at once. And take advantage of these important benefits.
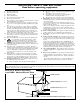
IMPORTANT SAFETY INSTRUCTIONS Read before operating equipment 1. 2. 3. 4. 5. 6. 7. 8. 9. 10. 11. 12. 13. 14. 15. 16. Read these instructions. Keep these instructions. Heed all warnings. Follow all instructions. Do not use this apparatus near water. Clean only with a dry cloth. Do not block any of the ventilation openings. Install in accordance with the manufacturers instructions.
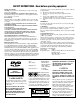
SAFETY INSTRUCTIONS - Read before operating equipment Safety Precautions encouraged to try to correct the interference by one or more of the following measures: 1) Reorient or relocate the receiving antenna. 2) Increase the separation between the equipment and the receiver. 3) Connect the equipment into an outlet on a circuit different from that to which the receiver is connected. 4) Consult the dealer or an experienced radio/TV technician for help.
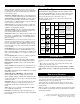
CONTENTS Introduction Operating the DVD Player Welcome/Registration of Your TV . . . . . . . . . . . . . . . . . . . . . .2 Safety Instructions . . . . . . . . . . . . . . . . . . . . . . . . . . . . . . . .3-4 Table of Contents . . . . . . . . . . . . . . . . . . . . . . . . . . . . . . . . . . .5 Features . . . . . . . . . . . . . . . . . . . . . . . . . . . . . . . . . . . . . . . . . .6 Disc Types and Disc Cleaning . . . . . . . . . . . . . . . . . . . . . . . . .
FEATURES Active Control™ continuously measures and corrects all incoming signals to help provide the best picture quality. This feature monitors and corrects both the sharpness control and noise reduction control. Audio/Video Jack Panel allows direct connections with accessory devices, providing quality TV picture and sound playback. Audio Volume Leveler (AVL) Control keeps the TV sound at an even level.
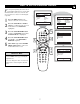
HOW TO USE THE LANGUAGE CONTROL F or our Spanish speaking TV owners an onscreen LANGUAGE option is present. With the LANGUAGE control you can set the TV’s on-screen menu to be shown in either English or Spanish. 1 2 3 4 5 Main Picture Sound Features Install Press the MENU button on the remote to show the on-screen menu. Brightness Color Picture Sharpness Tint More... Press the CURSOR UP or DOWN buttons to scroll through the on-screen menu until the word INSTALL is highlighted.
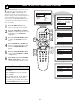
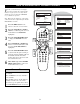
HOW TO USE TUNER MODE CONTROL THE T he TUNER MODE control allows you to change the TV’s signal input to either ANTENNA, CABLE or AUTO mode. It’s important for the TV to know what type of signal to look for. (From a Cable TV signal or a normal Antenna signal.) In the AUTO mode, when the AUTO PROGRAM feature is activated, the TV will automatically choose the correct mode. 1 2 3 4 5 6 Main Picture Sound Features Install Brightness Color Picture Sharpness Tint More...
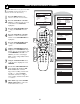
HOW TO AUTOMATICALLY PROGRAM CHANNELS Y our TV can automatically set itself for local area (or Cable TV) channels. This makes it easy for you to select only the TV stations in your area when the CHANNEL (+), (–) buttons are pressed. Main Picture Sound Features Install Note: Make sure the antenna or cable signal connection has been completed before AUTO PROGRAM is activated.
HOW TO ADD OR DELETE CHANNELS C hannel Edit makes it easy for you to ADD or DELETE channels from the list of channels stored in the TV’s memory. 1 2 Press the MENU button on the remote to show the on-screen menu. 3 4 Press the CURSOR RIGHT button to display the INSTALL menu features. 5 6 7 8 9 Main Picture Sound Features Install Brightness Color Picture Sharpness Tint More... Press the CURSOR UP or DOWN buttons to scroll through the on-screen menu until the word INSTALL is highlighted.
HOW TO USE THE PICTURE ADJUSTMENT CONTROLS T o adjust your TV picture controls, select a channel and follow the steps shown below: 1 2 3 4 5 6 7 Main Picture Sound Features Install Press the MENU button on the remote to display the on-screen menu. Press the CURSOR UP or DOWN buttons until the word PICTURE is highlighted. Brightness Color Picture Sharpness Tint More... Picture Brightness Color Picture Sharpness Tint Color Temp. Press the CURSOR RIGHT button to display the PICTURE menu features.
HOW TO USE THE SOUND ADJUSTMENT CONTROLS B esides the normal volume level control, your TV also has Treble, Bass, Balance, AVL (automatic volume leveler), Incr. Surround, Ultra Bass, and Sound (Stereo/Mono) controls. 1 2 3 4 5 6 Main Picture Sound Features Install Press the MENU button on the remote to display the on-screen menu. Brightness Color Picture Sharpness Tint More... Main Picture Sound Features Install Treble Bass Balance AVL Incr. Surround More . . .
HOW TO USE THE TIMER CONTROLS T he Timer controls allow you to use your TV as an alarm clock if set to turn itself on and off at a specific time. It also can be set to tune to a specific channel at a specific time. 1 2 3 4 5 6 Main Picture Sound Features Install Brightness Color Picture Sharpness Tint More... Press the MENU button on the remote to display the on-screen menu.
HOW TO USE THE FORMAT CONTROL M any times while watching movies from a DVD player the image is shown in “letter box” format. This is the format that is shown in movie theaters. When shown on a TV screen, the image will have areas of black on top and bottom of the screen. The FORMAT Control can help to display the image as close as possible to its original aspect ratio. 1 2 3 4 5 6 7 Main Picture Sound Features Install Brightness Color Picture Sharpness Tint More...
UNDERSTANDING THE AUTOLOCK™ CONTROLS T he AutoLock™ feature is an integrated circuit that receives and processes data sent by broadcasters, or other program providers, that contain program content advisories. When programmed by the viewer, a TV with AutoLock™ can respond to the content advisories and block program content that may be found objectionable (such as offensive language, violence, sexual situations, etc.). This is a great feature to censor the type of viewing children may watch.
SETTING UP AN AUTOLOCK™ ACCESS CODE O ver the next few pages you’ll learn how to block channels and get a better understanding of the rating terms for certain programming. Main Picture Sound Features Install First, let’s start by learning how to set a personal access code: 1 2 3 4 5 6 Press the MENU button on the remote to display the on-screen menu. Main Picture Sound Features Install POWER Press the CURSOR UP or DOWN button until the word FEATURES is highlighted.
HOW TO BLOCK CHANNELS A fter your personal access code has been set (see previous page), you are now ready to select the channels you want to block out or censor. 1 2 3 4 5 6 7 Press the NUMBERED (or CH +, –) buttons to tune the channel you wish to block or censor. 8 9 Press the CURSOR UP or DOWN buttons until the words BLOCK CHANNELS are highlighted. 10 Main Picture Sound Features Install Brightness Color Picture Sharpness Tint More...
HOW TO CLEAR ALL BLOCKED CHANNELS AT THE SAME TIME A fter blocking specific channels there may come a time when you want to clear all the channels so they can be viewed. The following steps explain how to CLEAR ALL blocked channels. 1 2 3 4 5 6 Press the MENU button on the remote to show the on-screen menu. 7 8 9 Press the CURSOR UP or DOWN button until the words CLEAR ALL are highlighted. Main Picture Sound Features Install Press the CURSOR UP or DOWN button until the word FEATURES is highlighted.
HOW TO BLOCK ALL CHANNELS AT THE SAME TIME T here may come a time when you want to Block All the television’s channels. Maybe you don’t want your children to watch TV for a given time. With the Block All control, ALL available channels (including the A/V Inputs) can be set to block at the same time. 1 2 3 4 5 6 Press the MENU button on the remote to show the on-screen menu. 7 8 Press the CURSOR UP or DOWN button until the words BLOCK ALL are highlighted.
BLOCKING PROGRAMS BASED ON MOVIE RATINGS T here are two types of program ratings within the AutoLock™ feature. One is based on the Movie Industry ratings while the other is based on the TV Industry ratings. Both can be used to block or censor programming that has been rated in either manner. Main Picture Sound Features Install Brightness Color Picture Sharpness Tint More...
BLOCKING PROGRAMS BASED ON TV RATINGS T his portion of the AutoLock™ features cover program ratings based on the TV Industry rating system. This is known as TV Rating within AutoLock™. After selecting the Autolock™ feature and entering your personal access code, the AutoLock™ options screen appears; 1 2 Scroll the menu using the CURSOR UP or DOWN buttons until the words TV RATING are highlighted. To view a program blocked by the TV Rating options, enter your 4 digit access code.
OTHER AUTOLOCK™ BLOCKING OPTIONS A utoLock™ offers the viewer other blocking features as well. With these Blocking Options, the censoring can be turned ON or OFF. 1 2 3 4 5 6 7 8 9 10 Main Picture Sound Features Install Press the MENU button on the remote to show the on-screen menu. Brightness Color Picture Sharpness Tint More... Press the CURSOR UP or DOWN button until the word FEATURES is highlighted. VCR MODE 1 10 Press the CURSOR RIGHT button.
HOW TO USE THE ACITVE CONTROL T he Active Control monitors and adjusts incoming video signals to help provide the best picture quality. When you choose to turn the Active Control ON, the Brightness, Picture, Sharpness, Contrast + and DNR (dynamic noise reduction) features are controlled automatically. Active Control adjusts these picture settings continuously and automatically. 1 2 3 4 5 Main Picture Sound Features Install Brightness Color Picture Sharpness Tint More...
SETTING THE SLEEPTIMER CONTROL H ave you ever fallen asleep in front of the TV only to have it wake you up at two in the morning with a test pattern screeching in your ears? Well, your TV can save you all that trouble by automatically turning itself off. 1 2 Press the SLEEP button on the remote control and the SLEEP timer display will appear on the screen.
HOW TO USE THE CLOSED CAPTIONING CONTROL C losed Captioning (CC) allows you to read the voice content of television programs on the TV screen. Designed to help the hearing impaired, this feature uses on-screen “text boxes” to show dialogue and conversations while the TV program is in progress. CC Off 1 2 Press the CC button on the remote to display the current Closed Caption setting. CC 1 Press the CC button repeatedly to choose from the four Closed Caption options (CC Off, CC 1, CC 2, CC Mute).
SETTING THE SMARTPICTURE™ CONTROL W hether you’re watching a movie or a sporting event, your TV has automatic video control settings matched for your current program source or content. The SmartPicture™ feature quickly resets your TV’s video controls for a number of different types of programs and viewing conditions you may have in your home.
SETTING THE SMARTSOUND™ CONTROL T he SmartSound™ feature allows the listener to select between four different factory set sound options. Personal (which can be set by the user), Theatre (for movie viewing), Music (for musical type programming) and Voice (when the program is mainly dialogue). These setting affect the Sound menu’s Bass, Treble, AVL, and Incredible Surround controls Personal Voice To select any of the options follow the directions below.
USING THE QUADRASURF™ BUTTONS A “list” or series of previously viewed channels can be selected with the QuadraSurf™ (colored) buttons on your remote control. With this feature you can easily switch between different TV programs that currently interest you. The QuadraSurf™ control allows you set up four different personal Surf lists using the colored buttons (on the remote control), each holding up to ten channels in its quick viewing“list.
USING THE QUADRASURF™ BUTTONS T he QuadraSurf™ buttons on your remote control allow you to store up to 10 channels per button (40 total). This is a great feature if you want to store all your favorite Sports channels, Movie channels, or News channels in one surf list. Family members can have there own favorite list of channels. You can even program the external A/V Input jacks (Front channel) for one of the buttons making it a “source” button for your external accessory devices.
OPERATING THE DVD PLAYER - BASIC OPERATION This section of the Directions for Use manual begins to explain the operating procedures of the DVD Player portion of this television. L et’s learn the simple operation of the TV’s built-in DVD Player. Unless otherwise stated, all operations can be performed by using the remote control. 1 2 3 4 5 Press the POWER button on the remote control (or the TV) to turn the television ON. Press the EJECT button on the remote control to place the TV/DVD in the DVD mode.
OPERATING THE DVD PLAYER - MENU BAR OPERATION GENERAL EXPLANATION T his manual gives the basic instructions for operating this DVD Player. Some DVD’s require specific operation or allow only limited operation during playback. In these cases, the player may not respond to all operating commands. When this occurs, please refer to the instructions contained with the DVD (disc). When the symbol X appears on the TV screen, the operation is not permitted by the player or the disc.
OPERATING THE DVD PLAYER - USER PREFERENCE SETTINGS PICTURE Many of the DVD Player’s features can be set to suit your personal preference. Let’s start by looking at the PICTURE features. off 1en DVD play 2:45:23 0:00:34 1 2 3 4 5 Press the SYSTEM MENU (OSD) button on the remote control to display the on-screen menu. Press the CURSOR UP or DOWN button to select and highlight the feature you wish to change. Choose Black level shift, or Video shift.
OPERATING THE DVD PLAYER - USER PREFERENCE SETTINGS SOUND The Personal Preference area of the menu has various SOUND features to customize and compliment your viewing and listening pleasure. off 1en DVD play 2:45:23 0:00:34 1 2 3 4 5 6 Press the SYSTEM MENU (OSD) button on the remote control to display the on-screen menu. off User Preference Settings POWER Press the CURSOR DOWN button to highlight the Sound Icon .
OPERATING THE DVD PLAYER - USER PREFERENCE SETTINGS LANGUAGE Many DVDs are capable of multi-lingual settings. The Language feature within the Personal Preference area of the DVD on-screen menu will let the user set the Audio and Subtitle language. off 1en DVD play 2:45:23 0:00:34 off 1en Black Level shift On Video shift 1 2 3 4 5 Press the SYSTEM MENU (OSD) button on the remote control to display the on-screen menu.
OPERATING THE DVD PLAYER - USER PREFERENCE SETTINGS FEATURES off The Features section of the Personal Preference options contain an area where an Access Code and Parental censoring can be set. There also are features that can be turned On or Off (Access Control, Status Window, Low Power Standby, PBC - Playback Control, and Help text). 1 2 3 4 5 off Black Level shift User Preference Settings POWER SLEEP 7 8 9 EJECT TV VCR MODE Press the CURSOR DOWN button to highlight the Features Icon .
OPERATING THE DVD PLAYER - USER PREFERENCE SETTINGS ACCESS CODE When using and making changes within the Access Control option of the Features submenu, an ACCESS CODE will have to entered before any new settings can be made. This page discusses how to set the Access Code to allow changes to this section of the on-screen menu.
OPERATING THE DVD PLAYER - PLAYING A DISC AUTHORIZING DISCS W hen the Child Lock or Parental Level controls are on and a disc containing material that will be blocked is inserted, the disc must first be authorized before playback can occur. 1 2 3 With the TV/DVD Player turned on, press the EJECT button on the remote control or TV. Place the disc in the disc tray and press the EJECT button on the remote control or TV.
OPERATING THE DVD PLAYER - PLAYING A DISC PLAYING A DVD OR VIDEO CD A fter inserting a DVD or Video CD and closing the tray, playback will start automatically and the Status Window will show the type of disc loaded and the discs playing time. You may be asked to select an item from a menu on the disc itself. Use the CURSOR buttons to navigate the disc menu and press the OK button to activate your selection. 1 2 Press the PLAY button to start the playback of a DVD or Video CD.
OPERATING THE DVD PLAYER - GENERAL FEATURES MOVING TO ANOTHER TITLE OR TRACK POWER SLEEP W hen a disc has more than one Title or Track you can move to another Title or Track by the following steps: With a disc in the tray: EJECT TV VCR MODE SYSTEM MENU 1 2 3 4 Press the CURSOR RIGHT button until the “T” is highlighted. Press the CURSOR UP or DOWN button to select any other available Titles or Tracks. Press the SYSTEM MENU (OSD) button to clear the mennu from the screen.
OPERATING THE DVD PLAYER - GENERAL FEATURES STILL PICTURE/PICTURE BY PICTURE PLAYBACK POWER SLEEP EJECT TV W hen a disc has more than one Title or Track you can move to another Title or Track by the following steps: VCR MODE SYSTEM MENU OSD AUDIO REPEAT REPEAT A-B SUBTITLE SMART SOUND 1 2 3 With the disc playing, press the PAUSE button. The playback will freeze the picture on the screen.
OPERATING THE DVD PLAYER - GENERAL FEATURES REPEAT REPEAT A-B 7 6 5 POWER R epeat chapter/Title/Index on DVD Video discs, or repeat Tracks or the disc on Video CDs. SLEEP title EJECT TV VCR MODE SYSTEM MENU OSD 1 2 3 4 5 6 Press the REPEAT button once to repeat the playback of the current chapter. 7 To exit the repeating sequence, press the REPEAT A-B button again. Press the REPEAT button twice to repeat playback of the current title.
OPERATING THE DVD PLAYER - GENERAL FEATURES 6 1 TIME SEARCH T he Time Search control allows you to start the playback at any chosen time on the disc 1 2 3 4 5 6 SLEEP TV VCR MODE Press the SYSTEM MENU (OSD) button to display the on-screen menu bar. Press the OK button to confirm the time and begin playback at that moment on the disc. 1en st DVD play 2:45:23 0:00:34 OSD REPEAT REPEAT A-B SUBTITLE AUDIO 2 Press the CURSOR RIGHT button until the Time Search Icon is highlighted.
OPERATING THE DVD PLAYER - GENERAL FEATURES FAVORITE TRACK SELECTION VIDEO POWER T he FTS-Video control allows you to store your favorite titles/chapters (DVD) and favorite tracks/indexes (Video CD) for a particular disc in the players memory. Storing a FTS-Video Program: 1 2 3 4 Press the SYSTEM MENU (OSD) button on the remote control to display the on-screen menu. Press the CURSOR RIGHT button until the Video FTS Icon is highlighted.
OPERATING THE DVD PLAYER - GENERAL FEATURES ERASING A FAVORITE TRACK SELECTION T he FTS-Video control also allows you to customize or erase programming set up in the Favorite Track Selection memory of the TV/DVD Player. 11 7 6 1 AUDIO Press the CURSOR RIGHT button until the Video FTS Icon is highlighted. Press the CURSOR DOWN button to select “Program.
OPERATING THE DVD PLAYER - SPECIAL FEATURES TITLE/CHAPTER/DISC MENUS POWER SLEEP F or titles and chapters, selection menus may be included on the disc. The DVD’s menu feature allows you to make selections from these menus. Press the appropriate numerical buttons or use the CURSOR UP/DOWN, RIGHT/LEFT buttons to highlight your selection, then press the OK button to confirm. 1 VCR MODE Fantasic Studios Present....
OPERATING THE DVD PLAYER - SPECIAL FEATURES AUDIO LANGUAGE POWER T he following steps describe how to change the Audio Language control. off SLEEP TV VCR MODE 1 2 3 Press the AUDIO button. The onscreen menu will be displayed with the Audio Language Icon highlighted. Press the CURSOR UP or DOWN button repeatedly to scroll and select the available language options. Press the SYSTEM MENU (OSD) button to clear the on-screen menu from the TV screen.
OPERATING THE DVD PLAYER - SPECIAL VIDEO CD FEATURE PLAYBACK CONTROL (PBC) S ome Video CDs contain information that allow you to control the playback of the disc through a special playback menu. 1 2 3 4 5 Load a Video CD with Playback control and press the PLAY button to start the disc. Go through the menu with the buttons indicated on the TV screen until your chosen passage starts to play. If a PBC menu consists of a list of title, you can select a title directly.
OPERATING THE DVD PLAYER - PLAYING AUDIO CDS FAVORITE TRACK SELECTION AUDIO CD F TS allows you to store your favorite tracks for a particular disc in the TV/DVD Player memory. Each FTS program can contain up to 20 tracks. 1 Storing an FTS Program: 1 2 3 4 5 Load an audio CD and press the STOP button. Press the CURSOR DOWN button to highlight the list of available tracks. Press the CURSOR RIGHT or LEFT button to highlight a specific track.
TROUBLESHOOTING • Check the TV power cord. Unplug the TV, wait 10 seconds, then reinsert the plug into the outlet and push the POWER button again. • Be sure the fuse is not blown on the AC power strip, if one is being used. • Check to be sure the TV outlet is not on a wall switch. No Power • Check the TV power cord. Unplug the TV, wait 10 seconds, then reinsert the plug into the outlet and push the POWER button again. • Check that the outlet is not on a wall switch.
GLOSSARY OF TERMS Auto Programming • The procedure of adding or deleting channel numbers into the Television’s memory circuits. In this way the Television “remembers’’ only the locally available or desired channel numbers and skips over any unwanted channel numbers. Closed Caption • Broadcast standard which allows you to read the voice content of television programs on the TV screen.
RENEWED 90 DAY LIMITED WARRANTY