Register your product and get support at www.philips.
Contents 1 2 3 4 5 6 EN Get started 3 TV tour Important Environmental efforts Position the TV Help and support 3 6 7 8 10 Use your TV 11 Controls Watch TV Watch a connected device Ambilight Browse PC through DLNA Browse Net TV Rent online video 11 13 16 18 19 21 22 Use more of your TV 25 Pause TV Record TV shows Enjoy HbbTV View Teletext Set locks and timers View subtitles View Scenea Use EasyLink 25 26 29 30 31 32 32 33 Set up your TV 36 Settings assistant Picture and sound Channels Me
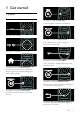
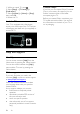
1 Get started TV tour Remote control To open or close the Find menu. In the Find menu, access the channel list. To adjust the volume. To open or close the Adjust menu. In the Adjust menu, access a range of frequently used settings. To switch TV channels. To open or close the Text menu. In the Text menu, access teletext for news and information. To open or close the Home menu. In the Home menu, access connected devices, picture and sound settings, and other useful features.
Press and hold to return to watching TV. Connect devices To select a red menu option, access digital Interactive TV services*, or watch TV demonstration clips. *Available on certain models only. To select a green menu option or to access energy efficient settings. To select a yellow menu option or to access the electronic user manual. Read more about the remote control in Use your TV > Controls > Remote control (Page 11). Alternatively, look at the index in Search for...
English You can learn more on device connections in Connect your TV > Connect devices. High Definition TV Ambilight For high-definition (HD) picture quality, watch HD programmes. On standard-definition (SD) programmes, the picture quality is standard.
Important Safety Read and understand all instructions before you use your TV. If damage is caused by failure to follow instructions, the warranty does not apply. Risk of electric shock or fire! Never expose the TV to rain or water. Never place liquid containers, such as vases, near the TV. If liquids are spilt on or into the TV, disconnect the TV from the power outlet immediately. Contact Philips Consumer Care to have the TV checked before use.
Educate children about the dangers of climbing on furniture to reach the TV. Risk of swallowing batteries! The product/remote control may contain a coin-type battery, which can be swallowed. Keep the battery out of reach of children at all times! Risk of overheating! Never install the TV in a confined space. Always leave a space of at least 4 inches or 10 cm around the TV for ventilation. Ensure that curtains or other objects never cover the ventilation slots on the TV.
Screen off: If you only want to listen to audio from the TV, you can turn off the TV display. Other functions continue to operate normally. Light sensor: The built-in ambient light sensor lowers the brightness of the TV screen when the surrounding light darkens. Low standby power: The advanced power circuitry brings down the power consumption of the TV to an extremely low level, without losing out on the constant standby functionality.
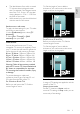
The ideal distance from which to watch TV is three times its diagonal screen size. For example, if the diagonal screen size of the TV is 116cm / 46", the ideal viewing distance is ~3.5m / ~138" from the front of the screen. While seated, your eyes should be level with the centre of the screen. Stand mount or wall mount To apply the best settings for your TV, select wall mount or stand mount. 1. In the [Preferences] menu, select [TV placement]. 2. Select [On a TV stand] or [Wall mounted], then press OK.
1. While you watch TV, press . 2. Select [Setup] > [TV settings] > [Preferences]. 3. Select [Location] > [Home] or [Shop], then press OK. 4. Restart the TV. Lock the TV Your TV is equipped with a Kensington security slot at the base of the TV. Purchase a Kensington anti-theft lock (not supplied) to secure the TV. Help and support Use Help You can access onscreen [Help] from the Home menu by pressing the Yellow button.
Indicators English 2 Use your TV Controls TV controls 1. Ambient sensor / remote control sensor Ambient sensor is available on certain models only. Remote control 1. +/-: Increase or decrease volume. 2. AMBILIGHT: Switch Ambilight on or off. Ambilight is available on certain models only. 3. (Home): Access the Home menu. Press again to launch an activity in the Home menu. Confirm an entry or selection. 4. CH +/-: Switch to the next or previous channel. 5.Power: Switch the TV on or off. 1.
4. (Home): Access the Home menu. 5. (Navigation buttons): Navigate through menus and select items. 6. CH - / CH + (Previous/Next): Switch channels, navigate through menu pages, tracks, albums or folders. 7. OK: Confirm an entry or selection. 8. (Back): Return to the previous menu page or exit from a TV function. 9. FIND: Access the menu to select TV channel list. 10. ADJUST: Access the menu to adjust settings. 11. SOURCE: Select connected devices. 12.
Access EasyLink controls 1. While you view content from a connected HDMI-CEC device, press OPTIONS. 2. Select [Show device keys], then press OK. 3. Select the EasyLink control button, then press OK. Read more on EasyLink in Use more of your TV > Use EasyLink (Page 33). Smartphone control For remote control with CR2032 (3V) batteries: Use your smartphone as a secondary remote, and even as a keyboard. You can also view a slideshow of the images in your smartphone on the TV.
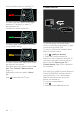
If the TV is in standby, press on the remote control. Note: There is a short delay before the TV responds. Tip: If you cannot find your remote control and want to switch on the TV from standby, press CH +/- on the front of the TV. Adjust TV volume Increase or decrease the TV volume Press +/- on the remote control. Press +/- on the front of the TV. Though your TV consumes very little energy in standby, it does use some energy.
Press on the remote control. Press CH +/- on the TV. Press the Numeric buttons to enter a channel number. 1. In the channel list, press OPTIONS. 2. Select [Select list] > [Analogue] or [Digital], then press OK. Depending on your selection, only analogue or digital channels are available. Listen to digital radio If digital radio channels are available, they are installed automatically when you install the TV channels. 1. While you watch TV, press FIND. The channel list is displayed. 2. Press OPTIONS.
1. In the programme guide, press OPTIONS. 2. Select one of these settings, then press OK: [Set reminder]: Set programme reminders. [Clear reminder]: Clear programme reminders. [Change day]: Select the day to display. [More info]: Display programme information. [Search by genre]: Search TV programmes by genre. [Scheduled reminders]: List programme reminders. [Update Programme guide]: Update the latest programme information.
If you connect an HDMI-CEC compliant device to the TV through an HDMI connector and switch it on, the device is automatically added to the Home menu. 1. Connect and switch on the device. 2. Press . 3. Select [Add your devices], then press OK. 4. Follow the onscreen instructions. Select your device. Select the connector. Note: If you are prompted to select the TV connection, select the connector that this device uses.
[Slideshow speed]: Set the display time for each picture in the slideshow. [Slideshow transition]: Set the transition from one picture to the next. [Set as Scenea]: Set the selected picture as wallpaper on TV. Listen to music Press the Navigation buttons to select a music track, then press OK. Press / to search forward or backward within a track. Press and hold to exit content browser. Press OPTIONS to access or exit the following music options: [Stop]: Stop audio play.
[Separation]: Adjust the difference in colour levels on each side of the TV. Turn off this feature for a dynamic and uniform Ambilight colour. [TV switch off]: Select how Ambilight switches off when the TV is switched off. [Lounge light mood]: Select a lounge light mode. The lounge light comes on when the TV is in standby. [Scenea lounge light]: Switch Scenea lounge light on or off when Scenea is enabled. [Wall colour]: Select the colour of the wall behind the TV.
5. Select Library > Apply Media Information Changes to activate the changes. Enable sharing on Windows Media Player 12 1. Start Windows Media Player on your computer. 2. In Windows Media Player, select the Stream tab, and then select Turn on media streaming. The Media streaming options screen appears. 3. Click Turn on media streaming. Return to the Windows Media Player screen. 4. Click Stream > More streaming options. The Media streaming options screen appears.
What you can do Enjoy Internet Applications (Apps), specially adapted internet websites for your TV. You can control the Apps with the TV remote control. For example, you can: Read newspaper headlines Watch videos Check weather forecasts Use the catch-up TV feature to watch TV programmes that you missed. Availability of catch-up TV Apps differ for each country. To find out which TV programmes are available, access the Net TV programme guide.
Access Net TV Applications (Apps) The first page shown is the Net TV home page. The icons on this page represent the applications (Apps). Browse Internet websites with the Internet Apps. Press the Navigation buttons to select an App, then press OK to confirm. Read the Net TV quick guide for more information. Access the App Gallery to add more Apps to your home screen. You can change country settings and select Apps from other countries. Access website 1. Select an Internet App, then press OK. 2.
To rent and download a video, you need a high-speed Internet connection to the TV. Read more about network connections in Connect your TV > Computers and the Internet (Page 53). You also need an SD memory card to insert into the TV SD card slot. SD memory size Use a blank SD memory card of type SDHC class 6, with at least 4 GB of storage capacity. For high-definition video, make sure that you use an SDHC card with at least 8 GB of storage capacity.
Download the video When you have paid, you can download the video on to the video memory. During the download, you can continue to watch a TV programme until the TV notifies you that the video is ready to play. If you cancel a download, you can still download the video until the rental period expires. Watch video 1. Press , select [Browse Net TV]. The installed video stores are displayed. 2. Select the video store where you rented the video, then press OK. 3.
Pause TV What you can do While watching a digital channel, you can pause a programme to answer an urgent phone call or to have a break. The broadcast is stored on a USB hard disk that is connected to the TV; you can replay the broadcast instantly. Note: The maximum time for which you can pause a TV broadcast is 90 minutes. Do not overload the USB port. If you connect a USB hard disk device that consumes more than 500 mA power, ensure that it is connected to its own external power supply.
Pause a live TV broadcast Start a programme recording. Switch the TV to standby. Switch to another channel. Switch source to watch from a connected device - a Blu-ray disc player or digital receiver. To change playback speed Press or repeatedly. To jump back to the beginning of the TV broadcast Press the left navigation button repeatedly until you reach the beginning of the broadcast storage. 1. On a digital channel, press (pause) to pause a TV broadcast. 2. Press (play) to continue watching.
Note: If you are using a USB hub, do not connect any other USB device to the TV when you are formatting the USB hard disk. Hard disk installation Before you can record a TV programme, you must connect a USB hard disk to the TV and format it. Caution: TP Vision is not responsible if the USB storage device is not supported, nor is it responsible for damage or loss of data in the device. Formatting removes all data from the connected USB hard disk device.
If your TV remote control does not have a button: 1. Press and select [Programme guide]. 2. With the current TV programme selected, press OPTIONS and select [Record]. The TV sets the end time of the recording to the end of the programme. 3. Select [Schedule]and press OK to start recording. To stop recording immediately, press (stop). Notes: While recording, you cannot switch TV channels. While recording, you cannot pause the TV broadcast.
Cancel a scheduled recording To cancel a scheduled recording: 1. Select the recording and press OPTIONS. 2. Select [Cancel recording] and press OK. Expired recordings Broadcasters can limit the number of days a recording can be viewed after airing or restrict playback. A recording in the list can show the number of days before it expires. An expired recording can no longer be played.
View Teletext Select a page 1. Select a channel that has teletext feature, then press TEXT. 2. Select a page in one of the following ways: Enter the page number with the Numeric buttons. Press or to view the next or previous page. Press the Colour buttons to select a colour coded item. 3. Press to exit. Teletext options 1. When you view teletext, press OPTIONS. 2. Select one of the following options: [Freeze page] / [Unfreeze page]: Freeze or unfreeze the current page.
Teletext 2.5 offers more colours and better graphics than normal teletext. If Teletext 2.5 is broadcast by a channel, it is switched on by default. To switch Teletext 2.5 on or off 1. Press . 2. Select [Setup] > [TV settings] > [Preferences]. 3. Select [Text 2.5] > [On] or [Off], then press OK. Set locks and timers Clock You can display a clock on the TV screen. The clock displays the time that is broadcast by your TV service operator. Display the TV clock 1. While you watch TV, press OPTIONS. 2.
Parental rating Subtitle language Some digital broadcasters rate their programmes according to age. You can set your TV to display only programmes with age ratings lower than your child's age. 1. Press . 2. Select [Setup] > [Channel settings] or [Satellite settings]. 3. Select [Child lock] > [Parental rating]. A message prompts you to enter the child lock code. You can change the subtitle language on some digital channels. 1. Press . 2.
4. Select a picture, then press OPTIONS. 5. Select [Set as Scenea], then press OK. 6. Select [Yes], then press OK. 7. Press any button to exit Scenea. Set Scenea lounge light When the TV is in standby, you can switch on Ambilight and create a lounge light effect with your wallpaper. Ambilight is available on certain models only. When the TV is in standby, press AMBILIGHT on the front of the TV. Note: It can take more than 5 seconds for the lounge light to switch on.
Connect at least two HDMI-CEC compliant devices through HDMI Configure each HDMI-CEC compliant device properly Switch on EasyLink Numeric buttons: Select a title, chapter or track. Play buttons: Control video or music play. Standby: Display the menu of the connected device. : Display the TV menu. (Standby): Switch the TV and the connected device to standby. Switch on To switch on or off EasyLink Note: If you do not intend to use Philips Easylink, switch it off. 1. Press . 2.
Note: Make sure that the picture format of the TV is set to [Auto format] or [Movie expand 16:9]. Hear another device at TV standby You can hear a connected HDMI-CEC compliant device through the TV speakers, even when the TV is in standby. 1. Press ADJUST to receive audio from the connected Philips EasyLink device. If available, audio only mode is enabled. 2. Accept the prompt on the TV to turn off the TV screen. 3. Control the audio playback with the TV remote control.
4 Set up your TV Settings assistant Use the settings assistant to guide you through the picture and sound settings. 1. While you watch TV, press . 2. Select [Setup] > [Quick picture and sound settings], then press OK. 3. Select [Start], then press OK. 4. Follow the onscreen instructions to choose your preferred settings. Picture and sound More picture settings 1. Press . 2. Select [Setup] > [TV settings] > [Picture], then press OK. 3.
Select audio language If the TV channel has multiple or dual sound broadcast, you can select the preferred audio language. While you watch TV, press OPTIONS. [Audio language]: Select the audio language for digital channels. [Dual I-II]: Select the audio language for analogue channels. Digital TV channels can stream several audio languages. If multiple languages are available, select the preferred language. 1. Press . 2. Select [Setup] > [Channel settings] or [Satellite settings] > [Language]. 3.
Update channel list When the TV was switched on for the first time, a full installation of channels was performed. You can automatically add or remove digital channels or manually update channels. Note: If you are prompted to enter a code, enter '8888'. Automatic update To automatically add or remove digital channels, leave the TV in standby mode. The TV updates channels and stores new channels everyday. Empty channels are removed from the channel list.
Press the Navigation buttons or Numeric buttons to manually enter the channel frequency. Select [Search] then press OK to search for the next channel automatically. 3. When the correct channel frequency is entered, select [Done], then press OK. 4. Select [Store as new channel], then press OK to store the new TV channel. Install digital and satellite channels Install digital channels To improve TV reception, reposition the antenna. You need to know the correct frequency to tune.
compatible software versions. An onscreen message will notify you if the channel list cannot be copied to the second TV. Note: If you are prompted to enter a code, enter '8888'. Copy channel list to USB 1. Connect a USB storage device to the TV with the channels installed on it. 2. Press . 3. Select [Setup] > [TV settings] > [Preferences] > [Channel list copy] > [Copy to USB], then press OK. The channel list is copied to the USB storage device. 4. Unplug the USB storage device.
Visually impaired Tip: To verify whether visually impaired audio is available, press OPTIONS and select [Audio language]. Languages with an eye icon support visually impaired audio. To switch on visually impaired audio (if available) 1. While you watch TV, press OPTIONS. 2. Press the green button to select [Visually impaired]. 3. Press one of the following buttons to select an option: Red - [Off]: Turn off visually impaired audio.
Update from digital broadcast For more information, see the following pages. Update with USB Before performing this procedure, make sure that you have the following: Spare time to complete the entire update. A USB flash drive that has at least 256MB of storage space, is FAT or DOS formatted, and has its write protection disabled. Access to a computer with a USB port and internet access. Note: Do not use a USB hard drive. 1. Press . 2. Select [Setup] > [Update software], then press OK.
English Update [Help] Do not switch off the TV or remove the USB storage device during the update. If a power failure occurs during the update, do not remove the USB storage device from the TV. The TV continues to update as soon as power is restored. If an error occurs during the update, retry the procedure. If the error reoccurs, contact Philips Consumer Care. 1. Switch on the TV. 2. Disconnect all other USB devices from the TV. 3. Connect the USB storage device containing the *.
5 Connect your TV Do not use an HDMI cable longer than 5 meters / 16.4 feet. About cables Cable quality Overview Before you connect devices to the TV, check the available connectors on the device. Connect the device to the TV with the highest quality connection available. Good quality cables ensure a good transfer of picture and sound. The connections shown in this user manual are recommendations only. Other solutions are possible.
VGA A SCART cable combines video and audio signals. SCART connectors can handle RGB video signals but cannot handle high-definition (HD) TV signals. Use this connection to display PC content on the TV. For video and sound, use the VGA and AUDIO IN connectors. Connect devices Overview You can connect your devices to the TV with any of the following options. After connection, press > [Add your devices].
Blu-ray or DVD disc player Connect the disc player with an HDMI cable to the TV. Connect the disc player with a component cable (Y Pb Pr) and an audio L/R cable to the TV. TV receiver Connect the satellite or digital TV receiver with an antenna cable to the TV. (SAT is available on certain models only.
English Connect the satellite or digital TV receiver with an HDMI cable to the TV. Connect the satellite or digital TV receiver with a SCART cable to the TV. Connect the satellite or digital TV receiver with a component cable (Y Pb Pr) and an audio L/R cable to the TV.
Recorder Connect the recorder with an antenna cable to the TV. (SAT is available on certain models only.) Connect the recorder with a SCART cable to the TV. Connect the recorder with a component cable (Y Pb Pr) and an audio L/R cable to the TV. Game console The most practical connectors for a game console are on the side of the TV. However, you can also use the connectors at the back of the TV. EN 48 For the best gaming experience, set the TV to game mode. 1. Press ADJUST. 2.
English Connect the game console with an HDMI cable to the TV. Connect the game console with a component cable (Y Pb Pr) and an audio L/R cable to the TV. Home theatre system Connect the home theatre with an HDMI cable and an optical or coaxial audio cable to the TV. (Optical audio output is available on certain models only.
Connect the home theatre with a SCART cable to the TV. Connect the home theatre with a component cable (Y Pb Pr) and an audio L/R cable to the TV. Digital camera Connect the digital camera with a USB cable to the TV.
Digital camcorder English Connect the digital camera with an HDMI cable to the TV. Connect the digital camcorder with a component cable (Y Pb Pr) and an audio L/R cable to the TV. Connect more devices External hard disk Connect the external hard disk with a USB cable to the TV.
Computer Connect the computer with an HDMI cable to the TV. Connect the computer with a DVI-HDMI cable to the TV. Connect the computer with a VGA cable and an audio cable to the TV. Keyboard and mouse USB keyboard *Available on certain models only. You can connect a USB keyboard to enter text on the TV. You can also type in a new channel name or subject name in the YouTube application within Net TV. EN 52 To install the USB keyboard Switch on the TV.
Net TV keys on your keyboard Enter : OK to confirm an entry. Backspace : return to the previous page. Navigation keys : navigate to the next field. Home : scroll to the top of the page. End : scroll to the bottom of the page. Page Up : jump one page up. Page Down : jump one page down. +/- : zoom in or out one step. * : fit to the width of the page. USB mouse *Available on certain models only. You can connect a USB mouse to navigate pages on the Internet.
A computer network that includes: a) A universal plug-and-play (UPnP) router and b) A computer with one of these operating systems: Microsoft Windows XP, Microsoft Windows Vista, Mac OSX, or Linux. To connect your TV to computers, you also need media server software that is set to share files with your TV. See Use your TV > Browse PC through DLNA (Page 19). To connect your TV to the Internet, you also need a high-speed connection to the Internet. Note: This DLNA1.
If you have several routers in your network, you can select the network you need. To select a specific network router, press [Scan]on the first page of the installation. The routers with WPS and the strongest signal are shown first in the list on screen. Select the router you need. If you are connecting a WPS router, select [WPS] on the TV. If you have set the PIN code in your router software, select [WPS pincode:] and enter the code.
3. Enter the code printed on the CD-ROM envelope. 4. Click the 'Download now' button to download the free Wi-Fi MediaConnect software. 5. Once downloaded, start the file 'Wi-Fi MediaConnect_setup.exe'. Follow the instructions on your PC. TV network name If you have more than one TV in your home network, you can rename this TV. To rename this TV in the network, press > [Setup] > [Network settings] and select the TV network name.
English 1. Switch off the TV. 2. Follow the directions printed on the CAM and insert the CAM into the Common Interface at the side of the TV. 3. Push the CAM in as far as it will go, then wait for the CAM to be activated. This takes a few minutes. To prevent digital services from being deactivated, do not remove the CAM from the slot when it is in use. Watch CAM services 1. After inserting and activating the CAM, press OPTIONS. 2. Select [Common interface], then press OK. 3.
6 Troubleshooting Contact Philips Warning: Do not attempt to repair the TV yourself. This may cause severe injury, irreparable damage to your TV or void your warranty. If you cannot resolve your problem, refer to the frequently asked questions (FAQs) for this TV at www.philips.com/support. You can also contact Philips Consumer Care in your country for support. You can find the contact number in the leaflet that accompanies the TV. Take a note of your TV model and serial number before you contact Philips.
Make sure that the antenna is properly connected to the TV. Make sure that the correct device is selected as the display source. Make sure that the external device or source is properly connected. There is sound but no picture: Make sure that the picture settings are set correctly. There is poor TV reception from an antenna connection: Make sure that the antenna is properly connected to the TV.
HDMI There are problems with HDMI devices: Note that HDCP (High-bandwidth Digital Content Protection) support can delay the time taken for a TV to display content from a HDMI device. If the TV does not recognise the HDMI device and no picture is displayed, switch the source from one device to another and back again. If there are intermittent sound disruptions, make sure that output settings from the HDMI device are correct.
Power and reception Product specifications are subject to change without notice. Power Mains power : AC 220-240 V~, 50/60 Hz Standby power consumption : <0.15 W Ambient temperature: 5 to 40 degrees Celsius For power consumption, see the product specifications at www.philips.com/support. The power rating stated on the product typeplate is the power consumption for this product during normal household use (IEC 62087 Ed.2).
480i - 60 Hz 480p - 60 Hz 576i - 50 Hz 576p - 50 Hz 720p - 50Hz, 60 Hz 1080i - 50Hz, 60 Hz 1080p - 24Hz, 25Hz, 30Hz, 50Hz, 60 Hz USB : NTFS, FAT 16, FAT 32. Connect only USB devices which consume 500mA of power or less. SD card (Videostore) Ethernet LAN RJ-45 Supported image files JPEG (*.jpg) Multimedia Supported multimedia connections Supported audio/video files Multimedia file names must not exceed 128 characters.
Component and Audio: Y Pb Pr, Audio L/R Service port: SERV.U Headphones: stereo 3.5mm mini-jack SAT: F-pin (Satellite). Available on certain models only. Bottom Ethernet LAN RJ-45 DIGITAL AUDIO OUT: Optical HDMI 1 - 3 AUDIO IN: DVI/VGA (stereo 3.
Use your TV legend to note the dimensions of your TV (with and without the stand). Use your TV legend to note the thickness of your TV (with and without the stand).
A D demo - 35 devices, add - 15 age rating - 27 devices, watch - 16 analogue channels, fine-tune - 33 digital channels - 33 analogue channels, subtitles - 28 digital channels, subtitles - 28 audio language - 31 digital radio - 14 C dimensions - 51 display - 50 CAM, enable - 46 display resolution - 50 CAM, insert - 46 DLNA - 17 CAM, see Conditional Access Module - 46 care - 7 English 8 Index E channel list - 14 EasyLink, controls - 29 channels, favourites - 14 EasyLink, enable - 29 ch
home menu - 4 home mode - 9 humidity - 7 power - 50 R recording, TV shows - 23 I recordings, manage - 25 install channels - 32 recycle - 7 install channels (automatic) - 32 register product - 9 install channels (manual) - 33 reinstall TV - 36 remote control - 11 K remote control, batteries - 12 kensington lock - 9 remote control, onscreen - 29 L remote control, overview - 11 language, menu - 34 location, home or shop - 9 rename channels - 32 reorder channels - 32 S M media server softwar
English T teletext 2.
© 2012 TP Vision Netherlands B.V. All rights reserved.