Model / Model / Model: P41TL016813 1A
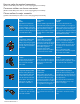
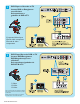
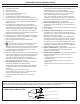
How to make the optimal connection (Need a Cable? Philips has them at: www. shopping.philips.com/cables) Comment réaliser une bonne connexion (Need a Cable? Philips has them at: www. shopping.philips.com/cables) Cómo realizar la mejor conexión (¿Need a Cable? Philips has them at: www. shopping.philips.com/cables) Best HDMI Supérieure HDMI La mejor HDMI High-Definition Multimedia Interface provides an uncompressed, all-digital audio/video connection.
AC IN VGA L Y Pb Pr L R Y Pb Pr L R VIDEO IN AV1 R PC IN S-VIDEO AV1 37PFL5322D AC IN HDMI2 HDMI1 VGA AUDIO IN L Y Pb Pr L R Y Pb Pr L R VIDEO IN AV1 R PC IN S-VIDEO AV2 AV3 AC In HDMI 1, HDMI 2 PC - VGA, Audio SPDIF output (Digital Only) AV3 - Composite Video, (Video In) S-Video, Audio L/R input AV2 - Component Video (YPbPr), Audio L/R input AV1 - Component Video (YPbPr), Audio L/R input 75 / RF Entrée CA HDMI 1, HDMI 2 Ordinateur - VGA, Audio Sortie SPDIF (numér
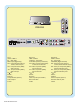
1 Set-Top Box to TV Boîtier de décodage vers téléviseur De la caja superior o caja de cable al TV A A HDMI B HDMI2 B HDMI1 OR/OU/O RF C 2 DVD Player/Recorder to TV Lecteur DVD/Enregistreur DVD vers téléviseur Del reproductor o grabador de DVD al TV HDMI2 HDMI1 VGA PC IN A HDMI B Cover & Connection 3
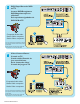
3 DVD Player or Recorder toTV Lecteur DVD ou Enregistreur vers téléviseur Del reproductor o grabador de DVD alTV AC IN HDMI2 HDMI1 VGA L Y Pb Pr L R Y Pb Pr L R AV1 VIDEO IN R PC IN S-VIDEO AV2 AV3 Y Pb Pr L R Y Pb Pr L R AV1 AV2 B A C Component Video Input /Entrée vidéo composant /Entrada de video componente 4 DVD Player/Recorder/VCR to TV Lecteur DVD/Enregistreur DVD/Magnétoscope vers téléviseur Del reproductor/grabador de DVD/VCR al TV AC IN HDMI2 HDMI1 VGA L Y
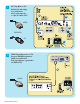
5 DVD Player/Recorder/VCR to TV AC IN HDMI2 HDMI1 VGA L Y Pb Pr L R Y Pb Pr L R AV1 R PC IN Lecteur DVD/Enregistreur DVD/Magnétoscope vers téléviseur Del reproductor/grabador de DVD/VCR al TV S-VIDEO AV2 AV3 VGA L VIDEO IN R PC IN S-VIDEO AV3 A B Composite Audio-video /Audio-Vidéo composite /Audio-Video compuesto C You can connect this input by AV3 or Side AV. Vous pouvez connecter cette entrée par AV3 ou AV latéral.
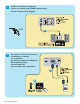
Audio to Hi-fi System (Digital) Audio vers chaîne haute fidélité (Numérique) Audio al sistema Hi-fi (Digital) L VIDEO IN R S-VIDEO AV3 SPDIF 8 A A PC connects to TV (as PC monitor) L’ordinateur se connecte sur un téléviseur (en tant que moniteur d’ordinateur) El computador (PC) se conecta al televisor (como monitor del computador).
Return your Product Registration Card or register online at www.philips.com/usasupport today to get the very most from your purchase. Registering your model with PHILIPS makes you eligible for all of the valuable benefits listed below, so don’t miss out. Complete and return your Product Registration Card at once, or register online at www.philips.
IMPORTANT SAFETY INSTRUCTIONS Read before operating equipment 1. 2. 3. 4. 5. 6. 7. 8. 9. 10. 11. 12 13. 14. 15. 16. Tilt/Stability - All televisions must comply with recommended international global safety standards for tilt and stability properties of its cabinet design. • Do not compromise these design standards by applying excessive pull force to the front, or top, of the cabinet which could ultimately overturn the product.
Precaution ADDITIONAL SAFETY PRECAUTIONS • ENSURE that LCD TV stand is tightened properly to the set on the right way of tightening of the screw of the stand to the set. Improper tightening of screw may render the set unsafe. • If LCD TV is installed on the wall, installation should be carried out by qualified servicemen. Improper or incorrect installation may render the set unsafe. • Disconnect main plug when : — cleaning the TV screen, never use abrasive cleaning agents. — there is a lightning storm.
Contents Help If this User Manual does not provide an answer or if the “Trouble Shooting Tips” do not solve your TV problem, you can call the Philips Customer Care Center at 1-888-PHILIPS (744-5477) Please have your model and serial number of your TV before making this call. You can find your TV’s model and serial number located on a sticker on the front of this User Manual or on the back side of the TV. Model: 37PFL5322D Serial No: Care of the screen See Tips, p.
Preparation 1 Do not insert the power plug in a wall socket before all connections are made. Place the TV on a solid surface. For ventilation, leave at least 4” to 6” free all around the TV. Do not place the TV on a carpet. To prevent any unsafe situations, no naked flame sources, such as lighted candles, should be placed in the vicinity. Avoid heat, direct sunlight and exposure to rain or water. The equipment shall not be exposed to dripping or splashing.
75 - Cable TV Connect the cable TV signal to the CABLE/ jack at the bottom of the TV. ANTENNA 75 See page 12 for details on using Autoprogram to store channels in the TV’s memory. Note: This connection will supply stereo sound to the TV if the station you are viewing broadcasts stereo sound. - Cable box with RF IN/OUT ANTENNA CABLE HDMI 1 CABLE OR ANTENNA 75 OUTPUT /OUT (TO TV) IN H DM I 2 2 3 Note: This connection will not supply stereo sound to the TV.
- Cable box with S-Video, component video (YPbPr) or HDMI connectors ANTENNA See “Cover and connection” CABLE - Antenna Through an antenna, you can watch any HDTV programs that are broadcast in your area without paying fees. If you’re not sure what HDTV programming is available in your area, contact your local content provider or your local electronics retailer. Broadcasters are currently transitioning from analog to digital TV.
Use of the remote control Note: Pressing most buttons once will activate the assigned function. Pressing a second time will de-activate it. When a button enables multiple options, a small list will be shown. Press repeatedly to select the next item in the list. The list will be removed automatically after six seconds or press OK to remove immediately. POWER Press to turn on/off the TV from or to standby mode. Note: The TV is never powered off completely unless it is physically unplugged.
FORMAT Press this button to display a list of available display formats. Available display formats are determined by the type of signal you are receiving. To choose the display format you prefer, press the FORMAT button repeatedly: Automatic, Super Zoom, 4:3, Movie expand 14:9, Movie expand 16:9, 16:9 subtitle and Widescreen.
Buttons on the top of the TV Should your remote be lost or broken you can still change some of the basic settings with the buttons on the top of your TV. Press the power switch to switch the TV on. Press: •the + VOL -button to adjust volume; •the + CH -buttons to select the TV channels or sources. The MENU button can be used to display the Settings menu without the remote control. MENU button can also Exit the menu.
To use the menus Introduction When you use a menu or take an action, convenient instructions, help texts and messages will be displayed on your TV. Please, follow the displayed instructions and read the help text on the specific item highlighted. The color buttons perform different actions, when using on screen menu. By pressing the corresponding color button on the remote control to perform the required action when using these menus.
TV menu-Installation Installation 7 Select the menu language Language Language English Autoprogram Francais Source Espanol 3 Clock Weak channel installation Current software info Reset AV settings Press the MENU button on the remote control. Use the cursor down to select Installation in the Settings menu. Use the cursor right to enter the Installation menu. Select Language and enter the list of available languages with the cursor right.
Channel tuning Available channels: - Cable (analog NTSC or digital QAM) - Terrestrial (analog NTSC or digital ATSC) If a tuned channel is not yet in the master channel map, the TV will attempt to tune to the channel and it will be added to the map. If the channel is not acquired, a message will appear reporting that the channel is not available. When you tune an audio-only digital subchannel, a display appears with the message Audio only.
Source Installation 7 Source Language TV Autoprogram AV1 Source AV2 Clock AV3 Weak channel installation HDMI1 Current software info HDMI2 Reset AV settings Side 8 This menu allows you to identify the accessory devices you have connected to the external inputs/outputs. 1 Select Source in the Installation menu. 2 Press the cursor right to enter the list, and press up/down key to the selected input. 3 Press OK button to confirm.
Info Reset AV settings Installation 7 Reset AV settings Language Autoprogram Source Clock Weak channel installation Current software info Reset AV settings This function allows you to reset most of the picture and sound settings to their default factory levels. Start now 1 Select Reset AV settings with the cursor down key. 2 Press the cursor right key. 3 Press the OK button to erase settings and reset them to their default values.
TV menu-Features Settings 6 Features menu Features Picture Closed captions Sound Caption service Features Digital caption service Parental control Digital caption options Installation Preferred channels Exit Sleeptimer 6 1 Select Features in the TV Settings menu. 2 Press the cursor right key to enter the features menu. 3 Select the menu items with the cursor up/down key and adjust the settings with the cursor left/right key.
Digital caption service Closed captions Reset to default Caption service Size 6 Preferred channels This allows you to configure the way you choose to view digital 2 captioning. 3 Caption service Select one of the digital service channels made available by the 4 Digital caption service caption provider. 5 Digital caption options Features channels Preferred channels 6 Preferred There 6are six standard services. Service 1 is designated as the Closed captions 72 Sleeptimer Primary Caption Service.
Preferred channels 6 Features 6 A channel, when installed, is marked as preferred by default and added to the channel list. This feature provides the ability to remove a channel number from the channel list. Preferred channels Closed captions 2 Caption service 3 Digital caption service 4 Digital caption options 5 Preferred channels 6 Sleeptimer 7 Select Preferred channels with the cursor down key. Press the cursor right key to enter a list with all stored channel numbers.
TV menu-Picture & Sound Picture menu Settings 6 Picture Picture Smart picture Sound Contrast Features Brightness Parental control Color Installation Sharpness Exit Color temperature 10 Note: Some menu items are not available in case of HD sources. 1 2 3 4 Tint Noise reduction Select Picture in the TV Settings menu. Press the cursor right key again to enter the Picture menu. Select the menu items with the cursor up/down key.
Sharpness This will adjust the sharpness of fine details in the picture. Color temperature This will increase or decrease Warm (red) and Cool (blue) colors to suit personal preferences. Select Cool to give the white colors a blue tint, Normal to give the white colors a neutral tint, Warm to give the white colors a red tint. Tint Allows you to select the picture‘s color mix or hue. Noise Reduction Reduce picture noise. Dynamic contrast Enhance contrast ratio.
Settings Sound 5 Sound mode Smart sound Mono Sound mode Stereo Alternate audio Incredible surround 3 Sound mode This select the modes for more spatial or surround sound reproduction dependent on the broadcast signals or signals from external inputs received.
TV menu-Parental Control Settings 6 Parental Control menu Parental control 6 Picture Channel lock Sound TV ratings lock Features Movie ratings lock Parental control Region ratings lock Installation Clear regions lock Exit Change PIN This menu can control special functions for the TV channels. 1 Select Parental Control in the TV settings menu with the cursor up/ down key. 2 Press the cursor right to enter the channels menu. 3 Press the cursor up/down key to select a channels menu item.
Age-based Rating Content-based Rating All None TV-Y TV-Y7 TV-G TV-PG TV-14 TV-MA none none none (FV) Fantasy Violence none (D) Dialog (L) Language (S) Sex (V) Violence (D) Dialog (L) Language (S) Sex (V) Violence (L) Language (S) Sex (V) Violence TV-Y TV-Y7 TV-Y7-FV TV-G TV-PG TV-14 TV-MA When All has been selected, all items in the age-based and in the contents-based lists are locked.
Movie Ratings Lock Parental control 6 Channel lock Movie ratings lock Please enter your PIN TV ratings lock This function allows you to control access to individual movies based on their MPAA ratings (Motion Picture Association of America).
Parental control 6 Channel lock Region ratings lock Channel lock Please enter your PIN TV ratings lock This allows you to control access to individual programs base on their broadcasted regional rating. Movie ratings lock Region ratings lock 1 Select Region ratings lock with the cursor down.
PC menu-Installation Installation 4 Language Language English Source Francais Picture adjustment Espanol Select the menu language 3 Press the MENU button on the remote control. Use the cursor down to select Installation in the Settings menu. Use the cursor right to enter the Installation menu. Select Language and enter the list of available languages with the cursor right. 5 Select your preferred language with the cursor up/down and press the OK button to confirm you selection.
PC menu-Picture Picture menu Settings 4 Picture Picture Contrast Sound Brightness Installation Color temperature Exit Picture format 4 1 2 3 4 Select Picture in the TV Settings menu. Press the cursor right key again to enter the Picture menu. Select the menu items with the cursor up/down key. Adjust the settings with the cursor left/right key or enter the list of submenu items with the cursor right key. Select a submenu item with the cursor up/down key.
PC menu-Sound Settings 4 Sound menu Sound Picture Smart sound Sound Incredible surround 2 1 Select Sound in the TV Settings menu. 2 Press the cursor right key to enter the sound menu. 3 Select the menu items with the cursor up/down key and adjust the settings with the cursor left/right key. Installation 4 Remember, control settings are at normal mid-range levels when the Exit bar scale is entered.
Record with your recorder PICTURE SOUND Recorder Pr Pb Y L R VIDEO Record a TV program You can record a TV program using your recorders tuner without affecting your TV. 1 Select the channel number on your recorder. 2 Set your recorder to record. See the handbook for your recorder. Note: Switching channel numbers on your TV does not disturb recording ! TV To select connected devices 1 Press the SOURCE button repeatedly or select Source in the Settings menu (see p.
Trouble Shooting Tips Symptoms Items to Check and Actions to follow “Ghost” or double images • This may be caused by obstruction to the antenna due to high rise buildings or hills. Using a highly directional antenna may improve the picture. No power • Check that the TV’s AC power cord is plugged into the mains socket. • Unplug the television, wait for 60 seconds. Then re-insert plug into the mains socket and turn on the television again.
Glossary Aspect Ratio The ratio between the width and height of the TV picture on the screen. In a normal TV set the aspect ratio is 4 to 3 (4:3). The new aspect ratio in HDTV is 16:9 which resembles the aspect ratio in a movie theatre (Widescreen). New TV systems support both 4:3 and 16:9 aspect ratio and can automatically switch between them.
Care And Cleaning WARNING concerning stationary images on the TV Screen: Do not leave fixed images on the screen for extended periods of time. This can cause uneven aging of the LCD panel. Normal use of the TV should involve viewing of programs that have constantly moving or changing images. Do not leave moving images on screen for extended periods of time. Do not display the same images too frequently; if you do, subtle “ghost” images can be left on the LCD screen.
REGULATORY FEDERAL COMMUNICATIONS COMMISSION (FCC) NOTICE (U.S. ONLY) This equipment has been tested and found to comply with the limits for a Class B digital device, pursuant to Part 15 of the FCC Rules. These limits are designed to provide reasonable protection against harmful interference in a residential installation.
REGULATORY FCC Declaration of Conformity Trade Name: Philips Responsible Party: Philips Consumer Electronics North America P.O. Box 671539 Marietta , GA 30006-0026 1-888-PHILIPS (744-5477) Declaration of Conformity for Products Marked with FCC Logo, United States Only This device complies with Part 15 of the FCC Rules.
Specification - TV 37PFL5322D PICTURE/ DISPLAY Aspect ratio Picture Enhancement Widescreen Progressive Scan, 3D Comb Filter, Noise Reduction, Smart Picture (6 modes): Personal, Rich, Natural, Soft, Multimedia, Eco SOUND Output Power (RMS) Sound Enhancement Sound Mode 2x10W Mono, Stereo, Incredible Surround Smart Sound (3 modes): Personal, Speech, Movies CONVENIENCE Auto Program, Closed Captioning Full Text, Sleeptimer, Clock ON SCREEN DISPLAY LANGUAGE English, Canadian French, Spanish CONNECTIVITY Bo
PHILIPS LIMITED WARRANTY ONE (1) YEAR WARRANTY COVERAGE: PHILIPS warranty obligation is limited to the terms set forth below.