Rear-projection TV with HD Input 55PP8620 46PP8621 3135 035 20472
CONTENTS Thank you for purchasing this television set. You are now the proud owner of a Philips TV, which promises full value to you as a customer. Please read this manual carefully and thoroughly for help with installation and operation. Setup and Installation Using Smart Picture and Smart Sound . . . . . . . . . . . . .24 Product Highlights . . . . . . . . . . . . . . . . . . . . . . . . . . . . .3 Using the Sleep Timer . . . . . . . . . . . . . . . . . . . . . . . . .25 Installing the TV . . . . . .
PRODUCT HIGHLIGHTS Philips HD Pix optics system answers the demand for extreme resolution HD with cutting-edge processing and display technology, including microphosphor CRTs, hybrid projection lenses, first-surface mirrors, fine-pitched lenticular screens, and Philips wideband amplifier. Auto IntelliSense® Focus Automatically adjusts the picture convergence at the push of a key.
INSTALLING THE TV 1 The major benefit of this projection television is its large viewing screen. To see the large screen at its best, test various locations in the room to find the optimal spot for viewing. Be sure to allow a minimum of 15 cm of space around the TV. To avoid cabinet warping, cabinet color changes, and increased chance of set failure, do not place the TV where temperatures can become excessively hot—for example, in direct sunlight or near a heating appliance.
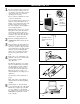
USING THE TV KEYS VOLUME A A - + CHANNEL ? > Intelli Sense MENU VOLUME A - CHANNEL A + ? > Intelli Sense MENU MAINS POWER KEY STANDBY Switches the mains power on or off. Switches the TV on or activates standby mode. REMOTE SENSOR Receives infrared commands to activate controls when the remote-control handset is aimed at it and remote keys are pushed. IntelliSense - +A / MENU VOLUME A CHANNEL %fi The fi key selects channels in descending order.
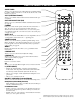
USING THE REMOTE CONTROL KEYS SLEEP TIMER Allows you to select a time period after which the set will automatically switch to standby mode. Choose 15, 30, 45, 60, 90, 120, 180, or 240 minutes. See page 25. A/CH (Alternate Channel) Allows you to alternate between the last viewed channel and the present channel. PICTURE-IN-PICTURE (PIP) Allows you to access the Picture-in-Picture and Dual-window features. See page 26. FORMAT Each press selects another picture format.
USING THE REMOTE CONTROL KEYS STANDBY • Switches the set off temporarily to standby mode. (The red light indicator lights up when the set is in standby mode.) • To switch the set on from standby mode, press the Standby, Channel +/–, or Digit (0–9) keys. FREEZE Allows you to freeze the main picture when PIP is off. SMART PICTURE Allows you to select from four predefined optimal settings—Rich, Natural, Soft, and Multimedia—and a Personal setting based on choices you make through the onscreen Picture menu.
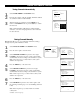
USING THE MENUS : OVERVIEW 1 2 Press the MENU key to display/cancel the main menu. Use the cursor in the up/down directions to select a menu item. Note : Sometimes not all the menu items are visible on the screen; press the cursor up/down until you can see the item you desire. 3 4 5 Use the cursor in the left/right directions to display the menu and adjust the settings. Return Select menu item Press the MENU key to return. Switch menu off Press the m key to switch the menu off.
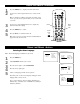
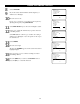
USING THE MENUS : INSTALL Tuning Channels Automatically INSTALL 1 2 3 • LANGUAGE • AUTO STORE • SEARCH • MANUAL STORE • SORT • CHANNEL EDIT • Select AUTO STORE in the INSTALL menu. Press the cursor right to start the searching. All the TV channels are searched for and stored automatically. When the tuning is completed, press the MENU key to return to the INSTALL menu or press the m key to switch the menu off. INSTALL LANGUAGE • AUTO STORE • SEARCHING • MANUAL STORE PLEASE WAIT CHAN.
USING THE MENUS : INSTALL 8 9 10 Select CHANNEL. 11 12 Select FINE TUNE and press the cursor left/right to adjust. Key in the desired channel number with the digit keys or with the cursor left/right. •• Press the cursor down. In case of poor reception, you can improve the reception by adjusting the frequency using FINE TUNE. In rare cases, certain TV channels may reproduce distorted or unstable pictures.
USING THE MENUS : INSTALL Sorting Channels According to your preference, you can change the order of the stored TV channels. 4 5 6 7 Select SORT in the INSTALL menu. INSTALL • • • • • • Press the cursor right to enter the menu. G G 1 2 3 Key in the channel number in the FROM column you want to swap from. Use the digit keys or the cursor left/right. Press the cursor down and select TO.
USING THE MENUS : INSTALL Editing Channels This feature allows you to edit or skip channels from the channel list that have bad or weak signals or channels that you do not watch often. Note : Once a channel is skipped, you cannot select it with the CH – or + key. You can only access the channel with the digit keys. Select CHANNEL EDIT in the INSTALL menu. INSTALL F 3 4 5 6 •‰ 7 INSTALL • • • • G G Select the channel you want to skip with the cursor up/down.
USING THE MENUS : INSTALL Naming Channels It is possible to assign a name to a TV channel. This feature allows you to enter a name or modify an existing name of a channel, including peripherals. Note : Even when you have selected another language in the LANGUAGE menu, only the English language character set is offered to enter names to the TV channels stored. 6 Press the MENU key to store the named channel. INSTALL • • • • G G Select NAME in the INSTALL menu.
USING THE MENUS : PICTURE Accessing the Menu 1 2 3 4 5 6 Press the MENU key to display the main menu. Select PICTURE. Press the cursor right to access the PICTURE submenu. Use the cursor in the up/down directions to select an item. Select menu item Return Use the cursor in the left/right directions to make adjustments or settings. Switch menu off Press the MENU key to return or press the m key to switch the menu off.
USING THE MENUS : PICTURE Using Auto IntelliSense® • • • • PICTURE BRIGHTNESS COLOUR CONTRAST SHARPNESS COLOUR TEMP • • • •• G G G G PICTURE SOUND FEATURES INSTALL EDIT F G Your projection TV has three color projection tubes : one for red, one for green, and one for blue. When mixed in proper proportion, the beams of light coming from the tubes can produce any color. To create a clear picture, however, these color beams must be precisely aligned. This alignment is called convergence.
USING THE MENUS : PICTURE Using Manual Converge : Converge Red/Blue Using the Auto IntelliSense® feature, you can automatically adjust convergence in 20 seconds or less (see the previous page). Also, if you desire, you can use the Manual Converge controls to make additional convergence adjustments to suit your personal preferences or to further fine-tune the picture. Note : Allow the TV to warm up for 20 minutes before adjusting convergence.
USING THE MENUS : PICTURE Using Manual Converge : Multipoint Red/Blue The Multipoint Red/Blue convergence controls allow you to adjust picture convergence at specific points on the TV screen. Note : Allow the TV to warm up for 20 minutes before adjusting convergence. Adjust Converge Red or Converge Blue before using the Multipoint Red/Blue controls. See the previous page.
USING THE MENUS : SOUND Accessing the Menu 1 2 3 4 5 6 Press the MENU key to display the main menu. Select SOUND with the cursor down. Press the cursor right to access the SOUND submenu. Return Use the cursor in the up/down directions to select an item. Use the cursor in the left/right directions to make adjustments or settings. Select menu item Switch menu off Press the MENU key to return or press the m key to switch the menu off.
USING THE MENUS : FEATURES Accessing the Menu 1 2 3 4 5 6 Press the MENU key to display the main menu. Select FEATURES with the cursor down. Press the cursor right to access the FEATURES submenu. Use the cursor in the up/down directions to select an item. Return Select menu item Use the cursor in the left/right directions to make settings. Switch menu off Press the MENU key to return or press the m key to switch the menu off.
USING THE MENUS : FEATURES Setting Start Time G Press the cursor right to enter the START TIME mode. • ‰ --:-- G G --:-- G G • ‰ ‰ ‰ 12:30 16:00 G • • • ‰ ‰ ‰ 12:30 13:30 18:00 • Select STOP TIME with the cursor down. Press the cursor right to enter the STOP TIME mode. Key in the time you want the programme to be switched off.
USING THE MENUS : FEATURES Activating the Child Lock The Child Lock feature allows you to lock channels to prevent children from watching certain programmes. Entering the Access Code • • • • • TIMER CHILD LOCK PIP FORMAT ACTIVE CTRL EDIT Key in access code 0711 a second time. The message CORRECT will appear and make the Child Lock menu accessible.
USING THE MENUS : FEATURES The TV’s Screen Format options allow you flexibility in viewing video sources. Select a screen format using the v or cursor up/down keys or the onscreen menu. To use the onscreen menu : 1 2 Select FORMAT in the FEATURES menu. Press the cursor right repeatedly to cycle through the different screen formats and select your desired format. The options for AV1, CVI, AV2, and AV3 are : • 4:3 shows the picture in conventional picture size. Black bars appear on the left and right sides.
USING PROGRAM LIST The Program List feature allows you to navigate a list of installed channels, receive a quick overview of those available, and activate the channel you desire. PROGRAM LIST 1 2 Press the PROGRAM LIST b key. 3 4 Cursor right to activate the channel you have selected. • Cursor down to cycle through the list of installed channels and highlight the channel number you want to activate. The appearance of lock symbol means that a channel is blocked by the Child Lock feature. See page 21.
USING SMART PICTURE AND SMART SOUND The Smart Picture feature offers you a choice of five picture settings : Personal, Rich, Natural, Soft, and Multimedia. Smart Sound offers you a choice of four sound settings : Personal, Voice, Music, and Theatre. Press the SMART ` Picture or SMART ± Sound key on the remote control repeatedly to cycle through the settings and select your desired mode.
USING THE SLEEP TIMER Have you ever fallen asleep in front of the TV? Using the Sleep Timer, you can program your TV to turn off while you sleep. This feature allows you to set your TV to turn off within a certain amount of time : 15, 30, 45, 60, 90, 120, 180, or 240 minutes. Press the Sleep Timer key on the remote control. The Sleep Timer onscreen display will appear on screen.
USING PICTURE-IN-PICTURE (PIP) The Picture-in-Picture (PIP) feature allows you to call up a subscreen within your main screen to watch two channels or a channel and a peripheral at the same time. The Dual-window feature allows you to divide the main screen into two subscreens so that two channels or a channel and an external source can be watched simultaneously. 1 2 3 4 Press the n key on the remote control to switch PIP on.
USING TELETEXT (IF PROVIDED) Many TV channels broadcast information via teletext. Each channel that broadcasts teletext transmits a page with information on how to use its teletext system. Look for the teletext page with the main index (usually p. 100). Depending on the TV channel, teletext is transmitted in different systems. The colours used in the options line correspond with the colour keys of your remote control.
USING TELETEXT (IF PROVIDED) Quickly Running Through the Teletext Pages Press the cursor up/down or the CH +/– keys to run through the previous or the following pages. Selecting the Index Teletext Page Press the m key to return to the main index (usually p. 100). Selecting Subpages When a selected teletext page consists of different subpages, one of the subpages appears on the screen. Cursor to select pages Arrows in front of the page number indicate that other subpages are available.
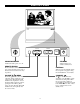
CONNECTING PERIPHERAL EQUIPMENT You can connect a wide range of video and audio equipment to your TV in various ways. This page and the next one provide an overview of signal compatibilities and the types of equipment you can connect to the sockets. Connection examples follow on subsequent pages. As necessary, also refer to the handbook for peripheral equipment. REAR OF TV Overview : Standard Inputs/Outputs 1 ANTENNA IN 75Ω socket—compatible with the broadcast standard in your area.
CONNECTING PERIPHERAL EQUIPMENT The AV4 and AV5 sockets allow you to connect digital equipment with 1080i/480p (60Hz) or 576p (50Hz) signal output.
CONNECTING PERIPHERAL EQUIPMENT Video Recorder : Playback 1 2 3 Connect the RF cable to the RF socket on your video recorder. ANTENNA IN 75Ω Connect another RF cable from the output of your video recorder to the ANTENNA IN 75Ω socket on your TV.
CONNECTING PERIPHERAL EQUIPMENT Video Recorder : Recording To record S-VHS quality, connect an S-VHS peripheral directly to the video recorder. Recording a TV Programme 1 2 Select the channel number on your video recorder. Set your video recorder to record. See the handbook for your video recorder. Switching channel numbers on your TV does not disturb recording.
CONNECTING PERIPHERAL EQUIPMENT Video Recorder and Other A/V Peripherals 1 2 Connect the RF cable to the RF socket on your A/V peripheral equipment. To obtain better picture quality, also connect the Video and Audio left and Audio right (only for stereo equipment) cables to the VIDEO and AUDIO L (mono) and AUDIO R input of the INPUT-AV 2 sockets. Note : In case of mono equipment, only the left loudspeaker reproduces sound.
CONNECTING PERIPHERAL EQUIPMENT S-Video Equipment Note : Progressive-scan DVD players can be connected to the AV4 or AV5 inputs only. ANTENNA IN 75Ω AMP SWITCH EXT 1 2 INT AV5-RGB, 480p/1080i-60Hz, 576p-50Hz _ + Connect an S-VIDEO cable to the INPUT-AV 2 S-VIDEO input.
CONNECTING PERIPHERAL EQUIPMENT Camera and Camcorder SIDE OF TV S-VIDEO 1 Connect your camera or camcorder to sockets at the side of your TV. 1 Connect the equipment to the VIDEO or S-VIDEO socket. Note : S-VHS quality with an S-VHS camcorder is obtained by connecting an S-VIDEO cable with the S-VIDEO socket instead of making a connection to the VIDEO socket. 2 Connect the equipment to the AUDIO L socket for mono or both the AUDIO L and R for stereo.
CONNECTING PERIPHERAL EQUIPMENT Additional Audio Connections : Surround Sound Your TV has extra sockets that allow you to connect to an external audio amplifier system and powered subwoofer. This connection will provide a surround-sound experience similar to a movie theatre or concert hall.
CONNECTING PERIPHERAL EQUIPMENT Setting the AV4 and AV5 Color Space AV5 The term colour space refers to how colours are defined and appear on your TV. When making connections to the AV4 or AV5 sockets, you will need to be sure the TV’s color space is set to match the output of the peripheral you have connected.
SELECTING CONNECTED EQUIPMENT Equipment Connected with an Aerial Cable Only Select the channel number under which you have stored the test signal with the digit keys. Equipment Connected to the back or to the side of the TV (AV3) Press the AV key repeatedly to select AV1, CVI, AV2, AV3, AV4, or AV5, according to where you connected your equipment at the back or the side of your TV.
CARE, CLEANING, AND TIPS WARNING Concerning Stationary Images on the TV Screen : Do not leave stationary or “letterbox” images on screen for extended periods of time.This can cause uneven picture-tube aging. Normal use of the TV should involve the showing of pictures that contain constantly moving and changing images that fill the screen.
BEFORE CALLING SERVICE Symptom What to do TV remote control does not work • • • • No power • Check that the TV’s power cord is plugged into the mains socket. If there is still no power, disconnect the plug. Wait for 60 seconds and reinsert the plug and then switch on the TV again. • See if the outlet is controlled by a wall switch. • If you are using an AC power strip, be sure the fuse on the power strip is not blown.
INDEX a active control, 7, 22 automatic tuning of channels, 9 b bilingual broadcast (I-II key), 7 c camcorder, 35 child lock, 21 n naming channels, 13 p picture adjustments, 14 picture-in-picture (pip), 26 pip position, 26 r recording, 32–33 s screen format, 22 sleeptimer, 25 smart picture and smart sound, 24 sorting channels, 11 sound adjustments, 18 stereo (I-II key), 7 storing TV channels, 9–10 S-VHS, 32, 35 Switching the TV on, 4 d dolby* virtual, 6 dual window, 26 DVD, 33–34 dynamic cont
SPECIFICATIONS Product Type Rear-projection TV with HD Input Connectivity • Rear : MONITOR OUT—CVBS and audio L/R INPUT-AV 1—CVBS, S-Video, and audio L/R Component video input (CVI)—YPbPr and audio L/R INPUT-AV 2—CVBS, S-Video, and audio L/R AV 4—YPbPr (or RGB+HV) accepting 480p/1080i-60Hz (EIA/CEA-770.2(&3)-C) and 576p-50Hz (ITU-R BT.1358); and audio L/R AV 5—RGB (or YPbPr with adaptor) accepting 480p/1080i-60Hz (EIA/CEA-770.2(&3)-C) and 576p-50Hz (ITU-R BT.
INTERNATIONAL GUARANTEE CONDITIONS This product is guaranteed by Philips for a period of one year after the date of purchase against defects due to faulty workmanship or materials.The guarantee covers both parts and labour. Service under guarantee is only provided upon presentation of reasonable evidence (e.g., completed guarantee card or purchase receipts) that the date of the claim is within the guarantee period.
CONSUMER INFORMATION CENTRES WESTERN EUROPE AUSTRIA Philips Kunden Information Triesterstrasze 64 A-1100 Wien Phone (01) 0660/6201 Fax (01) 60101 1312 BELGIUM Philips Consumer Products Léon Grosjeanlaan 2 B-1140 Brussel Phone (02) 702 03 03 Fax (02) 702 02 60 GERMANY Philips Infocenter Consumer Electronics Alexanderstraße 1 D-20099 Hamburg Phone (0180) 535 6767 Fax (040) 2852 2310 Datex J*32400# DENMARK Philips Konsument Elektronik A/S Philips Kundecenter Prags Boulevard 80 DK-2300 København. S.
CONSUMER INFORMATION CENTRES UNITED KINGDOM Philips Consumer Helpdesk P.O. Box 298 420 London Road Croydon-Surrey CR9 3QR Phone (0181) 665 6350 Fax (0181) 6894312 EASTERN EUROPE CZECH REPUBLIC Philips Service V Mezihorí 2 180 00 Prage Phone (02) 6831581 Fax (02) 66310852 HUNGARY Philips Markaszerviz Kinizsi U 30-36 Budapest 1092 Phone (01) 2164428 Fax (01) 2187885 POLAND Philips Polska CE UL. Marszalkowska 45/49 00-648 Warszawa Phone (02) 6286070 Fax (02) 6288228 RUSSIA Philips Representation Office UI.
CONSUMER INFORMATION CENTRES VENEZUELA Industrias Venezolanas Philips S.A. Apartado Postal 1167 Caracas 1010-A Phone (02) 2377575 Fax (02) 2376420 NORTH AMERICA CANADA Consumer Service Division 4977 Levy Street Ville St. Laurent Quebec H4R2N9 Phone (514) 9560120 Fax (514) 9560828 USA Philips Consumer Electronics P.O.
CONSUMER INFORMATION CENTRES JAPAN Philips Consumer Electronics 1-11-9, Ebisuminami Shibuya-Ku Tokyo 150 Phone (03) 3719 2235 Fax (03) 3715 9992 TAIWAN Philips Taiwan Ltd. Consumer Products Division 4F-1, 5, Lane 768, Pateh Rd, Sec 4 P.O. Box 22978 Taipei Phone (02) 7882856 Fax (02) 7882851 THAILAND Philips Electronics (Thailand) Ltd. Philips Service Centre 209/2 Sanpavut Road Bangna Bangkok 10260 Phone (02) 3980141/3980790 Fax (02) 3983319 KOREA Philips Korea Ltd. - Philips House C.P.O.