User Manual SET-UP AND BASIC GUIDE HDTV 51PP9910 55PP9910 Thank you for choosing Philips. Need help fast? Read your User Manual first for quick tips that make using your Philips product more enjoyable. If you have read your instructions and still need assistance you may access our online help at www.p4c.philips.com or call 1-800-531-0039 3/24/04 while with your product.
PANEL INDEX SUBJECT Panel # 1-2-3 HDTV 1 Getting Connected . . . . . . . . .1 2 Basic Use . . . . . . . . . . . . . . . . .5 3 Basic Installation . . . . . . . . . .10 HDTV Boot Camp Analog versus Digital . . . . . . . .13 Connections . . . . . . . . . . . .14-15 Rear Jack Panel . . . . . . . . . . . . .16 Connecting Your Device AV1 . . . . . . . . . . . . . . . . . . . . .17 AV2 . . . . . . . . . . . . . . . . . . . . .18 SIDE . . . . . . . . . . . . . . . . . . . . .19 AV3 . . . . . . . . . . . . . . .
Return your Warranty Registration Card today to ensure you receive all the benefits you’re entitled to. TION Congratulations on your purchase, and welcome to the N ! “family!” To get the most from your PHILIPS product, you rry must return your Warranty Registration Card within 10 u H A I T REG RA DED W YS T EE IS 3 days. So please mail it to us right now! HI N 10 D Once your PHILIPS purchase is registered, you’re eligible to receive all the privileges of owning a PHILIPS product.
IMPORTANT SAFETY INSTRUCTIONS Read before operating equipment 1. 2. 3. 4. 5. 6. 7. 8. 9. 10. 11. 12. 13. 14. 15. 16. Read these instructions. Keep these instructions. Heed all warnings. Follow all instructions. Do not use this apparatus near water. Clean only with a dry cloth. Do not block any of the ventilation openings. Install in accordance with the manufacturers instructions.
1 1-2-3 HDTV - 1 Getting Connected elcome to HDTV. You are about to experience the latest improvement in TV programming since the inception of color from black and white. To begin, you will need to select one of the following connections. Depending on the type of signal source you have. If you are connecting a cable or antenna directly from the wall to your TV, select connection A. If you are connecting a cable box with RF (coaxial) cable output to your TV, select connection B.
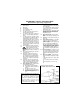
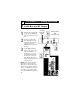
2 B 1-2-3 HDTV - 1 Getting Connected Cable Box with RF Output 1 2 Connect the incoming cable TV signal to the CABLE IN jack on the back of the cable box. 3 Set the Output Channel switch on the back of the cable box to CH 3 or 4 (whichever is correct for your cable box), then tune the TV to the corresponding channel. Once tuned, change channels at the cable box, not the TV.
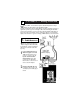
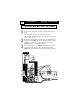
3 C 1-2-3 HDTV - 1 Getting Connected Analog Cable Box with AV Output 1 Connect the incoming cable TV signal to a signal splitter (not supplied). 2 3 Connect a coaxial cable to a connector on the signal splitter and to the CABLE jack on the TV and connect a coaxial cable to a connector on the signal splitter and to the The signal splitter enables you to avoid having to use the TO TV jack on the back of the cable box. This jack will not supply stereo sound to the TV.
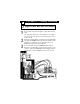
4 D 1-2-3 HDTV - 1 Getting Connected Digital Cable Box with AV Output 1 Connect the incoming cable TV signal to a signal splitter (not supplied). 2 3 Connect a coaxial cable to a connector on the signal splitter and to the CABLE jack on the TV and connect a coaxial cable to a connector on the signal splitter and to the The signal splitter enables you to avoid having to use the TO TV jack on the back of the cable box. This jack will not supply stereo sound to the TV.
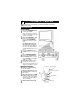
5 1-2-3 HDTV - 2 Basic Use ow that your set is connected, take a few minutes to familiarize yourself with some basic controls. N TV and Remote TV BUTTONS 1 2 3 4 5 Press the POWER button to turn the TV ON. Note: You can also press any button on the front of the TV to turn the TV ON. Press the VOLUME + button to increase the sound level, or the VOLUME – button to lower the sound level. Pressing both buttons at the same time will display the on-screen menu.
6 1-2-3 HDTV - 2 Basic Use REMOTE CONTROL BUTTON DESCRIPTIONS AV Buttons Press to access the AV Source menu. Then use Cursor Buttons to select the different signal sources connected to the TV: Antenna, Cable AV1, AV2, AV3, AV4, AV5, Side. MUTE Button Press to turn the TV sound off. To restore the sound to its previous level, press the button again. PIP buttons: PIP, POS, SWAP, FREEZE Press to operate the Picture-in-Picture (PIP) features.
7 1-2-3 HDTV - 2 Basic Use REMOTE CONTROL BUTTON DESCRIPTIONS POWER Button Press to turn the TV On or Off. Please note that due to the nature of DTV, the set will take longer to fully power-up than you are used to. FORMAT Button Press to select a picture format mode for a video source connected to the ANTENNA/CABLE or AV input. Each press of the button selects a different mode: Native (16:9), 4:3, Panoramic, Zoom. TIMER Button Press to access the TIMER menu.
8 1-2-3 HDTV - 2 Basic Use HOW TO USE THE ON-SCREEN MENU menu is simply a list of options. You can adjust or set your TV’s onscreen menu options by pressing buttons on the remote control. The following steps will familiarize you with how to use the remote control with the onscreen menu. A 1 2 Press the MENU button to bring the menu to the screen. Press the CURSORDOWN or UP button to highlight a menu option. Press the CURSOR RING RIGHT to enter the submenu for the option.
1-2-3 HDTV - 2 Basic Use 9 COMMON INFORMATION AND CHANNEL SCREEN our Philips DTV can display chanChannel nel information in one of two ways. The amount of information displayed in each will depend on the Small Banner Analog whether the channel is digital or analog, the broadcaster, and your preference. You can select a large or small channel banner. Channel Type he banner can only display the Channel and Name program name, time and a brief description if the broadcaster is sending the information.
10 1-2-3 HDTV - 3 Basic Installation ow that you are familiar with the basic operation of your TV, follow the next steps to correctly install the correct menu language, tuner mode, and Channel N list. LANGUAGE he menu LANGUAGE control enables you to set the TV’s onscreen menu and onscreen displays to be shown in English, French, or Spanish. Follow the steps in this section to set the control. T 1 2 Press the MENU button. The onscreen menu appears.
11 1-2-3 HDTV - 3 Basic Installation TUNER MODE CONTROL et the TUNER MODE control according to the type of signal you have connected to the TV— ANTENNA or CABLE. S 1 Press the MENU button. The onscreen menu appears. Press the CURSOR DOWN button repeatedly until INSTALL is highlighted. 2 Press the CURSOR RIGHT button to enter the INSTALL submenu. Then press the CURSOR DOWN button until TUNER MODE is highlighted. 3 Press the CURSOR RIGHT button to highlight the TUNER MODE options list.
12 1-2-3 HDTV - 3 Basic Installation AUTO PROGRAM he AUTO PROGRAM feature will scan for channels with active broadcast signals and store those channels in the TV’s memory. It will tune up to 69 analog and 69 digital channels for antenna, and up to 135 analog and 135 digital channels for cable. First it will search and store all analog channels, then search and store digital channels. After you run AUTO PROGRAM, you can use the CH(annel) +/– buttons to quickly and easily select stations.
HDTV BOOT CAMP 13 Analog Digital Channels Whether you use a high-tech, multifunction remote control or a dial, analog channels are what we’ve been watching for many years. What you see is what you get. Channels With Digital TV, each channel can have up to 999 subchannels. Broadcasters can use these to send a variety of information. Subchannels are represented in this format:10.2. In this example “10” is the major channel and “2” is the subchannel. You may also see this written as 10-2.
14 HDTV BOOT CAMP Connections and Jacks This page contains descriptions and illustrations of jacks, cables, and connectors you might use in making connections. The cables and connectors are not supplied with your TV, but you can purchase them at your electronics dealer. Or, you can order them by calling our Customer Care Center at 1-800-531-0039. HDMI Input Jack Cable used: HDMI This jack works with HDMI (High Definition Multimedia Interface) digital signals.
15 HDTV BOOT CAMP Connections and Jacks Tuner (RF) Input Jack Cables used: RF coaxial cable (75Ω) Antenna RF Jack Cable Used: RF Coaxial (75Ω) Allows you to connect an antenna, cable TV, or components having RF outputs to the antenna input on the TV. TUNER Signal Splitter Cables Used: RF Coaxial (75Ω) Signal Splitter Allows you to route an antenna or cable TV signal to two inputs.
16 HDTV BOOT CAMP Connections Antenna Connect an antenna to this jack. The TV can receive Digital and Analog broadcast signals. Cable Connect the Coaxial cable to this jack. The TV can receive Digital and Analog cable signals. AV5 This includes an HDMI jack to connect an HDMI device. You can also use a DVI to HDMI converter along with the left/right audio jacks to connect a DVI device.. Digital Audio Out Connect a digital audio device to this Jack.
17 CONNECTING YOUR DEVICES AV1 ANALOG se AVI for any device which uses a composite video or S-Video connec- U tion. Optimized for: VCR Other Options: Cable Box, DVD, etc... Refer to the directions-for-use manual for your device for further information on connections. 1 Connect the VIDEO OUT jack or S-Video jack on the rear of the device to the INPUT AV1 VIDEO or S-VIDEO jack on the rear of the TV.
18 CONNECTING YOUR DEVICES AV2 ANALOG se AV2 for any device which uses a composite video or S-Video connec- U tion. Optimized for: Personal Video Recorder Other Options: VCR, DVD, etc.... Refer to the directions-for-use manual for your device for further information on connections. 1 Connect the VIDEO OUT jack or S-Video jack on the rear of the device to the INPUT AV2 VIDEO or S-VIDEO jack on the rear of the TV.
19 CONNECTING YOUR DEVICES Side AV ANALOG se Side AV for any device which uses a composite video or S-Video connec- U tion. Optimized for: Game Console Other Options: VCR, Cable Box, Camcorder, etc... Refer to the directions-for-use manual for your device for further information on connections. 1 Connect the S-VIDEO or VIDEO OUT jack on the rear of the device to the S-VIDEO or VIDEO jack on the side panel of the TV.
20 CONNECTING YOUR DEVICES AV3 ANALOG/DIGITAL se AV3 to connect any device which uses component video cables. This input can process standard, enhanced, and high definition signals. Refer to the directions-for-use manual for your device. for further information on connections. Optimized for: Set-top Box Other options: DVD, Progressive scan DVD, etc... U 1 Connect the YPbPr or RGB(component) VIDEO OUT jacks from the device to the AV 3 YPbPr (component video) jacks on the rear of the TV.
21 CONNECTING YOUR DEVICES AV4 ANALOG/DIGITAL se AV4 to connect any device which uses component video cables. This input can process standard, enhanced, and high definition signals. Refer to the directions-for-use manual for your device. for further information on connections. Optimized for: DVD PLAYER Other options: HD Set-Top Box Progressive scan DVD,etc... U 1 Connect the YPbPr (component) VIDEO OUT jacks from the device to the AV 4 YPbPr (component video) jacks on the rear of the TV.
22 CONNECTING YOUR DEVICES AV5 DIGITAL o connect an HDMI device or a DVI device with a converter use AV5. Refer to the directions-for-use manual for your HDMI device for further information on connections. Optimized for: HD Set-Top box Other options: Digital DVD. T 1 Connect the HDMI OUT jack from the device to the AV 5 HDMI jack on the rear of the TV. 2 Press the AV button on the remote control to open the AV Source menu.
23 CONNECTING YOUR DEVICES AUDIO SYSTEM ANALOG/DIGITAL ou can use your TV’s AUDIO OUTPUT jacks to connect to an external audio hi-fi system. Follow the simple steps below. Y Digital Audio 1 Connect the DIGITAL AUDIO OUT COAX (or SPDIF) jack on the rear of the TV to the DIGITAL INPUT (coax) jack on the rear of the hi-fi system. Analog Audio 1 Connect the L(eft) and R(ight) ANALOG AUDIO OUT jacks on the rear of the TV to the L(eft) and R(ight) AUX/TV INPUT jacks on the rear of the hi-fi system.
24 TROUBLESHOOTING Check This List of Symptoms and Possible Solutions Before Requesting Service You may be able to solve the problem yourself. Charges for TV installation and adjustment of customer controls are not covered under your warranty. If you need to call a customer service representative, please know the model number and serial number of your product before you call. This information is displayed on the back of the product.
25 TROUBLESHOOTING, CONTINUED SD) based on the connection to the TV you have made. You cannot tune to a particular channel • Use the number buttons on the remote instead of the CH +/– buttons. • If necessary, select the Tuner Mode and run Auto Program to store channels to the set’s memory. • Make sure DSURF is not active. You see scrolling images • Check to ensure that you have made connections correctly.
26 C OMPATIBILITY INFORMATION FOR HD INPUTS our set’s HD inputs (HD INPUT-AV 3, HD INPUT-AV 4 and HD INPUT-AV 5) are designed to accept high-definition signal standards 480p, 480i, 720p and 1080i as specified by the Electronic Industries Association. Output standards may vary by manufacturer. Refer to the directions-for-use manual for the digital source equipment before connecting.
27 GLOSSARY Closed Captioning • The broadcast standard feature that allows you to read the voice content of television programs on the TV screen. Designed to help the hearing impaired, Closed Captioning uses onscreen text boxes to show dialogue and conversations while a TV program is in progress. Coaxial Cable • A single solid wire normally matched with a metal plug (Ftype) end connector that screws (or pushes) directly onto a 75-ohm input found on the television or VCR.
28 GLOSSARY ning technique that doubles the number of picture lines, eliminating the flicker and providing a jitter-free picture. PTV • Projection Television. (Rearand/or front-projection design systems are available.) QAM • Also known as “Cable in the clear,” QAM is an unscrambled digital cable signal. RGB • Red, green, and blue signal. These are the primary colors of light that are used to produce a picture in television.
PHILIPS LIMITED WARRANTY One (1) Year Labor & One (1) Year Parts & Two (2) Years Display Repair PHILIPS CONSUMER ELECTRONICS warrants this product against defect in material or workmanship, subject to any conditions set forth as follows: PROOF OF PURCHASE: You must have proof of the date of purchase to receive warranted repair on the product. A sales receipt or other document showing the product and the date that you purchased the product as well as the authorized retail included, is considered such proof.