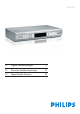
DSR 7121 NL Digitale Satellietontvanger 2 FR Décodeur Satellite Numérique 31 EN Digital Satellite Receiver 59
1 Important 60 2 2.1 2.2 2.3 2.4 2.5 Your Digital Satellite Receiver What’s in the box? What you also need Digital Satellite Receiver overview Main menu overview How to read this manual 62 62 63 63 64 64 3 3.1 3.2 3.3 3.4 Getting started Prepare the remote control Connect Insert the Smart Card Install 65 65 65 65 66 4 4.1 4.2 4.3 4.4 4.5 4.6 4.7 Using your Digital Satellite Receiver 67 Watching TV 67 Settings 68 Favorites 68 Parental Control 69 TV Display 69 Set-top Box 69 Teletext 69 5 5.1 5.
1 Important Take time to read this User Manual before using the Digital Satellite Receiver. It contains important information and notes regarding how to operate it. Disposal of your old product. Your product is designed and manufactured with high quality materials and components, which can be recycled and reused. When this crossed-out wheeled bin symbol is attached to a product or its packaging, it means the product is covered by European Directive 2002/96/EC.
The Digital Satellite Receiver has been manufactured to meet the appropriate safety standards, but the instructions below must be followed to operate it safely. These instructions must be kept for future reference. Warnings • Before connecting the Digital Satellite Receiver to the mains, check that the mains supply voltage corresponds to the voltage printed on the rear of the Digital Satellite Receiver. If the mains voltage is different, consult your dealer.
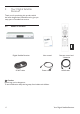
2 Your Digital Satellite Receiver Thank you for purchasing this product which has been designed and manufactured to give you many years of trouble-free service. 2.1 What’s in the box? Digital Satellite Receiver SCART cable User manual Power cord Remote control and 2 batteries HDMI cable Caution Plastic bags can be dangerous. To avoid suffocation keep the bag away from babies and children.
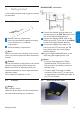
What you also need 2.3 Digital Satellite Receiver overview A B C D E Main Unit J I A BC D E FG Main unit backside A B C D H Main unit A Standby B Status led C Navigation buttons D Sensor E Smart Card door ENG L I S H 2.
2.4 Main menu overview Press the MENU key to access to the main menu. Press the OK key to open the Settings menu: 2.5 How to read this manual This User Manual contains all information you need to: • Set up all the available channels • Use correctly your Digital Satellite Receiver Each symbol below has a specific meaning. Danger Describes situations of injury or loss of life. Warning Describes actions that may cause damage to the product. Use the arrow keys / to navigate through the different options.
Getting started In this chapter, the basic steps to get you started are described. 3.1 HDMI/SCART connection Satellite Receiver Lead from satellite dish Prepare the remote control TV set Connect the Satellite antenna cable from the wall socket to the SAT IN socket at the rear of the Digital Satellite Receiver.
To insert the smart card: • Open the smart card door on the right side of the front panel. • Insert the smart card into the smart card slot as far as it will go.The end of the card will be visible from outside the slot. Warning Insert the Smart Card with the chip facing down. 3.4 Install Switch the receiver on by pressing remote control or front panel. on the The receiver is on: the LED is green. The receiver is in standby mode: the LED is red. During a software update: the LED is blinking.
Press the OK key to start scanning for channels. 4 Using your Digital Satellite Receiver Once you have connected your Digital Satellite Receiver, use the remote control to operate the basic, frequently-used functions, such as switching on and off, changing channels and altering the volume. Once the scanning is over, the list of channels which have been found will appear on screen. You can now enjoy using your Digital Satellite Receiver.
From the active channel list, select the desired channel using the arrow keys or . Press the arrow key . Current Event is highlighted. Press OK. Use the arrow key to move to Change Language and Subtitles, and press OK. Use the navigation keys to select the desired language and subtitle. Displaying information banner Every time you change channels, the information banner is displayed. To display the banner anytime, press INFO. To exit it, press EXIT.
Press the MENU key and then press OK. The menu item Favorite Lists is highlighted. Press the OK key. Two options are now available: • Existing favorite channels list. • New favorite 4.4 Parental Control Select this option to keep children from watching inappropriate channels. These channels are PIN protected.You could only watch them after entering the right PIN Code. Press the MENU key and then press OK. Highlight Parental Control. Press the OK key. Enter the PIN Code (by default 0000). Press the OK key.
5 Use more of your Digital Satellite Receiver This chapter gives a complete description of the functionalities of your Digital Satellite Receiver. 5.
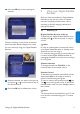
Remote control full overview M N O P Q A B C D E F G H R I J K L Remote control unit A - Switch on or to standby mode B Mute - Mute or restore the sound C VOD - Not active D HD - Not active E EXIT - Close Menu / Zapping Banner F Navigation keys - Move up/down, left/right OK: confirm the selection G Page up / down - Not active H Not active I Channel up / down - Select the next or previous channel J Alphanumeric keypad K Fav key - Not active L Contextual keys - Not active M MENU - Open menu N INFO - Di
5.3 Favorites Press the MENU key and then press OK. The menu item Favorite Lists is highlighted by default. Press the OK key. Two options are now available: • Existing favorite channels list. • New favorite. Note At the first use or if you did not create any favorite list, only the option New favorite will be displayed. Create a Favorite list Highlight New favorite and then press OK to create a new Favorite List. A virtual keyboard opens on screen. Notes • You can create up to 5 favorite lists.
Note It is not possible to indicate a channel number using the Remote control. Only the arrow keys or may be used here. 5.4 Parental Control Note By default no channel is locked. So, all channels installed on your Digital Satellite Receiver can be watched by anyone. Set Parental Lock on a channel Press the MENU key and then press OK. Highlight Parental Control. Press the OK key. Enter the PIN Code (by default 0000). Press the OK key. Parental Lock is highlighted. Press the OK key.
5.5 TV Display This option allows you to define TV settings. Press the MENU key and then the OK key. Highlight TV Display. Press the OK key. Format Two TV screen format are available: • 4:3 • 16:9 Note By default, the language selected is the one set during the first installation. 5.6 Once you have defined your TV settings, highlight Confirm with the arrow keys or and then press OK. Five options are available in this menu. On Screen Language Three languages are available.
Press the OK key. Press the OK key again to start the scanning. The same operations will have to be done as during the first installation. For more details, see chapter Install. ENG L I S H Manual Download Highlight this option with the arrow keys or , and then press OK to start the download. HD Audio This option allows to synchronize the SPDIF audio sound to the HDMI video. Highlight this option with the arrow keys or . Press the OK key to start the Audio Shift.
6 Maintenance 6.1 Cleaning For cleaning, use a soft, damp (not wet) cloth. Never use any abrasive cloth or aerosol cleaners 6.2 Replacement The Digital Satellite Receiver does not contain any user-serviceable parts. Do not attempt to open it. All maintenance work must be carried out by qualified service centers. 6.3 Disposal Your product is designed and manufactured with high quality materials and components, which can be recycled and reused.
Accessories and connections 7.1 Recorder connection Recorder 7.2 Audio connection Satellite Receiver ENG L I S H 7 Satellite Receiver Digital Audio equipment Connect the supplied scart cable to the AUX scart socket at the rear of the Digital Satellite Receiver and to the scart input EXT1 of the recorder. Warning To be able to record digital television, you must make sure the Digital Satellite Receiver is on.
8 Guarantee and service Dear Customer, Thank you for purchasing this product. For the warranty applicable to this product, we refer you to the Web site www.canaldigitaal.nl. In the event you do not have an Internet connection, please contact your local CanalDigitaal dealer.
Technical data This product is in conformity with European 95/47/EC and 2002/21/EC directives. The product complies with the following European council Directives: 2006/95/EEC and 89/336/EEC. Tuner DVB-S2 • Input Connector: IEC 169-24 Female • RF input: 950-2150 MHz, 75 Ω - 25 dBµV to –65 dBµV • Diseqc 1.
Accessories • User manual • Remote control • 2 batteries • 1 SCART cable • 1 HDMI cable • Power cord Miscellaneous • Temperature range (°C) Operating +05°C to +45°C Storage -20°C to +60°C • Mains : 230 V ac +/- 10%, 50 Hz • Weight Product #1,75 kg Including packaging #2,8 kg • Dimensions: Product 360 x 220 x 55 mm Packaging 480 x 290 x 120 mm • Color: Product Silver Software Feature Operating system • OS21 Loader • DVB SSU secured loader Conditional Access • Mediaguard Middleware • CanalDigitaal Network Pac
Frequently asked questions This chapter gives the most frequently asked questions and answers about your Digital Satellite Receiver. Some radio stations cannot be received from time to time These services are not transmitted 24 hours a day and can sometimes be unavailable. This is not a fault.
11 Glossary Analogue audio Sound that has not been turned into numbers. Analogue sound is available from the LEFT/ RIGHT AUDIO outputs. The red and white sockets send audio through two channels, the left and right. Aspect ratio Aspect ratio refers to the length to height ratio of TV screens. The ratio of a standard TV is 4:3, while the ratio of a high-definition or wide TV is 16:9. The letterbox format allows you to enjoy a picture with a wider perspective on a standard 4:3 screen.
12 Index Channel Channel lists, 68 Select a channel, 68 Use channel lists, 68 Connect basic connection, 65 Control Volume, 67 Displaying information banner, 68 ENG L I S H Favorite lists Add a channel to a Favorite list, 72 Create a Favorite list, 72 Delete a Favorite list, 72 Remove a channel from a Favorite list, 72 Rename a favorite list, 73 Information banner, 68 Insert smart card, 65 Install First installation, 66 Scanning failure, 66 Language and subtitle, 68 Morality Level, 73 Parental Control, 69
Contact information Trademarks and partner logos Trademarks are the property of Koninklijke Philips Electronics N.V. or their respective owners. DSR 7121 Serial number: www.canaldigitaal.nl Manufactured under license from Dolby Laboratories. “Dolby”, “Pro Logic”, and the double-D symbol are trademarks of Dolby Laboratories. This product incorporates copyright protection technology that is protected by U.S. patents and other intellectual property rights.