DVD VIDEO PLAYER DVP3005 User manual Thank you for choosing Philips. Need help fast? Read your User’s Manual first for quick tips that make using your Philips product more enjoyable. If you have read your instructions and still need assistance, you may access our online help at www.philips.
Important notes for users in the U.K. Mains plug This apparatus is fitted with an approved 13 Amp plug. To change a fuse in this type of plug proceed as follows: 1 2 Remove fuse cover and fuse. 3 Refit the fuse cover. Fix new fuse which should be a BS1362 5 Amp, A.S.T.A. or BSI approved type. If the fitted plug is not suitable for your jack outlets, it should be cut off and an appropriate plug fitted in its place. If the mains plug contains a fuse, this should have a value of 5 Amp.
Index Bemærk: Netafbryderen er sekundært indkoblet og ofbryder ikke strømmen fra nettet. Den indbyggede netdel er derfor tilsluttet til lysnettet så længe netstikket sidder i stikkontakten. English --------------------------------------- 6 Français Advarsel: Usynlig laserstråling ved åbning når sikkerhedsafbrydere er ude af funktion. Undgå utsættelse for stråling.
General Information Environmental Information Laser safety All unnecessary packaging has been omitted. The packaging has been made easy to separate into two materials: cardboard (box, buffer) and polyethylene (bags, protective foam sheet). This unit employs a laser. Due to possible eye injury, only a qualified service person should remove the cover or attempt to service this device. Your DVD player consists of materials which can be recycled and reused if disassembled by a specialised company.
Language Code Inupiaq Irish Íslenska Italiano Ivrit Japanese Javanese Kalaallisut Kannada Kashmiri Kazakh Kernewek Khmer Kinyarwanda Kirghiz Komi Korean Kuanyama; Kwanyama Kurdish Lao Latina Latvian Letzeburgesch; Limburgan; Limburger Lingala Lithuanian Luxembourgish; Macedonian Malagasy Magyar Malayalam Maltese Manx Maori Marathi Marshallese Moldavian Mongolian Nauru Navaho; Navajo Ndebele, North Ndebele, South Ndonga Nederlands Nepali Norsk Northern Sami North Ndebele Norwegian Nynorsk; Occitan; Provencal
Contents English Language Code .......................... 5 Introduction Supplied accessories ....................................... 8 Care and safety information .......................... 8 Connections Connecting TV ............................................ 9-10 Using SCART jack ........................................... 9 Using Composite Video jacks (CVBS) ........ 9 Using Component Video jacks (Pr Pb Y) . 10 Using an accessory RF modulator ............ 10 Connecting the power cord ...............
Contents English DVD Setup Menu Options General Setup menu ..................................... 24 Dimming player’s display panel .................. 24 OSD Language ............................................... 24 Sleep ................................................................ 24 Screen Saver - turning on/off ..................... 24 Audio Setup Menu ......................................... 25 Setting the Downmix ................................... 25 Digital Audio Setup ........................
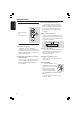
Introduction ● Avoid condensation problem – The lens may cloud over when the player is suddenly moved from cold to warm surroundings, making it impossible to play a disc. Leave the player in the warm environment until the moisture evaporates. English Supplied accessories Remote Control and two AA batteries PREVIEW MUTE ● Do not block the vents – Do not operate the DVD Player in an enclosed cabinet, allow about 10 cm (4 inches) of free space all around the player for adequate ventilation.
Connections English Connecting TV COMPONENT VIDEO IN AUDIO IN AUDIO IN S-VIDEO IN S-VIDEO IN V (Pr/Cr) U (Pb/Cb) TV IN VIDEO IN Y COMPONENT VIDEO IN S-VIDEO IN VIDEO IN V (Pr/Cr) AUDIO OUT U (Pb/Cb) VIDEO IN Y AUDIO IN S-VIDEO IN TV IN VIDEO IN 2 1 1 AUDIO OUT DIGITAL OUT VIDEO OUT AUDIO OUT DIGITAL OUT VIDEO OUT CVBS CVBS IMPORTANT! – You only need to make one video connection from the following options, depending on the capabilities of your TV system.
Connections English RF coaxial cable to TV 2 COMPONENT VIDEO IN AUDIO IN S-VIDEO IN V (Pr/Cr) Back of RF Modulator (example only) U (Pb/Cb) VIDEO IN Y COMPONENT VIDEO IN S-VIDEO IN V (Pr/Cr) AUDIO OUT INT IN U (Pb/Cb) VIDEO IN TO TV Y VIDEO IN AUDIO IN R L CH3 CH4 1 2 Antenna or Cable TV signal 1 AUDIO OUT DIGITAL OUT AUDIO OUT DIGITAL OUT VIDEO OUT VIDEO OUT CVBS IMPORTANT! – The progressive scan video quality is only possible when using Y Pb Pr and a progressive scan TV is requir
Connections English Connecting the power cord COMPONENT VIDEO IN AUDIO OUT S-VIDEO IN V (Pr/Cr) ~ AC MAINS U (Pb/Cb) VIDEO IN Y AUDIO OUT DIGITAL OUT After everything is connected properly, plug in the AC power cord to the power outlet. Never make or change any connections with the power switched on. When no disc is loaded, press STANDBY ON on the DVD Player front panel, “NO DISC” may appear on the display panel.
Connections English Optional: Connecting to an Audio System STEREO Optional: Connecting Digital AV Receiver AV Receiver AUDIO IN AUDIO IN DIGITAL DIGITAL AUDIO OUT DIGITAL OUT AUDIO OUT VIDEO OUT DIGITAL OUT VIDEO OUT CVBS CVBS Stereo system has Dolby Pro Logic or Right / Left Audio In jack 1 Select one of the video connections Receiver has a PCM, Dolby Digital, or MPEG2 decoder 1 Select one of the video connections (CVBS VIDEO IN or COMPONENT VIDEO IN) depending on the options available
Functional Overview English Front and Rear Panels T NEXT – To select next chapter or track IR Sensor STANDBY-ON B – – Point the remote control towards this sensor To switch the DVD Player to Standby mode or ON 9 STOP Disc tray – To stop playback OPEN/CLOSE / – 2; PLAY Open/Close the disc tray – To start or interrupt playback Display – PREV S Shows the current status of the DVD Player – To select previous chapter or track Mains (AC Power Cord) – Connect to a standard AC outlet Scart (TV O
Functional Overview English Remote Control POWER B RETURN / TITLE – To go back to previous menu / show title menu – DISC MENU To switch the DVD player to standby mode or ON 0-9 numerical key pad – Enters or exits the disc contents menu – Switches on or off the playback control mode (for VCD version 2.
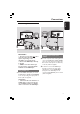
Getting Started 3 1 Step 2: Setting up the TV English Step 1: Inserting batteries into the Remote Control IMPORTANT! Make sure you have completed all the necessary connections. (See pages 9-10 “Connecting TV”). 1 Turn on the TV and set to the correct 2 video-in channel. You should see the Philips DVD background screen on the TV. 1 Open the battery compartment. 2 Insert two batteries type R06 or AA, 2 Usually these channels are between the following the indications (+-) inside the compartment.
Getting Started English Setting up Progressive Scan feature (for Progressive Scan TV only) The progressive scan display twice the number of frames per seconds than interlaced scanning (ordinary normal TV system). With nearly double the number of lines, progressive scan offers higher picture resolution and quality. IMPORTANT! Before enabling the progressive scan feature, you must ensure: 1) Your TV can accept progressive signals, a progressive scan TV is required.
To deactivate Progressive manually ● When the distorted picture still appears on the TV, it may be due to the connected TV does not accept progressive signals, and progressive is set by mistake. You must reset the unit to interlace format. 1 Turn off your TV progressive scan mode or turn on to interlaced mode (refer to your TV user manual.) 2 Press OPEN/CLOSE on the DVD player to open the disc tray. 3 Press numeric keypad ‘1’ on the remote control for few seconds.
Getting Started English Step 3: Setting language preference Setting the Audio, Subtitle and Disc menu language You can select your preferred language settings. This DVD Player will automatically switch to the language for you whenever you load a disc. You can choose your own preferred language or soundtrack from audio, subtitles and disc menu languages. If the language selected is not available on the disc, the disc’s default language will be used instead.
IMPORTANT! – If the inhibit icon (ø) appears on the TV screen when a button is pressed, it means the function is not available on the current disc or at the current time. – Depending on the DVD or VIDEO CD, some operations may be different or restricted. – Do not push on the disc tray or put any objects other than disc on the disc tray. Doing so may cause the disc player malfunction.
Disc Operations English Basic playback controls Unless otherwise stated, all operations described are based on Remote Control use. 1 Pausing playback During playback, press PAUSEÅ. ➜ Playback will pause and sound will be muted. 2 To resume normal playback, press PLAY B. Selecting track/chapter 1 Press T / S briefly during playback to go to the next chapter/track or to return to the beginning of the current chapter/track respectively.
Disc Operations Using the Disc Menu Depending on the disc, a menu may appear on the TV screen once you load in the disc. To select a playback feature or item ● Use 1 2 3 4 keys or numeric keypad (0-9) on the remote, then press OK to start playback. To access or remove the menu ● Press DISC MENU on the remote. Zooming in This function allows you to enlarge the picture on the TV screen and to pan through the enlarged picture.
Disc Operations English Special DVD Features Special VCD & SVCD Features Playing a Title Playback Control (PBC) 1 Press DISC MENU. ➜ The disc menu appears on the TV screen. 2 Use 341 2 keys or numeric keypad (0-9) to select a play option. 3 Press OK key to confirm. Camera Angle ● Press ANGLE repeatedly to select different desired angle. Changing the Audio Language For DVD ● Press AUDIO repeatedly to select different audio languages.
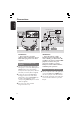
Playing MP3/JPEG (Kodak) Picture CD IMPORTANT! You have to turn on your TV and set to the correct Video In channel. (See page 15 “Setting up the TV”). ● Load a Picture disc (Kodak Picture CD, JPEG). ➜ For Kodak disc, the slide show will begin. ➜ For JPEG disc, the picture menu appears on the TV screen. Press PLAY B to start the slide-show playback. General Operation 1 Load an MP3/JPEG Picture CD disc. 2 ➜ The data disc menu appears on the TV screen.
DVD Setup Menu Options English This DVD Player setup is carried out via the TV, enabling you to customise the DVD Player to suit your particular requirements. Sleep Sleep function allows you to turn off the DVD Player automatically after a preset time. 1 In ‘GENERAL SETUP PAGE’, press 3 4 to General Setup menu highlight {SLEEP}, then press 2. 1 In disc mode, press SYSTEM MENU. 2 Press 1 2 to select ‘General Setup’ icon. 3 Press OK to confirm.
DVD Setup Menu Options Audio Setup Menu 1 In disc mode, press SYSTEM MENU. 2 Press 1 2 to select ‘Audio Setup’ icon. 3 Press OK to confirm. General Audio Video Preference - - Audio Setup Page - Downmix Digital Audio Setting the Downmix This options allows you to set the stereo analog output of your DVD Player. 1 In ‘AUDIO SETUP PAGE’, press 3 4 to highlight {DOWNMIX}, then press 2. LT/RT Select this option if your DVD Player is connected to a Dolby Pro-Logic decoder.
DVD Setup Menu Options English Video Setup Menu 1 In disc mode, press SYSTEM MENU. 2 Press 1 2 to select ‘Video Setup’ icon. 3 Press OK to confirm. General Audio Video Preference - - Video Setup Page - TY Type Setting the TV Display Set the aspect ratio of the DVD Player according to the TV you have connected. The format you select must be available on the disc. If it is not, the setting for TV display will not affect the picture during playback.
Progressive - turning on/off Brightness / Contrast In the progressive scan mode, you can enjoy the high quality picture with less flickers. It only works when you have connected the DVD player’s Y Pb Pr jacks to your TV that supports the progressive video input. Otherwise, the a distorted picture will appear on the TV. For proper progressive scan set up, see page 16. Increasing the value will brighten the picture or vice versa. Choose zero (0) for average setting.
DVD Setup Menu Options English Preference Page 1 Press Ç twice to stop playback (if any), then press SYSTEM MENU. 2 Press 1 2 to select the ‘Preference Page’ icon. 3 Press OK to confirm. General Audio Video Preference - - Preference Page - Audio Restricting playback by Parental Control Some DVDs may have a parental level assigned to the complete disc or to certain scenes on the disc. This feature lets you set a playback limitation level. The rating levels are from 1 to 8 and are country dependent.
DVD Setup Menu Options 1 In ‘PREFERENCE PAGE’, press 3 4 to highlight {PASSWORD}, then press 2 to select {CHANGE}. General Audio Video Preference Restoring to original settings Setting the DEFAULT function will reset all options and your personal settings to the factory defaults, except your password for Parental Control. English Changing the Password This feature is used for Parental Control. Enter your six-digit password when prompted on the screen. The default password is 136900.
Troubleshooting English WARNING Under no circumstances should you try to repair the system yourself, as this will invalidate the warranty. Do not open the system as there is a risk of electric shock. If a fault occurs, first check the points listed below before taking the system for repair. If you are unable to remedy a problem by following these hints, consult your dealer or Philips for help. Problem Solution No power – Check if the AC power cord is properly connected.
Problem Solution Disc can’t be played – – – – Picture freezes momentarily during playback – Check the disc for fingerprints/scratches and clean with a soft cloth wiping from centre to edge. No return to start-up screen when disc is removed – Reset the unit by switching the player off, then on again. The player does not respond to the Remote Control – Aim the Remote Control directly at the sensor on the front of the player. – Reduce the distance to the player.
Specifications English TV STANDARD (PAL/50Hz) (NTSC/60Hz) AUDIO PERFORMANCE Number of lines Playback DA Converter DVD 625 Multistandard 525 (PAL/NTSC) VIDEO PERFORMANCE DA Converter YPbPr Video Output RGB (SCART) SVCD 12 bit, 108 mHz 0.7 Vpp — 75 ohm 1Vpp — 75 ohm 0.7 Vpp — 75 ohm VIDEO FORMAT Digital Compression MPEG 2 for DVD,SVCD MPEG 1 for VCD DVD Horiz. resolution Vertical resolution 50Hz 720 pixels 576 lines 60Hz 720 pixels 480 lines VCD Horiz.
Analog: Sound that has not been turned into numbers. Analog sound varies, while digital sound has specific numerical values. These jacks send audio through two channels, the left and right. Aspect ratio: The ratio of vertical and horizontal sizes of a displayed image. The horizontal vs. vertical ratio of conventional TVs. is 4:3, and that of widescreens is 16:9. AUDIO OUT Jacks: Jacks on the back of the DVD System that send audio to another system (TV, Stereo, etc.).