Register your product and get support at www.philips.com/welcome DVP3260 DVP3264 EN FR ES DE NL DVD Video Player Lecteur de DVD Reproductor de vídeo DVD DVD-Videoplayer DVD-videospeler 1dvp3260_3264_eu_eng1.
Important notes for users in the U.K. Mains plug This apparatus is fitted with an approved 13 Amp plug. To change a fuse in this type of plug proceed as follows: Italia DICHIARAZIONE DI CONFORMITA’ Si dichiara che l’apparecchio DVP3260, DVP3264, Philips risponde alle prescrizioni dell’art. 2 comma 1 del D.M. 28 Agosto 1995 n. 548. Fatto a Eindhoven 1 Remove fuse cover and fuse.
DK Advarsel: Usynlig laserstråling ved åbning når sikkerhedsafbrydere er ude af funktion. Undgå utsættelse for stråling. Bemærk: Netafbryderen er sekundært indkoblet og ofbryder ikke strømmen fra nettet. Den indbyggede netdel er derfor tilsluttet til lysnettet så længe netstikket sidder i stikkontakten. S Klass 1 laseraparat Varning! Om apparaten används på annat sätt än i denna bruksanvisning specificerats, kan användaren utsättas för osynlig laserstrålning, som överskrider gränsen för laserklass 1.
‘CONSUMERS SHOULD NOTE THAT NOT ALL HIGH DEFINITION TELEVISION SETS ARE FULLY COMPATIBLE WITH THIS PRODUCT AND MAY CAUSE ARTIFACTS TO BE DISPLAYED IN THE PICTURE. IN CASE OF 525 OR 625 PROGRESSIVE SCAN PICTURE PROBLEMS, IT IS RECOMMENDED THAT THE USER SWITCH THE CONNECTION TO THE ‘STANDARD DEFINITION’ OUTPUT. IF THERE ARE QUESTIONS REGARDING OUR TV SET COMPATIBILITY WITH THIS MODEL 525p AND 625p DVD PLAYER, PLEASE CONTACT OUR CUSTOMER SERVICE CENTER.
NOTE: Pictures shown maybe different between countries. CAUTION: WARNING LOCATION: ON THE BACKPLATE OF THE SET English ------------------------------------ 6 Français ---------------------------------- 48 Español ---------------------------------- 90 Deutsch -------------------------------- 132 Deutsch Nederlands ---------------------------- 174 Nederlands NEVER MAKE OR CHANGE CONNECTIONS WITH THE POWER SWITCHED ON. Français This unit employs a laser.
Table of contents English General General Information ........................................................................................................ 8 Setup precautions.................................................................................................................................................8 Copyright notice ...................................................................................................................................................
Using Display menu options .................................................................................................................... 23-25 Selecting title/chapter/track .....................................................................................................................23 Switching camera angles ..........................................................................................................................23 Searching by time .............................................
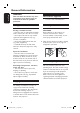
General Information English WARNING! This unit does not contain any userserviceable parts. Please leave all maintenance work to qualified personnel. Accessories supplied – 1 remote control with batteries Setup precautions Cleaning discs Finding a suitable location – Place this unit on a flat, hard and stable surface. Never place the unit on a carpet. – Never place this unit on top of other equipment that might heat it up (e.g., receiver or amplifier). – Never put anything under this unit (e.g.
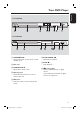
English Your DVD Player For DVP3260 8 For DVP3264 1 2 3 4 5 6 a STANDBY-ON f PLAY/PAUSE u – Turns on this unit or turns off to normal standby mode. – Starts/pauses playback. b Disc tray c OPEN/CLOSE ç – Opens/closes the disc tray. d Display panel – Show information about the current status of this unit. 7 8 g STOP Ç – Stops playback. h (USB) socket – Input for USB flash drive or digital camera. * Not all brands and models of digital cameras are supported.
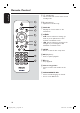
Remote Control English a 2 (Standby-On) – Turns on this unit or turns off to normal standby mode. 1 b ç (Open/Close) – Opens/closes the disc tray. 2 3 4 c DISPLAY – Displays the current status or disc information. d – 5 6 7 8 9 : Cursor buttons for moving up/ down or press up/down for a slow forward or backward search. – : Cursor buttons for moving to the left/right or press left/right for fast backward or forward search. e SETUP – Enters or exits the disc setup menu.
Remote Control (continued) English j DISC MENU – Enters or exits disc contents menu. – For VCD 2.0 and SVCD, turns on or off the playback control mode. k OK – Confirms an entry or selection. 10 l RETURN/TITLE – Returns to the previous menu or shows title menu. 11 m . / > (Previous/Next) – Skips to the previous or next title/ chapter/track. – Press and hold this button for fast backward or forward search. n (USB) – Switches to USB mode and shows the content of the USB device.
Remote Control (continued) English Using the remote control CAUTION! – Remove batteries if they are exhausted or if the remote control is not to be used for a long time. – Never mix batteries (old and new or carbon and alkaline, etc.). – Batteries contain chemical substances; they should be disposed of properly. A Open the battery compartment. B Insert two batteries type R03 or AAA, following the indications (+-) inside the compartment. C Close the cover.
TV English Basic Connections TV TV Audio (red/white cables) VIDEO OUT Pb Y Pr COMPONENT VIDEO OUT DVD TV OUT DIGITAL OUT COAXIAL AUDIO OUT Step 1: Connecting to television This connection enables you to view the video playback from this unit. You only need to choose one of the options below to make the video connection. – For a standard TV, follow option 1 or 2. – For a progressive scan TV, follow option 3.
Basic Connections (continued) English TV Video 1 Audio 2 VIDEO OUT Pb Y Pr COMPONENT VIDEO OUT TV OUT DIGITAL OUT COAXIAL AUDIO OUT Option 3: Using Component Video sockets (Y Pb Pr) You can connect this unit to a TV through the component video cables which provides superior picture quality. The progressive scan video quality is only available when using Y Pb Pr connection and a progressive scan TV is required.
AUDIO IN English Optional Connections AUDIO IN DIGITAL DIGITAL STEREO AV Receiver Audio (red/white cables) VIDEO OUT Pb Y Pr COMPONENT VIDEO OUT TV OUT DIGITAL OUT COAXIAL AUDIO OUT VIDEO OUT Pb Y Pr COMPONENT VIDEO OUT DIGITAL OUT COAXIAL AUDIO OUT Connecting to an Analogue Stereo System Connecting to a Digital AV Amplifier/Receiver You can connect this unit to a two channel stereo system (e.g. mini system, analogue receiver) in order to enjoy stereo sound output.
Getting Started English Finding the correct viewing channel A Press 2 to turn on this unit. B Turn on the TV and switch it to the correct video-in channel. You should see the blue DVD background screen. You may go to the lowest channel on your TV, then press the Channel Down button on your TVs remote control until you see the Video In channel. You may press ° button repeatedly on your TVs remote control.
Audio, Subtitle and Disc Menu language for DVD playback You can select your preferred language settings for DVD playback. If the selected language is not available on the disc, the disc’s default language is used instead. A Press Ç twice to stop playback (if any), then press SETUP. D Use keys to select a language and press OK to confirm.
Getting Started (continued) English Setting up Progressive Scan feature (for Progressive Scan TV only) The progressive scan displays twice the number of frames per second than interlaced scanning (ordinary normal TV system). With nearly double the number of lines, progressive scan offers higher picture resolution and quality. Before you start... – Ensure that you have connected this unit to a progressive scan TV using the Y Pb Pr connection (see ‘Option 3: Using Component Video sockets (Y Pb Pr)’ ).
Playable discs Region codes for DVD discs DVD discs and players are designed with regional restrictions. Before playing a disc, make sure the disc is for the same region as this unit. The region code for this unit is indicated at the rear panel. Region This unit plays: – Digital Versatile Discs (DVDs) – Video CDs (VCDs) – Super Video CDs (SVCDs) – Finalised DVD Recordable (DVD±R), DVD Rewritable (DVD±RW) – Audio Compact Discs (CDs) – MP3/ WMA discs – The file extension has to be ‘.mp3’, ‘.
Disc Operations (continued) English Notes: appears on – If the inhibit icon TV when a button is pressed, it means the function is not available on the current disc or at the current time. – Never put any objects other than discs in the disc tray. Doing so may cause the unit to malfunction. Playing a disc A Press 2 to turn on this unit. B Turn on the TV to the correct viewing channel for this unit. C Press ç to open the disc tray. D Load a disc into the disc tray and press ç.
Helpful Hints: – For video disc, playback always resumes from the point where it was last stopped even if the disc was ejected or the unit is in standby mode. To start playback from the beginning, press . while the message ‘Play from the start, press -PREV-’ appears on the TV. – Screen saver starts automatically if the disc playback is stopped or paused for about 5 minutes.
Disc Operations (continued) English Changing sound track language Playback Control (VCD/SVCD) This operation works only on DVDs with multiple sound track languages, or VCDs/ SVCDs with multiple audio channels. Playback Control (PBC) playback allows you to play VCDs/SVCDs interactively, following the menu on the display. For DVD Press AUDIO/CREATE MP3 repeatedly to select the available audio languages. For VCDs with PBC feature (version 2.
Using Display menu options This unit can display the disc playback information (for example, title or chapter number, elapsed playing time, audio/ subtitle language), a number of operations can be done without interrupting disc playback. B Use keys to view the information and press OK to access. C Use the numeric keypad 0-9 to input the number/time or use make the selection. English Disc Operations (continued) keys to D Press OK to confirm.
Disc Operations (continued) English Searching by time This option allows you to skip to a specific point in the current disc. A Move to { TT Time / CH Time / Disc Time / Track Time } in the display menu and press . Preview function (VCD/SVCD/DVD) This function allows you to preview the contents of a VCD/SVCD/DVD disc. A Move to { Preview } in the display menu and press . The preview menu appears. B Use the numeric keypad 0-9 to enter (DVD) the time where playback should start (eg. 0:34:27).
Disc Operations (continued) . Repeating a specific section (A-B) This function allows you to select the different repeat play options. A Move to { Repeat ab } in the display For DVD/VCD/SVCD B Press OK at the start point. A Move to { Repeat } in the display menu and press .
Disc Operations (continued) English Special Audio CD feature Playing a DivX® disc It is a time search option for audio CD playback. Playback skips to the time you input, within the disc or track. This unit supports the playback of DivX movies which you can copy from your computer onto a recordable disc. See ‘Setup Menu Options - { General Setup Page > DivX(R) VOD Code }’ for details. A During playback, press DISPLAY repeatedly to toggle between different input options.
Playing a JPEG photo disc (slide show) Before you start ... Turn on your TV to the correct Video In channel. See ‘Finding the correct viewing channel’ for details. Load a photo CD (Kodak Picture CD/ JPEG). The picture menu appears on the TV. For Kodak disc, the slide show begins automatically. Press u to start the slide-show playback. Preview function A During playback, press DISPLAY. 12 thumbnail pictures will be displayed on the TV. English Disc Operations (continued) B Press .
Disc Operations (continued) English Playing a MP3/ WMA disc This unit can playback most of the MP3 and WMA files recorded on a recordable disc or commercial CD. Before you start ... Turn on your TV to the correct Video In channel. See ‘Finding the correct viewing channel’ for details. A Load a MP3/WMA disc. The disc reading time may exceed 30 seconds due to the complexity of the directory/file configuration. The disc menu appears on the TV. 01:42 04:40 128kbps 001/020 \MP3 -M P3 M P3 During playback: Pr
English Disc Operations (continued) Playing music and photo files simultaneously You can create a musical slideshow playback if the disc contains both the MP3/WMA music and JPEG photo files. A Load a disc that contains both MP3/WMA and JPEG files. B Use keys to select a MP3/WMA file from the disc menu and press OK to start playback. C During MP3/WMA playback, use keys to select a JPEG file from the disc menu and press OK. Slideshow begins and continues till the end of the photo folder or album.
USB Operation English You can play or view the data files (JPEG, MP3, WMA or DivX®) in the USB flash drive. However, editing or copying the data file is not possible. D Use keys to select a desired file and press OK to start playback. For more playback information, see ‘Playing a DivX® disc’, ‘Playing a JPEG photo disc (slide show)’ or ‘Playing a MP3/WMA disc’ for details. E Press x to stop playback. F Press on the remote control to exit from the menu and switch to disc mode.
Creating audio CD to MP3 format This feature allows you to convert audio tracks from an audio CD into MP3 format. The created MP3 files are saved in your USB device. A Connect the USB flash drive directly to socket on this unit. the C During playback, press AUDIO/ CREATE MP3 on the remote control. D Read the message on the TV and confirm your action by selecting { YES } in the menu, then press OK. The Create MP3 menu appears. If the USB device is full, a warning message will be displayed.
Setup Menu Options English Accessing the setup menu General Setup Page Disc Lock You can change the settings in this unit to suit your particular requirements. OSD Language Sleep Volume Auto Standby DivX(R) VOD Code OK See ‘General Setup Page’ on this chapter. SETUP Audio Setup Page Analogue Output Digital Audio Setup Sound Mode CD Upsampling Night Mode A Press SETUP on the remote control. The setup menu appears. B Use keys to select one of the setup menu options and press OK.
General Setup Page (underlined options are the factory default settings) Disc Lock Not all discs are rated or coded by the disc maker. You can prevent play of specific discs with the disc lock function. Up to 20 discs can be locked. { Lock } – To block the playback of the current disc. Subsequent access to a locked disc requires a six-digit password. The default password is ‘136900’ (see { Preference Page - Password }). { Unlock } – All discs can be played.
Setup Menu Options (continued) English Audio Setup Page (underlined options are the factory default settings) Analogue Output This setting is only required if you have connected the audio output of this unit to a stereo device or TV using the analogue output socket. { LT/RT } – The connected device has a built-in Dolby Pro Logic decoder. It can deliver the surround sound through the two speakers. { Stereo } – The connected device can only output stereo audio through two speakers.
Audio Setup Page (underlined options are the factory default settings) Sound Mode Select the type of preset digital sound effect that can match the disc’s content or optimise the sound of the musical style you are playing. { 3D } – It provides a virtual surround sound experience through the left and right audio channels. Available options are: { Off }, { Living Room }, { Hall }, { Arena } and { Church }. { Movie Mode } – Movie sound effects.
Setup Menu Options (continued) English Video Setup Page (underlined options are the factory default settings) TV Type Select the colour system that matches the connected TV. It enables playback of a different type of disc (PAL or NTSC disc) on this unit. { PAL } – For PAL-system TV. { Multi } – For TV that is compatible with both PAL and NTSC. { NTSC } – For NTSC-system TV. TV Display The picture shape can be adjusted to fit your TV. { 4:3 Pan Scan } – For a full-height picture with the sides trimmed.
English Setup Menu Options (continued) Video Setup Page (underlined options are the factory default settings) Component Select the video output that matches the video connection between this unit and your TV. { RGB } – For scart (TV OUT) connection. { INTERLACED } – For component video (Y Pb Pr) connection. This unit provides three predefined sets of picture colour settings and one personal setting which you can define yourself. { Standard } – Original colour setting. { Vivid } – Vibrant colour setting.
Setup Menu Options (continued) English Preference Page (underlined options are the factory default settings) Audio Select the preferred audio language for DVD playback. Subtitle Select the preferred subtitle language for DVD playback. Disc Menu Select the preferred disc menu language for DVD playback. Note: If the selected audio/subtitle/disc menu language is not available on the DVD, the disc’s default language will be used instead.
Preference Page (underlined options are the factory default settings) Mp3/Jpeg Nav Mp3/Jpeg Navigator can only be set if the disc is recorded with a menu. It allows you to select different display menus for easy navigation. { Without Menu } – Display all the files contained in the MP3/ Picture disc. { With Menu } – Display the folder menu of the MP3/ Picture disc. Note: This feature is not available for USB mode. Password The password is used for Disc Lock and Parental control.
Software upgrade English Installing the latest software Philips provides software upgrades to make sure that this unit is compatible with the newest formats. To check the updates, compare the current software version of this unit with the latest software version available at the Philips website. A Press ç to open the disc tray. B Press numeric keypad ‘55’ on the remote control. C Write down the file name. D Go to www.philips.com/support to check the latest software version available for this unit.
WARNING Under no circumstances should you try to repair this unit yourself, as this invalidates the warranty. Do not open this unit as there is a risk of electric shock. English Troubleshooting If a fault occurs, first check the points listed below before taking this unit for repair. If you are unable to remedy a problem by following these hints, consult your dealer or Philips for help. Problem Solution No power. – Press STANDBY-ON on the unit to turn on the power.
Troubleshooting (continued) English Problem Solution The remote control does not function properly. – Aim the remote control directly at the sensor on the front of this unit (not towards the TV). – Remove any obstacles between this unit and the remote control. – Batteries are weak, replace the batteries. – Check the polarities of the batteries are as indicated on the remote control (± signs). The unit does not start playback. – Load a readable disc with the playback side facing inwards.
Troubleshooting (continued) Solution English Problem Picture freezes momentarily during playback. – Check the disc for fingerprint/scratches and clean with a soft cloth wiping from centre to edge. Unable to select Progressive Scan on/off. – Check that the video output of this unit is connected using the Component Video (Y Pb Pr) sockets. No sound during DivX movies playback. – The audio codec may not be supported by this unit. An DivX movie does not repeat.
Frequently Asked Questions (USB) English Why does it take so long to display the contents on my USB device? – This could be due to the large numbers of files (>500 files/folders) or size of the files (>1MB.) – There could be other non-supported files in the device that the system is trying to read/display. What if non-supported devices (e.g. USB mouse, keyboards) are plugged into the unit? – The device may cause the unit to be unstable. Remove the non-supported device and unplug the power cord.
TV STANDARD AUDIO PERFORMANCE (PAL/50Hz) (NTSC/60Hz) Number of lines 625 525 Playback Multistandard (PAL/NTSC) DA Converter DVD SVCD 24 bit, 192 kHz fs 96 kHz 4 Hz - 44 kHz fs 48 kHz 4 Hz - 22 kHz fs 48 kHz 4 Hz - 22 kHz fs 44.1kHz 4 Hz - 20 kHz fs 44.1kHz 4 Hz - 20 kHz VIDEO PERFORMANCE CD/VCD Video DAC Y Pb Pr Video Output Signal-Noise (1kHz) Dynamic range(1kHz) Crosstalk (1kHz) Distortion/noise (1kHz) MPEG MP3 12 bit, 108 MHz 0.
Glossary English Analogue audio: Sound that has not been turned into numbers. Analogue sound is available when you use the AUDIO LEFT/ RIGHT sockets. These red and white sockets send audio through two channels, the left and right. Aspect ratio: Aspect ratio refers to the length to height ratio of TV. The ratio of a standard TV is 4:3, while the ratio of a highdefinition or wide TV is 16:9. The letter box allows you to enjoy a picture with a wider perspective on a standard 4:3 screen.
Glossary (continued) English Region code: A system allowing discs to be played only in the region designated. This unit will only play discs that have compatible region codes. You can find the region code of your unit by looking at the product label. Some discs are compatible with more than one region (or ALL regions). Title: The longest section of a movie or music feature on DVD. Each title is assigned a title number, enabling you to locate the title you want.