Register your product and get support at www.philips.
2007 © Koninklijke Philips Electronics N.V. All rights reserved. Specifications are subject to change without notice. Trademarks are the property of Koninklijke Philips Electronics N.V. or their respective owners. Koninklijke Philips Electronics N.V. manufactures and sells many products targeted at consumers, which, like any electronic apparatus, in general have the ability to emit and receive electromagnetic signals.
Contents 7. Use your TV . . . . . . . . . . . . . . . . . . 28 Adjust TV settings . . . . . . . . . . . . . . . .28 Change your picture format . . . . . . . .29 1. Use Smart Mode settings. . . . . . . . . . .30 Important . . . . . . . . . . . . . . . . . . . . . 5 Use the Surf feature. . . . . . . . . . . . . . .31 2. Overview of television controls and connectors. . . . . . . . . . . . . . . . . . . . . . . . . . 7 Side controls . . . . . . . . . . . . . . . . . . . . .7 8. Use more of your TV . .
1. Important • Wall mounting of the TV should only be performed by qualified personnel. The TV must only be mounted on an appropriate wall bracket and on a wall that can safely hold the weight of the TV. Improper wall mounting can result in severe injury or damage. Do not attempt to wall mount the TV yourself. • If the TV is mounted on a swivel base or swivel arm, ensure no strain is placed on the power cord when the TV is swivelled.
• • Permanent hearing loss may occur if you use earphones or headphones at high volumes. Though high volume may sound normal over time, it can damage your hearing. To protect your hearing, limit the amount of time you use earphones or headphones at high volume. Although your TV consumes very little power when in standby, energy continues to be consumed as long as the mains remain connected and powered. When not in use for extended periods of time, switch off and disconnect the TV from the mains. 1.
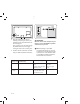
2. Overview of television controls and connectors Use the side connectors for mobile devices such as a digital camera or game console. You can also connect a pair of headphones. 2.3 2.1 Rear connectors Side controls HDMI 1 SPDIF OUT PBS SX R Y TV ANTENNA Y Pb Pr L VIDEO L L R CVI-1 2. MENU To display the on-screen menus or to exit from the on-screen menus. The CH + /- buttons can be used to navigate the menu items. The VOLUME + / - buttons can be used to select the menu items.
If necessary, refer to the Quick Start Guide for stand mounting instructions. 2.4 2.5 Install the remote control batteries Position the TV Consider the following before positioning your TV: • The ideal viewing distance for watching TV is three times its screen size. • Position the TV where light does not fall directly on the screen. 1. Slide the battery cover off the back of the remote control. • Connect your devices before you position your TV. 2. Insert the two supplied batteries.
• SIDE AV: Headphone jack, Composite video and audio, and S-Video input. • CVI 1: Component video (Y Pb Pr) with Component audio input. • CVI 2: Component video (Y Pb Pr) with Component audio input. • VGA: Video Graphics Array with audio input. • HDMI 1: High Definition Multimedia Interface input. • HDMI 2: High Definition Multimedia Interface input. • Side HDMI: High Definition Multimedia Interface input. 3.
x4 2. Align the plate/bracket to the four mounting nuts, placing the spacers (not supplied) between the plate/bracket and the mounting nuts. Using a spanner, insert the bolts through the plate/bracket and spacers, tightly securing the bolts to the mounting nuts. 3. Continue with the instructions provided with your VESA-compatible wall bracket. B WARNING: Use the correct bolts and spacers (see table) to secure the VESA-compatible wall bracket to your TV.
3. Overview of remote control keys and functions 1. POWER . To switch the TV to standby mode if it is already turned on. Or to turn on TV when it is in standby mode. 2. SOURCE To display the input source list or to cycle through list of input sources by repeatedly pressing button. 3. SMART MODE To select or cycle through predefined picture and sound settings 4. AMBILIGHT ON/OFF To turn on or turn off Ambilight. 1 2 3 4 5 6 7 8 9 10 5. SURF To channel surf up to 8 channels. 6.
15. SAP To select SAP, Stereo or Forced Mono. 16. A/CH (Alternate Channel) To display the last viewed channel and the current channel. 17. INCR. SURR To enable Incredible Surround in stereo mode and Spatial in mono mode. 18. CHANNEL LIST To display the list of available channels. 19. GUIDE (Digital mode only) Electronic Program Guide button To get program listings and information. 20. OK To select menu items or confirm a selection. 21. DIGITAL MENU To switch the menu on or off in digital mode. 22.
4. Use your TV in digital mode 4.1 • • • • Get Started When the TV is powered-on for the first time you are prompted to run auto install to receive the channels that are broadcasted locally. Auto installation takes 20 to 40 minutes depending on the number of channels that are transmitted by the cable provider or broadcaster. When the TV is not receiving any signal from the antenna or cable, NO SIGNAL appears on the TV screen.
4. Channel name Setup | Installation 5. Program title Total 1 Channels Found Current Scanning Scan percentage Information Analog TV services: Analog Radio services: Digital TV services: Digital Radion services: 69/69 6. Program start time 7. Program time progress bar :Displays time left indicator bar. 1 1 1 0 8. Program end time Yes Close A service scan is in progress, please press OK to stop. 9. Clock :Current time. 5. If no digital channels are detected, press ANA/DIGI to switch to analog mode.
Channels. Setupp | Installation 5. If new services are available, press Æ button to enter into the list of services, and press Î or ï to move through the list. Service Setup Add newServices Reinstall services Manual install services A Access restrictions t i ti 4_ I t ll ti Installation 5_ 6_ Setupp | Installation | Service List View TV Channels newServices IAdd Installation nstallation Add new services 7 7_ In Installation 8_ 05.1 - TV GloboHD Close 05.
C Caution: Reinstalling services overwrites all your previously stored channels. 4. Press OK to start the installation. A search is for digital services is started. The services are stored automatically. When the search is complete, the menu indicates the number of digital services found. When searching is complete, a list of stored channels is displayed. 7. Press Í to return to the previous menu or press DIGITAL MENU to exit. E Tip: Press ANA/DIGI to switch between the digital and analog modes.
8. Repeat the above steps to move other channels. 9. Press Í to return to the previous menu or press DIGITAL MENU to exit. E Tip: Press ANA/DIGI to switch between the digital and analog modes. 4.5 Set your preferences Set your language Select your preferred language, time zone, and digital audio output. 1. Press SOURCE and Î or ï to select Digital TV from the source list. 2. Press DIGITAL MENU to display the on-screen menu. 3. Select Preferences > Language and press Æ. Set your time zone 1.
Setupp | Preferences Preferences Setupp | Preferences Digital Audio Output Language AAC Preferences Transparency Language 0% Time Zone PCM Time Zone 20% Digital Audio Output (G GMT-04:00) G MT 04:00) 04 00) Manaus M Digital Audio Output 40% Transparency (G GMT-05:00) G MT 05:00) 05 00) Acre A Transparency 60% Color C olor l Temp T 80% Contrast C ontrast t t+ Contrast C ontrast t t+ N NR N NR Close Close Select AAC for 5.1 system. 5.
• Audio language: Set to Brazilian Portuguese. Change your PIN code • Menu language: Set to Brazilian Portuguese. 1. Enter the Access Restrictions menu as described in Turn on Set PIN Protection on this page. • Digital audio output: Set to PCM. 2. Press the ï to select Change Pin • Time zone: Set to Broadcasted time. • Pin Code: Reset to “1234”. 4.7 Control access to digital channels Restrict access to the digital channels by blocking them with an access PIN code. Code and press OK. 3.
The TV displays Incorrect Pin and prompts you to enter the PIN code again. Please enter your pin code D Note: You are prompted to enter the PIN code if the TV program is blocked by the Maturity Rating filter. Enter the PIN code to temporarily access the program. Incorrect Pin * * * * Cancel Restrict access to TV programs with Block Content 8. Enter “0711”. 9. The PIN code is reset to the default factory setting of “1234”. Please enter your pin code The default pin code is set.
Setupp | Access restrictions Access restrictions Setupp | Favorites Block Content Maturity Rating TV GloboHD Block Content Globo M Name List 1 Favorite List 1 F Favorite List 1 Select TV channels LList st 2 TV Channels Add all services LList i t3 ist Set Pin Protection Remove all services LList i t4 ist Change Pin Code Color l Temp T Color C olor l Temp T Contrast C ontrast t t+ Contrast C ontrast t t+ N NR N NR Close Select the TV channels you want to lock D Note: To unlock the TV
Setupp | Favorites List 1 Faa Favorite F List 1 Add all services Name Select TV channels Add all services LList i t3 ist Remove all services LList i t4 ist Color C olor l Temp T 2. Press DIGITAL MENU to display the on-screen menu. 3. Select System > Current Software Version, and press OK. The software version is displayed. Contrast C ontrast t t+ N NR Close Press [[OK]] to add all services to the favorites list System Information H/W Version: ZDT620 ISDTV V0.1 S/W Version: LC07B-DTM V0.13+ 2.
Setup | Information | New Software Television | TV guide Select file upgrade.zim Select USB disk USB disk1 Now 16:24 16:35 The fairly odd... 16:50 The fairly odd... 00.1 BBC Two 16:30 Ready Steady 17:15 The weakest lin 00.1 BBC Three 12:50 This is BBC Thr Do you really want to update? 00.1 BBC Four Close Select file to upgrade. A pop-up window displays an indicator bar while the update is in progress.
5. Use your TV in analog mode 5.1 Select your location Set the location to suit a shop floor or home environment. 1. Press SOURCE and Î or ï to select TV from the source list. 2. Press ANALOG MENU to display the on-screen menu. 3. Select Location and press OK. 4. Press ï or Î to select the location and press OK to confirm. Main Picture Setting Advance Picture Sound Ambilight Features Install Location Home Shop D Note: To select your menu language, refer to Set your language on page 17.
6. Install channels 6.1 Automatically install channels on-screen menu. 3. Select Install > Tuner Mode and press OK. 4. Press ï or Î to select Auto, Antenna or Cable, and press OK to select. 1. Press SOURCE and Î or ï to select TV from the source list. Install Tuner Mode Auto Program Manual Name Fav. Program 2. Press ANALOG MENU to display the on-screen menu. 3. Select Install > Auto Program and Auto Antenna Cable press OK. Auto Program Program TV 3 196 MHz 5.
channel reception. Manual System Fine Tune Auto NTSC PAL-M PAL-N 6. Press Í to return to the previous menu or press ANALOG MENU to exit. 6.3 Manage channels Name your channels 5. Press Í to return to the previous menu or press ANALOG MENU to exit. Assign a short name for your channels with the Name. This is available in TV mode only. TV Systems 1. Press SOURCE and Î or ï to select TV from the source list. • Auto: Detects the tuner system automatically. 2.
displayed on the top left of the screen. 10. Press Í to return to the previous menu or press ANALOG MENU to exit. Store your favorite channels Fav. Program lets you store only the channels you want on a favorite list. 1. Press SOURCE and Î or ï to select TV from the source list. 2. Press ANALOG MENU to display the on-screen menu. 3. Select Install > Fav. Program and press OK. Install Tuner Mode Auto Program Manual Name Fav. Program 001 002 003 004 005 006 007 008 7.
7. Use your TV 7.1 Adjust TV settings Adjust your picture settings 1. Press SOURCE and Î or ï to select TV from the source list. 2. Press ANALOG MENU to display the on-screen menu. 3. Select Picture Setting and press OK. 4. Press ï or Î to highlight the menu items and press OK to select. 5. Press ï or Î to adjust the settings of the menu items. Some items have the level indicator bar while some have discreet settings such as Cool, Normal and Warm. Cool Normal Warm 6.
Sound Equaliser Balance Auto Vol. Leveler Incr. Surround BBE SAP Forced Mono Off On D Note: Select Stereo or Incr. Surround modes when the TV broadcast is in stereo. Press INCR. SURR to toggle with the sound modes. 7.2 Change your picture format Select various screen formats to suit the type of programs you watch. Sound Equaliser Balance Auto Vol. Leveler Incr. Surround BBE SAP Forced Mono Mono Spatial 1. Press Í or Æ repeatedly to cycle through the available picture formats. Picture Formats: • 6.
leaving the subtitles area visible. The top of the picture is cropped. Power 100% 10% 0% Personal • Superzoom: Removes black bands on the sides of the screen of 4:3 format programs. Power 100% Personal 10% 0% • Widescreen: The picture is displayed in its original proportions. Smart Mode settings: 7.3 Use Smart Mode settings Smart modes are preset settings to match the different viewing and listening environment. 1. Press SMART MODE repeatedly to cycle through the available settings.
7.4 Use the Surf feature Store up to 8 of your favorite channels in the Surf list. channels while the Surf list is currently displayed. Add channels to your Surf list 1. Press the numeric (0-9) buttons or CH + / - to switch to your favorite channel. 2. Press SURF to display the Surf list. Only one channel number is displayed on the list. This is the same channel number currently selected. Surf 002 003 012 015 020 024 037 050 3. Press OK to add the channel to the Surf list.
8. Use more of your TV On + Light Sensor, and press OK to select. Advance Picture Contrast + Active Control Artifacts Reduction* Dig. Natural Motion* 8.1 Use the Advance Picture features Off On On + Light Sensor Use Contrast + Contrast + optimizes the contrast for overall picture quality. 1. Press SOURCE and Î or ï to select TV from the source list. 5. Press Í to return to the previous menu or press ANALOG MENU to exit. 2. Press ANALOG MENU to display the on-screen menu. Active Control settings 3.
Advance Picture Contrast + Active Control Artifacts Reduction* Dig. Natural Motion* Off On if the sleep timer is enabled or time remaining for the TV to switch to standby mode. To cancel the sleep timer, select Off in the Sleep menu. Set the TV time 5. Press Í to return to the previous menu or press ANALOG MENU to exit. 8.2 Use the Timer To switch the TV to standby mode or to a specified channel at a specified time from standby mode or while the TV is switched on. Set the sleep timer 1.
Timer Sleep Time Start Time Stop Time Channel No. Activate 4. Press the numeric (0-9) buttons of the remote control to enter the time in the 24-hour format. For example, 13:00 (for 1.00 p.m). 5. Press Í to return to the previous menu and select Stop Time, and press OK. Timer Sleep Time Start Time Stop Time Channel No. Activate Off Once Daily 10. Press ï or Î to select Off, Once or Daily, and press OK to select. 11. Press ANALOG MENU to exit. 12. Press . to switch the TV to standby mode.
Features Timer Child Lock Parental Lock Closed Caption Demo* 8.4 Control access to TV channels Off On Parental Lock lets you control the type of TV programs that can be accessed, according to program ratings based on age and content. Access Parental Lock 4. Press ï or Î to highlight On and press OK. 5. Switch off the TV or put it on standby mode.
Parental Lock. Features Timer Child Lock Parental Lock Closed Caption Demo* ** * * Confirmed You can access the Parental Lock menu now. 1. Access the Parental Lock menu as described in Access Parental Lock on the previous page. 2. Press OK to select Lock Channel and press ï or Î to highlight the channel number. 3. Press OK to lock the channel. A padlock symbol + is displayed beside the channel number. Change Access Code 1.
2. Press ï to highlight Clear All and press OK to select. Parental Lock Lock Channel Change Code Clear All Lock All Movie Rating TV Rating Block Options A tick ($) appears beside the rating label to indicate the rating lock is enabled. 4. Press Í to return to the previous menu or press ANALOG MENU to exit. Yes Cleared Parental Lock Lock Channel Change Code Clear All Lock All Movie Rating TV Rating Block Options 3. Press OK to select Yes.
• R: Material not suitable for children under 17 years of age. Requires parental guidance. • NC-17: Not suitable for children under 17 years of age. Has excessive violence, sex or offensive language. • X: Not suitable for children under 17 years of age. Content is pornographic. Use the TV Rating lock (For certain regions only) Block content based on TV ratings defined by your broadcaster. TV ratings are based on age and content.
Block Options Unrated No Rating Blocking Channel 5 Blocked By TV - 14 Access Code : ---- Unblock programs 1. Access Parental Lock menu as described in Access Parental Lock on page 35. Off On D Note: Programs with no rating or unrated are blocked. 2. Press ï to select Block Options and press OK to select. Channel 5 Blocked By No rating Access Code : ---- 3. Press ï or Î to highlight Off and press OK.
CC2 or CC Mute, and press OK to select. Demo Pixel Plus HD* Pixel Plus 2HD* Dig. Natural Motion* 100Hz* 5. Press Í to return to the previous menu or press ANALOG MENU to exit. Off On Closed Caption choices: • CC Off: Turn off closed captioning. • CC1: Most channels transmit closed captions in CC1 mode. Closed captions can be in Spanish, Portuguese or English. • CC2: Broadcasters may transmit closed captions in CC2 mode. CC2 is rarely used.
Turn on Ambilight 1. Press SOURCE and Î or ï to select TV from the source list. Ambilight Ambilight Brightness Mode Balance 2. Press ANALOG MENU to display the on-screen menu. 3. Select Ambilight > On. Ambilight Ambilight Brightness Mode Balance Off On 4. Press Í to return to the previous menu or press ANALOG MENU to exit. Select Ambilight modes 1. Turn on Ambilight as described in Turn on Ambilight on this page. 4. Press Í to return to the previous menu or press ANALOG MENU to exit. 2.
Select Ambilight color 1. Turn on Ambilight as described in Turn on Ambilight on the previous page. Custom Color Palette Saturation 2. Press ï until Mode is highlighted and press OK to select. 50 3. Press ï until Color is highlighted and press OK to select. 4. Press ï or Î to highlight the color. Ambilight Ambilight Brightness Mode Color Custom Color Balance Warm White Cool White Blue Red Green Yellow Magenta Custom 5. Press Í to return to the previous menu or press ANALOG MENU to exit.
9. Use your TV as a computer monitor Connect the TV to a computer via the VGA port to use your TV as a computer monitor. 9.2 Feature settings (VGA mode) • Phase / Clock: Fine tunes your TV to match the computer’s display settings. • Auto Adjust: Synchronizes the TV and computer’s Phase/Clock rate automatically. • Reset: Overrides with the factory default settings. D Note: Refer to the Quick Start Guide for connecting the computer to your TV. 1.
10. Use your TV in High Definition mode High Definition (HD) mode lets you enjoy clearer and sharper pictures using HD equipment. 10.1 Connect the HD equipment 1. Connect the HDMI or DVI output from your HD equipment to the HDMI 1, HDMI 2 or Side HDMI socket of the TV. and Í or Æ to adjust the settings. 4. Press Í to return to the previous menu. 5. Press Í to return to the previous menu or press ANALOG MENU to exit.
2. Press ANALOG MENU to display the on-screen menu. 3. Select Features > Mode Selection > PC or HD, and press OK. Features Timer Child Lock Parental Lock Mode Selection Closed Caption Display Demo* PC HD 1080p models HD format 480p SD format 480i 576p 720p 1080p 1080i 576i 4. Press Í to return to the previous menu or press ANALOG MENU to exit. Note:Your Philips TV is HDMI compliant. If you do not get a good picture, it is not a defect of your TV set.
11. Troubleshooting D Note: Before calling Customer Service, refer to the troubleshooting topic below which may help address and resolve your problem. Symptoms Possible cause What should you do No power or indicator light. The TV is not connected to the power. 1. Press . at the right side of the TV, or press . on the remote control. 2. Ensure the power cord is connected tightly to the TV power connector and to the mains socket outlet. 3. Connect the TV to a different mains socket outlet.
The picture is mostly red and green, or the picture is missing red when the TV is connected to an accessory device via component cables. Insecure/incorrect connection. 1. Ensure all the connections are made according to the color code. No sound on the TV loudspeaker. Volume level is set to zero. 1. Increase the volume. Sound is muted. 2. Press m on the remote control. Headphones are connected. 3. Ensure the headphones are not plugged into the TV. Audio cable is not connected. 4.
12. Specifications Model no. 42PFL7803D 52PFL7803D PICTURE ENHANCEMENT Type 1080p 120 Hz Aspect Ratio Advance Picture 16:9 Contrast +, Active Control, Dig.
13. Connect devices 13.1 Connection overview 7 8 9 HDMI 1 HDMI 2 11 6 PBS SX SERV. C SPDIF OUT AUDIO IN 5 R VGA 10 L 12 Y Y Pb Pb HDMI 1 SPDIF OUT PBS SX AUDIO IN SERV. C R Y 75X TV ANTENNA 1 VIDEO Pr Pr L L L R R R Pb 75X TV ANTENNA Pr L R CVI-1 13 CVI-1 CVI-2 AV1 IN 2 3 4 14 1. Antenna input 12. Headphones (Side): Stereo Mini Jack. 2. CVI-1: Component video input. Y Pb Pr and Audio L/R connectors for DVD, digital receiver or game console, etc. 13.
HDMI - Highest quality Component video cable - Red, Green, Blue HDMI produces the best audio visual quality possible. Both audio and video signals are combined in one HDMI cable, providing an uncompressed, digital interface between your TV and HDMI devices. Use HDMI to experience full high-definition video. E Tip: If your device only has a DVI connector, use a DVI-HDMI adaptor to connect your device to a HDMI connector on the TV.
Composite - Basic quality Composite video provides basic analogue connectivity, usually combining a (yellow) video cinch cable with (red and white) Audio L/R cinch cable. Match the cable colors when connecting to the composite Video and Audio L/R input connectors on the side of the TV. Audio L/R cable - Red, White Composite audio/video cable- Yellow, red and white D Note: For various device connections to your TV, please refer to the Quick Start Guide for detailed instructions.
3139 125 39891