C577 Mini Hi-Fi System CALL US BEFORE YOU CONSIDER RETURNING THE PRODUCT! Return your Warranty Registration Card within 10 days EE E S Philips representatives are ready to help you with any questions about your new product.We can guide you through Connections, First-time Setup, or any of the Features. We want you to start enjoying your new product right away! RTAN PO T! Need help? Call us! IM FW- WH Y INS ID 1-800-531-0039 or Visit us on the web at www.philips.com visit our website www.
CAUTION Canada English: This digital apparatus does not exceed the Class B limits for radio noise emissions from digital apparatus as set out in the Radio Interference Regulations of the Canadian Department of Communications. This warning label is located on the rearside and inside this laser product. Use of controls or adjustments or performance of procedures other than herein may result in hazardous radiation exposure or other unsafe operation.
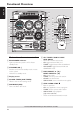
P3 P1 CD TUNER AUX CD1 CD2 GAME ➠ CD3 CD4 CD5 VOL TITLE ☞ ALBUM REPEAT DIM DSC PROGRAM SHUFFLE SLEEP VAC DISPLAY CLK/TIMER TIMER ON/OFF MUTE GAME GAME SOUND MIX-IT MAX ON/OFF P4 P2 2 CD /CD-R CD-R /CD-R CD-RW W CO COMP M PATIBLE TIBLE DISC1 DISC2 DISC3 DISC4 DISC5 DISC 1 DISC 2 DISC 3 DISC DISC 41 CD / CD-R / CD-R W COMPATIBLE CD CD-R CD-R W OMP TIBLE DISC1 DISC DISC2 DISC DISC3 DISC DISC4 DISC DISC5 DISC DISC 1 DISC 1 DISC 2 DISC 2 DISC 3 DISC 3 DISC 4 DISC 4 DISC
Return your Warranty Registration card today to ensure you receive all the benefits you’re entitled to. • Once your Philips purchase is registered, you’re eligible to receive all the privileges of owning a Philips product. • So complete and return the Warranty Registration Card enclosed with your purchase at once, and take advantage of these important benefits.
ATION y! r r Hu DED W IT AY EE S REG I TR N S Visit our World Wide Web Site at http://www.philips.com HIN 10 D Congratulations on your purchase, and welcome to the “family!” Dear Philips product owner: Thank you for your confidence in Philips.You’ve selected one of the best-built, best-backed products available today.And we’ll do everything in our power to keep you happy with your purchase for many years to come.
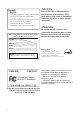
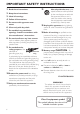
IMPORTANT SAFETY INSTRUCTIONS 1. Read these instructions. 12. 2. Keep these instructions. 3. Heed all warnings. 4. Follow all instructions. 5. Do not use this apparatus near water. 13. Unplug this apparatus during lightning 6. Clean only with dry cloth. 7. Do not block any ventilation storms or when unused for long periods of time. 14. Refer all servicing to qualified service openings. Install in accordance with the manufacturer´s instructions. personnel.
English Index Español English ------------------------------------------------ 8 Español --------------------------------------------- 32 7
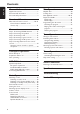
Contents English General Information Disc Operations Supplied accessories ............................................ 9 Environmental information ................................ 9 Care and safety information .............................. 9 Playable discs ....................................................... 20 Loading discs ....................................................... 20 Basic playback controls .............................. 20–21 Repeat and Shuffle ......................................
General Information Supplied accessories (page 3 – P1) – – – – – – – USB PC LINK software installer CD-ROM USB cable Remote control and two AA batteries. AM loop antenna FM wire antenna Video cinch cable (yellow) AC power cord Environmental information All unnecessary packaging has been omitted. We have tried to make the packaging easy to separate into three materials: cardboard (box), polystyrene foam (buffer) and polyethylene (bags, protective foam sheet).
Functional Overview English DISC1 DISC2 DISC3 DISC4 CD /CD-R CD-R / CDCD-R RW W CO COMP M PATIBLE TIBLE DISC5 ≤ DISC 1 DISC 2 £ DISC 3 DISC 4 1 2 DISC 5 ECO POWER GAMEPORT MINI SYSTEM STANDBY ON C FT LE H AN DSC 3 N EL GH RI RD RIVE OVE TC H AN JAZZ ROCK POP NEW S SLEEP M IX FM M W TITLEAM PM ™ ¡ CD 4 CD C R U ISE C R U ISE TU RB O TU RB O 5 VAC AC CLOCK •TIMER NEX T• P SET RE CD RE PROG USB PC LINK TUNER AUX•GAME ) ( STER VOLUME MA SE STO PLAY • PAUSE DBB DSC V
9 PLAY•PAUSE ÉÅ * MASTER VOLUME (VOL +-) – – – CD: starts/pauses playback. USB PC LINK: starts/pauses playback. (only on the main unit) TUNER: *enters Plug & Play mode and/ or starts preset radio station installation. Adjusts the volume level. ( PROG (PROGRAM) – – CD: starts or confirms tracks programming. TUNER: starts *automatic/manual preset programming. CLOCK: selects 12- or 24-hour clock display. 0 SEARCH•TUNING (à á) – – – – – )n CD: *searches backward/ forward.
Connections English Game console 12
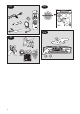
WARNING! – Use only the supplied speakers. The combination of the main unit and speakers provide the best sound. Using other speakers can damage the unit and sound quality will be negatively affected. – Never make or change connections with the power switched on. – Connect the AC power cord to the power outlet only after you have finished hooking up everything. Step 1: Connecting FM/ AM antennas – Place the AM loop antenna on a shelf or attach it to a stand or wall.
Connections English Step 5: Connecting the AC power cord "AUTO INSTALL – PRESS PLAY" may appear on the display panel when the AC power cord is plugged into the power outlet for the first time. Press ÉÅ on the main unit to store all available radio stations (page 3 – P3) or press Ç to exit (refer to “Tuner Operations”). Step 6: Inserting batteries into the remote control 3 1 2 1 Open the battery compartment cover.
Gameport Operations Gameport allows you to connect your game console to this mini system which enables you to enjoy a total game immersion experience by having powerful sound output. English 5 Press AUX• GAME until “GAMEPORT” is About Gameport displayed. 6 Press MODE (or GAME SOUND on remote) to select the type of sound setting that best suit the game : SPEED, PUNCH, BLAST or OFF.
USB PC Link 4 English Quick Setup Guide PC system requirement – – – – – Windows 98 (SE)/ ME /2000 / XP Intel Pentium MMX200 or higher CD-ROM drive USB port Free hard disk space : 15 MB for the software Install MusicMatch software Note: – You are advised to read the MusicMatch tutorial before using it for the first time. Make sure the mute function on the PC is deactivated in order to ensure sound output from the Audio System.
Enable digital CD audio output Connecting to USB PC LINK Before playing the CD through your PC’s CD-ROM drive, it is necessary to configure your PC’s hardware as follows: USB PC LINK allows you to playback your music collection from the PC via the powerful amplifier and speakers of this system. For Windows ME/2000/XP 1 Enter the system control panel menu and select : “SYSTEM ™ HARDWARE ™ DEVICE MANAGER ™ CD-ROM DRIVES ™ ACTION–PROPERTIES ™ PROPERTIES”.
Basic Operations English Switching on/off Setting the clock Switching to active mode The clock can be set in either 12-hour or 24-hour mode ("11:59 PM" or "23:59" for example). ● Press CD, TUNER, USB PC LINK or AUX•GAME. Switching to Eco Power standby mode 5 (00:00 / 12:00AM) ● Press B. ➜ ECO POWER button lights up. ➜ The display screen will go blank. 4 (00:00 / 12:00AM) 2 CLK/TIMER 3 (00:00 î 12:00AM) Switching to standby mode (view clock) ● Press and hold B. ➜ The clock is displayed.
Dimming system’s display screen Sound control You can select the desired brightness for the display panel. MAX sound, DSC and VAC sound features cannot be activated on the same time. While in game mode, all the sound control features are not available for selection, except DBB and Game Sound control. ● In any active mode, press DIM MODE (or DIM on remote) repeatedly to turn on/ off dim mode. ➜ DIM is shown, except for DIM OFF mode.
Disc Operations English IMPORTANT! – This system is designed for regular discs. Therefore, do not use any accessories such as disc stabilizer rings or disc treatment sheets, etc., as offered on the market, because they may jam the changer mechanism. – Do not load more than one disc onto each tray.
To interrupt playback ● Press ÉÅ. ➜ To resume normal playback, repeat the above. Programming the disc tracks Programming tracks is possible when playback is stopped. Up to 40 tracks can be stored in the memory in any order. To stop playback ● Press Ç. ➜ If the system remains in stop mode for 30 minutes, it will switch to Eco Power standby mode.
Disc Operations English Checking the program 1 Stop playback and press í or ë repeatedly. 2 Press Ç to exit. OR Press ÉÅto start playback from the current programmed track Playing a disc without clearing the program ● Press one of the CD 1~5 buttons on the remote to select a disc for playback. ➜ After the selected disc has been played, the program mode will resume. Clearing the program ● Stop playback, then press Ç to clear the program. OR Press the OPEN•CLOSE 0 button of the programmed disc tray.
Tuner Operations Tuning to radio stations 1 Press TUNER to enter tuner mode. To select another waveband (FM or AM), press TUNER again. 2 Press and hold à or á until the frequency indication starts to change, then release. ➜ The system automatically tunes to the next strong signal radio reception. lights up for FM stereo reception. ➜ For tuning to a weak signal station, ● Press à or á briefly and repeatedly until an optimal reception is found.
Timer Operations English Timer setting The system can switch on to CD, TUNER or USB PC LINK mode automatically at a preset time, serving as an alarm to wake you up. IMPORTANT! – Before setting the timer, ensure that the clock is set correctly. – The volume of the timer will increase gradually to minimum level 10 or last tuned volume level.
Other Connection Sleep timer setting Listening to an external source The sleep timer enables the system to switch to Eco Power standby mode automatically at a preset time. You can listen to the sound of the connected external device through your system’s speakers. 1 Press SLEEP repeatedly until it reaches the desired preset turn-off time.
Specifications English AMPLIFIER Output power ☞ Signal-to-noise ratio Frequency response Input sensitivity AUX In Gameport Output Speakers Headphones (1) (6 Ω, 60 Hz – 12.5 kHz, 10% THD) 640 m V 310 mV ≥6Ω 32 Ω – 1000 Ω 40 20 – 20000 Hz, –3 dB ≥ 76 dBA ≥ 60 dB (1 kHz) USB Frequency response Signal-to-noise ratio Channel separation Total harmonic distortion 20 – 20000 Hz, –3 dB ≥ 75 dBA ≥ 40 dB (1 kHz) < 0.
WARNING Under no circumstances should you try to repair the system yourself, as this will invalidate the warranty. Do not open the system as there is a risk of electric shock. If a fault occurs, first check the points listed below before taking the system for repair. If you are unable to remedy a problem by following these hints, please call 1-800-531-0039 for help. Problem Solution When in USB PC LINK mode, “NO CONNECTION” is displayed.
LIMITED WARRANTY AUDIO SYSTEM One Year Free Labor One Year Free Service on Parts This product must be carried in for repair. WHO IS COVERED? You must have proof of purchase to receive warranty service. A sales receipt or other document showing that you purchased the product is considered proof of purchase. WHAT IS COVERED? Warranty coverage begins the day you buy your product. For one year thereafter, all parts will be repaired or replaced, and labor is free.