Mini HiFi System FW930SR 1
English Français Español Deutsch Nederlands Italiano Svenska Dansk Suomi Português ∂ÏÏËÓÈο 2 Important notes for users in the U.K. Mains plug This apparatus is fitted with an approved 13 Amp plug. To change a fuse in this type of plug proceed as follows: 1 Remove fuse cover and fuse. 2 Fix new fuse which should be a BS1362 5 Amp, A.S.T.A. or BSI approved type. 3 Refit the fuse cover.
Italiano .................................157 Svenska ...............................187 Dansk ...................................217 Suomi ...................................247 Português ............................277 CLASS 1 LASER PRODUCT ∂ÏÏËÓÈο ............................ 307 Français Español Italiano Nederlands Deutsch Nederlands ..........................127 Svenska Deutsch ..................................95 Dansk Español ..................................65 Suomi Français ............
General Information ........................ 5 Safety Information ........................... 5 Preparation ................................. 6 - 7 Controls ..................................... 8 - 10 Operating the system ............. 11 - 13 CD ............................................. 13 - 15 GENERAL INFORMATION SAFETY INFORMATION General Information Safety Information • The typeplate (which contains the serial number) is located at the rear of the system.
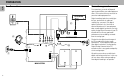
PREPARATION English Rear Connections Connections general STANDBY ON SU BW O OFER LEVEL CONT RO L MIN CD PLAYER MAX CUT OFF FREQUENCY HIGH POWER SUBWOOFER 60Hz 150Hz Digital recordings (optical or coaxial) give the best performance in audio and usability (e.g. auto-track). (The digital optical connection is less sensitive to external disturbances).
A AM Loop Antenna Connection D Subwoofer Out Connection Connect the supplied loop antenna to the AM ANTENNA terminal. Place the AM loop antenna far away from the system and adjust its position for the best reception. B FM Wire Antenna Connection Connect the optional active subwoofer to the SUBWOOFER OUT terminal. The subwoofer reproduces just the low bass effect (e.g. explosions, the rumble of spaceships, etc.). Be sure to follow the instructions supplied with the subwoofer.
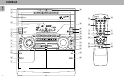
CONTROLS English # @ DISC CHANGE $ OPEN•CLOSE DISC 1 DISC 2 DISC 3 ! 3CD AUX CHANGER % 0 % MINI HIFI SYSTEM PROGRAM SHUFFLE REPEAT TIMER REC NEWS T.A. AM MW FM LW STEREO BACK FRONT HSD 60Hz 3 ≥ § 2 8 500Hz 1KHz 2KHz 4KHz DOLBY B NR RDS ^ RDS CLOCK/ TIMER CD1 • 2 • 3 BAND TAPE 1 • 2 CDR CD TUNER TAPE AUX PROG SIDE A•B SEARCH • TUNING STOP•CLEAR PLAY PAUSE PRESET ▲ PREV NEWS! NEWS/TA VOLUME A.
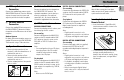
Controls on the system and remote control 1 STANDBY ON – to switch the system on or to standby mode. – to use for EASY SET. 2 DIGITAL SOUND CONTROL (DSC) – to select the desired sound effect : OPTIMAL, CLASSIC, TECHNO, JAZZ, ROCK or VOCAL. 3 INCREDIBLE SURROUND – to switch on or off the surround sound effect. 4 n – to connect headphones. 5 REC (RECORD) – to start recording on tape deck 2. for CD Recorder – to start recording, finalizing and erasing.
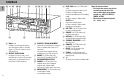
CONTROLS English +-=‚ ERASE ·° 0 ‡ fl 5 ( ( FINALIZE REM REC TIME TRACK 3 5 TOTAL REM SCROLL DISPLA Y 1 CDR MINI AUDI O CD RECO RDER 2 DIGITAL I OPTICAL I ANALOG 4 CD 6 7 8 TRACK TIME ON/OFF STEP 9 10 11 12 13 14 15 16 17 18 19 20 + MANUAL SYNC SCAN SHUFFLE REPEAT TRACK ALL PROGRAM RW SOURCE REC TYPE OPEN/CLOS Recordable RECORD PLAY/P AUSE STOP CANCEL MENU/STOR E REWIND E FFWD EASY JOG ENTER ⁄ ¤ • Digit 0 - 9 – (numbers consisting of two figures must be keyed in within
Easy Set MINI HIFI SYSTEM PROGRAM SHUFFLE REC REPEAT NEWS T.A. AM MW FM LW EASY SET allows you to store all available radio stations and RDS stations automatically. STEREO BACK FRONT HSD 60Hz 250Hz 500Hz 1KHz 2KHz 4KHz 8KHz STANDBY ON DOLBY B NR RDS RDS CD1 • 2 • 3 BAND CD TUNER PROG TAPE SIDE A•B SEARCH • TUNING STOP•CLEAR PLAY PAUSE NEWS/TA CDR TAPE 1 • 2 VOLUME AUX ▲ CLOCK/ TIMER PRESET ▲ PREV A. REV A.
OPERATING THE SYSTEM English Switching the system to standby mode • Press STANDBY ON again or B on the remote control. ™ The system will switch to standby mode. Selecting the Source • Press the respective source selection button: CD, TUNER, TAPE or AUX. ™ The display indicates the selected source. Note: – For an external source, make sure you have connected the audio left and right OUT terminals of the external equipment (TV, VCR, Laser Disc player, DVD player or CD Recorder) to the AUX/CDR IN terminals.
• First select the DSC feature, then rotate the JOG until the desired digital sound setting level is reached. ™ The digital sound setting level will increase or decrease between level 1 and 5. Automatic DSC-DBB selection The best DBB setting is generated automatically for each DSC selection. You can manually select the DBB setting that best suits your listening environment. DISC CHANGE To switch off DBB • Press DBB briefly until “DBB OFF” is displayed.
CD English Loading the CD Changer Playing a CD Selecting a desired track Programming Tracks 1 Press CD to select CD mode. 2 Press OPEN•CLOSE. ™ The CD carousel slides out. 3 Load a CD with the printed side up in the right tray. • You can load another disc in the left tray. • To load the third disc, press the DISC CHANGE button. ™ The CD carousel will rotate until the empty tray is ready for loading. 4 Press OPEN•CLOSE to close the CD carousel.
– During programming, if no button is pressed within 20 seconds, the system will exit program mode automatically. Reviewing the program Reviewing of the program is possible only when playback is stopped. • Press PREV í or NEXT ë repeatedly to review the programmed tracks. • Press STOP•CLEAR Ç to exit review mode. Playing the program 1 Press PLAY É to start program playback. ™ “PLAY PROGRAM” appears on the display. ™ The track number and elapsed playing time of the current track will appear on the display.
CD RECORDER English General Information Accessories (Supplied) • With your Philips CD Recordable/ ReWritable Recorder, you can record, play and erase your own high-quality audio CDs, subject to legal restrictions on copying. Naturally, you will also be able to play all pre-recorded audio CDs. • For recording use, special audio discs must be used (for music only). These Discs bear the logos as shown below.
DISPLAY messages Messages, as listed and explained here, may appear on the display for your guidance. GENERAL READING ............ reading disc information. NO DISC ............ no disc inserted, disc unreadable or disc inserted upside down. PROG FULL ....... program full. INSERT DISC…insert disc or insert disc in correct way. WRONG DISC .... inserted disc is not audio CD. UNFINALIZED…unfinalized CDR(W) disc. MEMORY XX%…indicates the amount of text memory used for unfinalized discs. RECORDING UPDATE .......
CD RECORDER English Switching the system ON 1 Plug the power cord supplied into the MAINS connector on the CD recorder, then into a mains socket. 2 Press ON/OFF. ™ The recorder is now in Standby mode. 3 Press any key to activate the recorder. Notes: – The CD recorder will automatically adjust to the local mains voltage. – When the CD recorder is in the 'OFF' position, it is still consuming some power. If you wish to disconnect your player completely from the mains, withdraw the plug from the AC outlet.
MANUAL RECORDING Preparing for manual recording 1 Press SOURCE repeatedly to select DIGITAL, OPTICAL or ANALOG mode. • When Auto Track is ON (default setting), track numbers will automatically be increased during recording. ™ To switch off the Auto Track function you have to enter Menu mode. If you wish to increase track numbers manually, press TRACK INCREMENT on the remote control. For further instructions see Menu mode. ON (AUTO) ....
CD RECORDER English ERASING CDRW DISCS For unfinalized CDRW discs only You can erase: – one or more tracks from the end, – the entire disc. To erase one or more tracks from the end 1 Press ERASE once. ™ The number of tracks and their total playing time appear on the display. ™ “ERASE TRACK“ and “ PRESS RECORD” appear on the display. • If the disc is finalized, CD appears on the display after inserting a CDRW in the recorder. The recorder will ask you to confirm unfinalizing first.
Programming • You can program up to 99 tracks to play in any desired sequence. • Tracks can be programmed more than once, but each time counts as a track (STEP). 1 In Stop mode, press PROG on the remote control to enter Program mode. ™ The PROGRAM flag starts flashing and "PROGRAM" appear on the display. 2 Select the required track numbers by turning EASY JOG left or right (or Digit 0-9 on the remote control) and store by pressing ENTER button . ™ The track will be stored in the program.
CD RECORDER English – When an artist’s name has been stored for a certain track, the name will automatically be copied for the next track. The name can be confirmed by pressing STORE/MENU or a new name can be entered as described above. Erasing names 1 Select the TEXT ERASE submenu. ™ "TEXT ERASE" appears on the display. 2 Press ENTER to confirm. 3 Rotate EASY JOG to select the required option in the submenu: ALL TEXT, ALBUM TITLE, ALBUM ARTIST, TRACK 1 TITLE, TRACK 1 ARTIST, etc. 4 Press ENTER to confirm.
Storing Preset Stations MINI HIFI SYSTEM PROGRAM SHUFFLE REPEAT TIMER REC NEWS T.A. AM MW FM LW STEREO BACK FRONT HSD 60Hz 250Hz 500Hz 1KHz 2KHz 4KHz 8KHz STANDBY ON RDS CD1 • 2 • 3 BAND TAPE 1 • 2 CDR CD TUNER TAPE AUX PROG SIDE A•B SEARCH • TUNING STOP•CLEAR PLAY PAUSE ▲ CLOCK/ TIMER PRESET ▲ PREV NEWS! NEWS/TA VOLUME A. REV A.
TUNER English – You can cancel manual programming by pressing STOP•CLEAR Ç (on the system only). – During programming, if no button is pressed within 20 seconds, the system will exit program mode automatically. Tuning to Preset Radio Stations • Press PRESET 4 or 3 to select the desired preset number. ™ The preset number, radio frequency, and waveband appear on the display.
™ If no RDS station is found in the first 5 presets after the search, the NEWS/TA function will be switched off. The display will show "NO RDS NEWS" or "NO RDS TA" and NEWS or TA flag will disappear from the display. • When NEWS/TA transmission is detected, the system will switch to Tuner mode. ™ The NEWS or TA flag starts flashing. – If set is switched to Tuner source, the NEWS/TA function will be cancelled, "NEWS OFF" or "TA OFF" will be displayed immediately after the "TUNER" message.
TAPE English MINI HIFI SYSTEM PROGRAM SHUFFLE REPEAT TIMER REC NEWS T.A. AM MW FM LW STEREO BACK FRONT HSD 60Hz 250Hz 500Hz 1KHz 2KHz 4KHz 8KHz STANDBY ON RDS RDS CD1 • 2 • 3 BAND TAPE 1 • 2 CDR CD TUNER TAPE AUX PROG SIDE A•B SEARCH • TUNING STOP•CLEAR PLAY PAUSE ▲ CLOCK/ TIMER PRESET ▲ PREV NEWS! NEWS/TA VOLUME A. REV A.
AUX/CDR During playback • Press and hold à or á until the desired passage is located. ™ During searching, the sound is reduced to a low volume. ™ When you release à or á, the tape continues playing. KARAOKE PROGRAM SHUFFLE REPEAT TIMER REC NEWS T.A.
RECORDING English MINI HIFI SYSTEM PROGRAM SHUFFLE REPEAT TIMER REC NEWS T.A. AM MW FM LW STEREO BACK FRONT HSD 60Hz 250Hz 500Hz 1KHz 2KHz 4KHz 8KHz STANDBY ON DOLBY B NR RDS RDS CD1 • 2 • 3 BAND CD TUNER PROG TAPE SIDE A•B SEARCH • TUNING STOP•CLEAR PLAY PAUSE NEWS! NEWS/TA CDR TAPE 1 • 2 VOLUME AUX ▲ CLOCK/ TIMER PRESET ▲ PREV A. REV A.
Dubbing tapes (from tape deck 1 to tape deck 2) 1 Press TAPE ( TAPE 1•2 ) to select tape deck 2. 2 Load the prerecorded tape into tape deck 1 and a blank tape into tape deck 2. • Make sure the tape in tape deck 1 has its full spool to the left. 3 (For Tape Deck 2 only) Press SIDE on the remote control to select the recording side. 4 Press DUB (HSD) once for normal speed dubbing or twice (within 2 seconds) for high speed dubbing.
CLOCK TIMER English MINI HIFI SYSTEM PROGRAM SHUFFLE REPEAT TIMER REC NEWS T.A. AM MW FM LW STEREO BACK FRONT HSD 60Hz 250Hz 500Hz 1KHz 2KHz 4KHz 8KHz STANDBY ON DOLBY B NR RDS RDS CLOCK/ TIMER NEWS/TA BAND CD TUNER PROG TAPE SIDE A•B SEARCH • TUNING STOP•CLEAR CDR TAPE 1 • 2 PLAY PAUSE VOLUME AUX ▲ CD1 • 2 • 3 PRESET ▲ PREV A. REV A.
MAINTENANCE To switch off the TIMER 1 Press CLOCK/TIMER for more than 2 seconds. 2 Press Ç on the system to cancel the timer. ™ The timer is now switched off. ™ The display will show "OFF" and the TIMER flag disappears. Maintenance To start the TIMER again (for the same preset time and source) 1 Press CLOCK/TIMER for more than 2 seconds. 2 Press CLOCK/TIMER again to store the start time. ™ The timer is now switched on. ™ The TIMER flag appears on the display.
SPECIFICATIONS English Specifications AMPLIFIER Output power ............... 2 x 100 W MPO / 2 x 50 W RMS(1) Signal-to-noise ratio ..................................... ≥ 75 dBA (IEC) Frequency response .......................... 40 – 20000 Hz, ± 3 dB Input sensitivity AUX/CDR In ......................................................... 500 mV Output Speakers ................................................................ ≥ 6 Ω Headphones ............................................
Warning! Under no circumstances you should try to repair the set yourself as this will invalidate the guarantee. Do not open the set as there is a risk of electric shock. • If a fault occurs, check the points listed below before taking the system for repair. • Should any problems persist after you have made these checks, consult your nearest dealer or service center. “DISC NOT FINALIZED” is displayed. • The CD-RW or CD-R disc is not properly recorded for the use of a standard CD player.
TROUBLESHOOTING English A howling sound at external source. • You hear feedback when you are listening and recording from the same source simultaneously. ™ Press AUX to select CDR mode. All lighted buttons are not lit. • Equalizer Display is switched on in NITE mode. ™ Rotate JOG to other Equalizer Display. CD Recorder System does not react. • CD Recorder is in standby mode. ™ Press any key to activate the CD Recorder. • The system is not switched on. ™ Ensure that the ON/OFF button is on.