
Manual

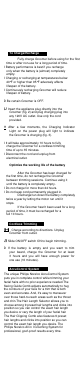


Contouring without the hair clipping
comb attachment
D Remove the hair comb by pressing and
sliding the Hair Length Selector upwards
(fig. 22).
Be careful when you are clipping without comb
attachment as when the appliance is turned on it
will trim every hair it touches.
D Tilt the appliance in such a way that only
one edge of the trimming attachment
touches the hair ends when you shape the
contours around the ears (fig. 23).
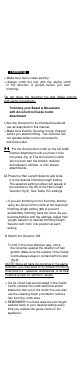
B To contour the nape of the neck or hairline,
turn the appliance and hold it with the
trimming attachment pointing downwards
(fig. 24).
□ To contour the sideburns, turn the appliance
and hold it with the trimming attachment
pointing downwards (fig. 25).
Cleaning
i Do not use water or a moist cloth to clean the
Groomer.
k Always switch Groomer OFF before cleaning.
i Do not use compressed air, abrasive cleaning
agents, scourers or liquids such as alcohol,
benzene, bleach or acetone to clean the
Groomer and attachments.
I Never clean, replace or remove Groomer
attachments with motor ON.
i Do not apply pressure to cutters.
I Do not touch cutters with hard objects as this
may damage them.
i Do not use while bathing, showering or
immerse the Groomer in water or other
liquids as damage to Groomer may occur.
During Use:
I If cut hairs have accumulated in the Guide
Comb area, remove hairs by shaking, blowing
or using cleaning brush provided. Remember
to adjust the trimming length back to your
selected setting when you replace the comb on
Groomer.
After Each Use:
I
Make sure the Groomer is switched OFF
and disconnected from the electrical outlet.
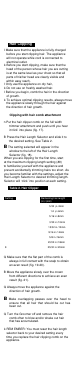
B Remove any attachment.
B Also separate the top part of the mini
shaver attachment from its body (fig. 26).
□ Blow and/or shake out any hair that may
have accumulated in the attachment.
I The shaving foil is very delicate and should not
be handled.
I If foil becomes damaged, replace it. Do not
apply pressure to shaving foil.
i Do not clean the foil with the brush, as this
may cause damage.
B Place the attachment back on the Groomer.