coffee maker flavor select HD7606 / HD7610 / HD7612
IMPORTANT SAFEGUARDS When using electrical appliances, basic safety precautions should always be followed including the following: Read all instructions before using. 1. Do not touch hot surfaces. Use handles or knobs. Care must be taken to prevent burns which can occur from touching hot parts or from spilling hot liquids. 2. To protect against electrical shock, do not immerse cord, plug, or Coffee Maker in water or other liquid. 3.
10. This appliance is intended for household use ONLY; it is not for commercial or industrial use. 11. Any service of the Coffee Maker, should be performed by the retail location where it was purchased. 12. To disconnect Coffee Maker, turn Power Control Switch to "OFF", then remove plug from electrical outlet. Remove plug by gripping plug body and pulling it from the outlet. Never yank or twist cord to unplug. 13. The carafe is designed for use with this Coffee Maker.
SPECIAL INSTRUCTIONS The Coffee Maker has a short cord to reduce the hazards of becoming entangled in or tripping over a longer cord. An extension cord may be used if the rating is equal to or greater than the rating of the Coffee Maker. Use an extension cord rated 13 amperes or greater. Care must be taken to arrange extension cord so that it will not drape over countertop or tabletop where it can be pulled on by children or tripped over unintentionally.
Table of Contents Features 2 Important 3 Preparing the Appliance for Use 3-4 Using the Anti-Chlorine Filter 4-5 Brewing Coffee 6-8 Cleaning 8-9 Descaling 9 Glass Carafe Safety Precautions 9-10 For Assistance 10 Warranty Back Cover
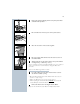
2 Features Model HD7612 Lid Reservoir Flavor Selector AUTO Power Control On/Off (1) / (0) OFF Pilot Light Thermos Carafe Dual Power System Features: Two heating elements for optimal brewing time Glass Carafe (For Models HD7610 & HD7606) HD7610 Control Panel AUTO OFF HD7606 Control Panel Flavor Selector Pilot Light Power Control On/Off (1) / (0) Minutes Auto Button Digital Clock Display / Coffee Freshness Indicator Hour AUTO OFF 120 min M H AUTO Flavor Selector Pilot Light Power Control On/
3 Important: C C Model HD7612 only: ◗ Do not disassemble the thermal carafe. ◗ To prevent water from entering the thermal carafe housing: - Never immerse or submerge Thermos carafe in water or any other liquid. - Always place carafe in a normal (i.e. upright) position. ◗ If you have made coffee and wish to make some more immediately, allow the appliance to cool down for about 3 minutes.You may then fill the water reservoir again.
4 6 Discard hot water from carafe. Let the appliance cool down for at least 3 minutes before you start brewing coffee. HD7610 only: Setting the Clock C H H H 1 When you plug the cord into the electrical outlet, the word 'SET' appears in the display. M C 2 To set the clock: press the 'H' button. The display will show 0:00 and the first digit (the hour indication) will be blinking. C 3 Adjust the blinking digit by pressing the 'H' button again.
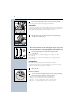
5 C 1 Remove the plastic packaging and rinse the (new) water filter well with fresh tap water. C 2 Place the filter into the lower part of the special cassette. C 3 Close the 2 sections of the cassette together. C 4 Place the cassette with the filter into the water reservoir of the Coffee Maker. 5 Slide the indicator to the number which corresponds with the month (January = 1, February = 2, etc.) This is a reminder of when you installed the filter, so it can be replaced at the correct time.
6 Brewing Coffee C 1 Place a paper filter (type 1x4 or no.4) in the brew basket. Do not forget to fold the sealed edges of the filter. CAUTION: To prevent overflow of brew basket, which could cause scalds and/or property damage, always use a paper filter when brewing coffee and clean the basket and basket drain hole after each use. C HD7606/7610 HD7612 C 2 Fill the water reservoir with cold water and put the glass or Thermos carafe in place.
7 C C HD7612: Flavor Select • To the left for a smooth, rich flavor. • To the right for a full, robust flavor. The lid of the Thermos carafe should be closed.The coffee will pour through the hole in the lid. 6 Turn the appliance on by pressing the Power Control button (1) to "ON" position . • HD7610 only: press A to turn coffee maker on or use the timer (see below). 7 The Pause & Pour system allows you to pour a cup of coffee while coffee’s still brewing.
8 HD7610 only: switching the appliance on by setting the timer C 1 Press the 'AUTO' button to set the timer. The yellow pilot light will go on. 2 Press the 'H' (Hour) button or the 'M' (Minute) button to set the desired brew start time. The corresponding digits will start blinking. H M 3 Adjust the blinking digits forward by pressing the 'H' or the 'M' button again. A few seconds after you have finished setting the timer, the digits will stop blinking and the normal time will reappear.
9 HD7612 only: Wash the inside of the Thermos carafe using a soft brush, hot water and detergent. After cleaning, rinse the Thermos carafe with fresh hot water. Do not clean in a dishwasher or submerge or immerse in water. TIP: to remove any stubborn brown deposit, just put a spoonful of baking soda with hot water into the carafe. Allow it to act for some time. After this, you can easily wipe the deposit away with the brush.
10 • Do not set empty carafe on a hot heating surface. • Do not clean carafe with steel wool pads, abrasive cleanser or any other materials that may scratch. • Do not place hands inside carafe.When handling, be careful if wearing any hand jewelry, especially diamond rings. Jewelry can scratch the glass, which increases possibility of breakage. • Do not bump, scratch, or boil dry the carafe. • Discard carafe if it is cracked, scratched, or heated while empty for an extended period of time.
FULL ONE YEAR WARRANTY Philips Electronics North America Corporation warrants each new Philips product, model HD7606, HD7610, or HD7612, (except cord and glass Thermos carafe), against defects in materials or workmanship for a period of one year from the date of purchase.