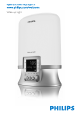
Wake-up Light
1
HF3462/10, HF3462/20, HF3461, HF3451 English 6 Français 16 Nederlands 26
English Introduction Congratulations on your purchase and welcome to Philips! To fully benefit from the support that Philips offers, register your product at www.philips.com/welcome. This appliance helps you wake up feeling fitter and more energetic. It creates a summer dawn experience that makes awakening and getting up easier. The light intensity slowly increases to the chosen level during 30 minutes.
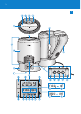
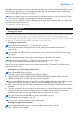
English 3 4 5 6 7 8 9 10 11 12 13 14 ( button (to set clock time) * button (to set alarm time) Natural pond sound symbol (HF3462/HF3461 only) Natural sea sound symbol (HF3462/HF3461 only) Natural forest sound symbol Gentle beep symbol Radio symbol (HF3462/HF3461 only) ^ button Radio frequency indication (HF3462/HF3461 only) Light level indication (visible when light level is adjusted) Alarm time indication Sound level indication (visible when sound level is adjusted) I Reset button Note:The HF3462/20 a
- - - English Do not use this appliance as a means to reduce your hours of sleep. The purpose of this appliance is to help you wake up more easily. It does not diminish your need for sleep. Always replace the lamp with a Philips 75W E27 SOFTONE softwhite 230V T55 (HF3451) or a Philips 100W E27 SOFTONE softwhite 230V T55 lamp (HF3462/HF3461). The appliance has no on/off switch. To disconnect the appliance from the mains, remove the plug from the wall socket.
English Note: After you have set the time for the first time, you have to press the ‘set time’ button before you can adjust the time again.The time on the display starts flashing and arrows appear above and below the time to indicate that the clock time can be set. 3 When you have set the correct time, press the ‘set time’ button to confirm the time (Fig. 6). , The time on the display stops flashing and the arrows disappear.
English Tip:We advise a light intensity between 9 and 20 (for the HF3451 with 75W lamp) or between 7 and 15 (for the HF3462/HF3461 with 100W lamp) for the alarm function. Set the light intensity to your own preference by trying out the alarm function at different light intensity levels. 2 If you do not want the light to go on at wake-up time, select light intensity level 0. Quick alarm check 1 Press the QUICK CHECK button to start an accelerated wake-up alarm test (Fig. 15).
English 11 Press the button again to set the brightness to another level. There are three levels. Note:This button cannot be used to adjust the display brightness when the alarm goes off and during snoozing. 3 button 1 When the alarm goes off at the set wake-up time, press the 3 button to switch off the wake-up alarm light and sound. Note:The alarm function remains active and the light ring round the alarm button continues to burn.
English Never use scouring pads, abrasive cleaning agents or aggressive liquids such as petrol or acetone to clean the appliance. Regularly remove dust from the inside of the appliance with a dry cloth, as accumulated dust close to a powerful lamp presents a potential fire hazard. 1 Clean the outside of the appliance with a damp cloth. 2 Clean the inside of the appliance with a dry cloth.
English 13 Specifications Models HF3451/HF3461/ HF3462 Rated voltage 230V Rated frequency 50Hz Rated input 75W (HF3451) or 100W (HF3462/HF3461) Class II Classification Not classified Ingress of water IPX0 Operating conditions Temperature from +10°C to +35°C Relative humidity from 30% to 90% Temperature from -20°C to +50°C Relative humidity from 30% to 90% (no condensation) Storage conditions Circuit diagrams, parts lists and other technical descriptions will be provided on request.
English Question Answer Perhaps you switched off the alarm function by pressing the ALARM button. Perhaps the lamp is defective. Replace the lamp (see chapter ‘Replacement’). Why can I not switch on You have to wait 3 seconds for the lamp to dim. During this time, the the lamp again 3 button does not work. immediately after I switched it off? Why do I hear no sound Perhaps you set the sound level too low. Turn the volume control to a when the alarm goes higher sound level.
English 15 Question Answer Why does the SNOOZE button not function? The snooze function can only be used within 15 minutes after the alarm starts to go off. After those 15 minutes, the button no longer functions as SNOOZE button and only functions as SCREEN BRIGHTNESS CONTROL button.
Français Introduction Félicitations pour votre achat et bienvenue dans l’univers Philips ! Pour profiter pleinement de l’assistance Philips, enregistrez vos produits sur le site à l’adresse suivante : www.philips.com/ welcome. Cet appareil apporte une sensation de bien-être et de dynamisme dès le réveil. Il crée une aube estivale qui permet de se réveiller et de se lever plus facilement. L’intensité lumineuse augmente doucement pendant 30 minutes jusqu’à ce qu’elle atteigne le niveau choisi.
Français 17 4 5 H 1 2 3 4 5 6 7 8 9 10 11 12 13 14 I Bouton QUICK CHECK (bouton de contrôle rapide) $ (molette de réglage du volume) Affichage % (bouton) Indicateur de l’heure ( (bouton de réglage de l’heure) * (bouton de réglage de l’heure de l’alarme) Symbole du son naturel « étang » (HF3462, HF3461 uniquement) Symbole du son naturel « mer » (HF3462, HF3461 uniquement) Symbole du son naturel « forêt » Symbole de l’alarme douce Symbole Radio (HF3462, HF3461 uniquement) ^ (bouton) Indicateur de fréquence
- - - - Français Posez l’appareil sur une surface stable et plane, et veillez à laisser un espace libre de 15 cm tout autour et de 40 cm au-dessus pour éviter les surchauffes. (fig. 3) N’utilisez pas l’appareil lorsque la température de la pièce est inférieure à 10 ºC ou supérieure à 35 ºC. En cours de fonctionnement, n’obturez pas les orifices d’aération à l’arrière de l’appareil. Laissez l’appareil refroidir pendant 15 minutes environ avant de le nettoyer ou le ranger.
Français 19 2 Placez l’appareil à une distance comprise entre 40 cm et 50 cm de votre tête, sur une table de chevet par exemple (fig. 4). 3 Branchez le cordon d’alimentation sur la prise secteur. , L’heure affichée commence à clignoter et des flèches s’affichent au-dessus et en dessous de l’heure pour indiquer que cette dernière doit être réglée (fig. 5). Remarque : si l’affichage ne s’allume pas après avoir branché l’appareil, appuyez sur le bouton de réinitialisation à la base de l’appareil.
, Français Le premier symbole de son (symbole radio pour le HF3462 et le HF3461, symbole de signal sonore doux pour le HF3451) clignote pendant 3 secondes avant que le signal sonore se déclenche. 2 Si nécessaire, appuyez de nouveau sur le bouton ALARM pour sélectionner un autre son. Une fois le son voulu sélectionné, n’appuyez plus sur le bouton ALARM (fig. 10). , Au bout de 3 secondes, le symbole du son cesse de clignoter pour indiquer qu’il a été sélectionné.
Français 21 Répétition 1 Appuyez sur le bouton SNOOZE/SCREEN BRIGHTNESS CONTROL pour désactiver le son pendant 9 minutes après déclenchement de l’alarme (fig. 20). La lampe reste allumée à l’intensité sélectionnée. Au bout de 9 minutes, le son de réveil est diffusé de nouveau. 2 Appuyez un peu plus longtemps sur le bouton SNOOZE/SCREEN BRIGHTNESS CONTROL pour réduire la luminosité. Remarque :Vous ne pouvez effectuer cette opération qu’une seule fois.
Français Radio (HF3462, HF3461 uniquement) 1 Appuyez sur le bouton RADIO pour écouter la radio (fig. 22). , L’anneau lumineux entourant ce bouton s’allume (fig. 23). 2 Utilisez les boutons % et ^ pour sélectionner la fréquence radio voulue. (fig. 24) Vous pouvez choisir des stations FM. 3 Vous pouvez utiliser l’antenne externe pour améliorer la réception. Pour ce faire, branchez l’antenne externe sur la prise d’antenne située à proximité du symbole ò à l’arrière de l’appareil.
Français 23 3 Ouvrez le panneau d’accès à l’ampoule. Pour ce faire, appuyez sur la languette inférieure et poussez fermement le panneau vers le haut (fig. 26). 4 Faites-le pivoter vers l’extérieur, aussi loin que possible (fig. 27). 5 Enlevez l’ampoule de son support (fig. 29). 6 Remplacez-la par une ampoule neuve. Environnement - Lorsqu’il ne fonctionnera plus, ne jetez pas l’appareil avec les ordures ménagères, mais déposezle à un endroit assigné à cet effet, où il pourra être recyclé.
Français Foire aux questions Question Réponse Pourquoi l’appareil ne fonctionne-t-il pas ? Vous n’avez peut-être pas inséré correctement la fiche du cordon d’alimentation dans la prise secteur. Vérifiez si la fiche a été correctement insérée dans la prise secteur. Il y a peut être une panne de courant. Vérifiez si l’alimentation électrique fonctionne en branchant un autre appareil. Si le cordon d’alimentation est peut-être endommagé.
Français 25 Question Réponse Pourquoi la radio (HF3462, HF3461 uniquement) ne fonctionne-t-elle pas ? La fonction radio est sans doute défectueuse. Contactez le Service Consommateurs Philips de votre pays. Raccordez l’antenne externe si vous ne l’avez pas déjà fait. Voir la section « Radio » du chapitre « Utilisation de l’appareil ». Pourquoi la radio émetelle des grésillements (HF3462, HF3461 uniquement) ? Le signal d’émission est peut-être trop faible.
Nederlands Inleiding Gefeliciteerd met uw aankoop en welkom bij Philips! Als u volledig wilt profiteren van de ondersteuning die Philips biedt, registreer uw product dan op www.philips.com/welcome. Met dit apparaat voelt u zich fitter en energieker wanneer u wakker wordt. De lamp creëert een zomerse dageraadervaring, waardoor u makkelijker wakker wordt en opstaat. De lichtintensiteit neemt gedurende 30 minuten langzaam toe naar het ingestelde niveau.
Nederlands 27 1 2 3 4 5 H 1 2 3 4 5 6 7 8 9 10 11 12 13 14 I @ wieltje (draaien om de lichtintensiteit in te stellen) ALARM-knop (wekker) RADIO-knop (alleen HF3462/HF3461) QUICK CHECK-knop (snel controleren) $ wieltje (draaien om volume in te stellen) Displaygedeelte % knop Tijdaanduiding ( knop (om tijd in te stellen) * knop (om wektijd in te stellen) Symbool voor natuurgetrouwe vijvergeluiden (alleen HF3462/HF3461) Symbool voor natuurgetrouwe zeegeluiden (alleen HF3462/HF3461) Symbool voor natuurgetro
- - - - Nederlands Let op Stel het apparaat niet bloot aan zware schokken. Plaats het apparaat op een stabiele, vlakke ondergrond en zorg ervoor dat er minstens 15 cm vrije ruimte rondom het apparaat en 40 cm vrije ruimte boven het apparaat is om oververhitting te voorkomen. (fig. 3) Gebruik het apparaat niet bij kamertemperaturen lager dan 10°C of hoger dan 35°C. Zorg ervoor dat de ventilatieopeningen in de voet en boven op het apparaat tijdens gebruik open blijven.
Nederlands 29 Klaarmaken voor gebruik Installatie 1 Open voor het eerste gebruik de klep aan de achterzijde van het apparaat (zie hoofdstuk ‘Vervangen’) en schroef de lamp in de lamphouder. 2 Plaats het apparaat op 40-50 cm afstand van uw hoofd, bijvoorbeeld op een nachtkastje (fig. 4). 3 Steek de stekker in het stopcontact. , De tijd op het display begint te knipperen en er verschijnen pijlen boven en onder de tijd om aan te geven dat de tijd dient te worden ingesteld (fig. 5).
Nederlands Het geluid en het geluidsniveau instellen 1 Druk op de ALARM-knop (fig. 10). , De lichtring rond de ALARM-knop gaat aan (fig. 11). , Het eerste geluidssymbool (radiosymbool bij de HF3462/HF3461 en een symbool voor een zacht piepje bij de HF3451) knippert 3 seconden en het geluid is hoorbaar. 2 Druk nogmaals op de ALARM-knop wanneer u een ander wekgeluid wilt selecteren. Druk niet opnieuw op de ALARM-knop wanneer u een geluid hebt gevonden dat u wilt gebruiken (fig. 10).
Nederlands 31 4 Als u de wekfunctie wilt uitschakelen, drukt u een of meerdere keren op de ALARM-knop totdat u geen geluidssymbool meer op het display ziet en de lichtring rond de ALARM-knop niet meer brandt. Sluimeren 1 Druk op de SNOOZE/SCREEN BRIGHTNESS CONTROL-knop om het geluid 9 minuten uit te schakelen nadat de wekker is afgegaan (fig. 20). De lamp blijft branden op het geselecteerde intensiteitsniveau. Na 9 minuten wordt het wekgeluid automatisch opnieuw afgespeeld.
Nederlands Radio (alleen HF3462/HF3461) 1 Druk op de RADIO-knop om de radio in te schakelen (fig. 22). , De lichtring rond de knop gaat aan (fig. 23). 2 Gebruik de knoppen % en ^ om de frequentie van uw favoriete zender te selecteren. (fig. 24) U kunt FM-zenders kiezen. 3 U kunt de externe antenne gebruiken voor een betere ontvangst. Steek de externe antenne in het aansluitpunt voor de antenne naast het symbool ò aan de achterkant van het apparaat.
Nederlands 33 2 Laat het apparaat ongeveer 15 minuten afkoelen. 3 Open de klep voor het vervangen van de lamp door eerst de onderkant naar binnen te duwen en vervolgens met enige kracht naar boven te duwen (fig. 26). 4 Beweeg de klep voor het vervangen van de lamp zo ver mogelijk naar buiten (fig. 27). 5 Verwijder de oude lamp uit de lamphouder (fig. 29). 6 Draai een nieuwe lamp in de lamphouder.
Nederlands Veelgestelde vragen Vraag Antwoord Waarom werkt het apparaat niet? Misschien zit de stekker niet goed in het stopcontact. Steek de stekker goed in het stopcontact. Mogelijk is er een stroomstoring opgetreden. Controleer of dit zo is door een ander apparaat aan te sluiten. Misschien is het netsnoer beschadigd.
Nederlands 35 Vraag Antwoord Waarom werkt de radio (alleen HF3462/ HF3461) niet? De radiofunctie is mogelijk defect. Neem contact op met het Philips Customer Care Centre in uw land. Sluit de externe antenne aan als dit nog niet is gebeurd. Zie ‘Radio’ in hoofdstuk ‘Het apparaat gebruiken’. Waarom hoor ik kraakgeluiden op de radio (alleen HF3462/ HF3461)? Misschien is het uitzendsignaal zwak. Zoek het juiste signaal (zie hoofdstuk ‘Het apparaat gebruiken’). De wekker ging gisteren af.
2 3 4 5 6 7 8 9 10 11 12 13 14 15 16 17 18 19 20 21
22 23 24 25 26 27 28 29 30
4222.002.6448.