Read this manual first! Congratulations on purchasing this Philips product We’ve included everything you need to get started. If you have any problems. Philips Representatives can help you get the most from your new product by explaining: • Hookups, • First Time Setup, and • Feature Operation. Do not attempt to return this product to the store.
Return your Warranty Registration card today to ensure you receive all the benefits youVe entitled to. Once your Philips purchase is registered, you’re eligible to receive all die privileges of owning a Philips product So complete and return the Warranty Registration Card enclosed with your purchase at once, and take advantage of these important benefits.
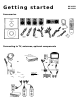
Getting started Accessories Connecting to TV, antennas, optional components CIHUcortNtf (for digibl ncorcBng • «umpfo only) or 0 Vrs I° — AirffifllA—* o ^ iSo’ eDilJI«*! CEVTap« Recorder (for analo9 rKordIng - »xampt* only) I rr^»>il o 0- ,is T-yrTr^T-Tf BiBiigiBiia El Bi la la Bi tiaaan MX-3600D MX-3700D
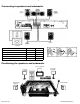
T Connecting to speakers and subwoofer front speaker rear speaker subwoofer . . -.•.. ...................................... .............. ..................................................... ............... ................. .
Index Canada English: English This digital apparatus does not exceed the Class B limits for radio noise emissions from digital apparatus as set out in the Radio Interference Regulations of the Canadian Department of Communications. Français: Cet appareil numérique n'emet pas de bruits radioélectriques dépassant les limites applicables aux appareils numériques de Class B prescrites dans le Règlement sur le Brouillage Radioélectrique édicté par le Ministère des Communications du Canada.
IMPORTANT SAFETY INSTRUCTIONS 1« Read these instructions. 2. Keep these instructions. 3. Heed all warnings. 4. Foliow aii instructions. 5. Do not use this apparatus near water. 6. Clean only with dry cloth. 7. Do not block any ventilation openings. Install in accordance with the manufacturer's instructions. 8. Do not Install near any heat sources such as 11.Only use attachments/accessories specified by the manufacturer. 12. 13.
Contents introduction and General Information Features....................................................................................6 Discs for playback.....................................................................6 Player zone Supplied accessories...... ..................................................... 6 Environmental information........................................................ 6 Installation.................................................................................
Introduction and General Information Features Supplied accessories Your complete 7-piece 350-Watt (MX-3700D) / 300-WATT (MX-3600D) DVD Digital Home Cinema System creates the same dynamic sound qualities that you find in full-fledged cinemas and incorporates some of the best features in home theater technology.
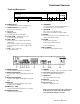
Functional Overview Front and Rear panels E№nS 1 pP cz r£.* .y 1 ss® ____________ t::___ vvv MrM i.T •- 6Z9 KSi Rme € @ ® (i) ®(i) d) (I) ® ® STANDBY ON C!) - ( 8) SURROUND to switch between power on and standby modes. (2) OPEN/CLOSE A (in Disc mode only) to open or close the disc tray. ®® - to select multichannel surround (Dolby Digital, DTS or Dolby ProLogic) or stereo sound effect. (3) Disc Tray Display screen (9) PROGRAM in Disc mode, to program disc tracks.
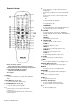
©/ in disc mode, press to skip to the previous/next chapter/track. in disc mode, hold down to fast reverse/forward the disc. in Tuner mode, to tune to a lower or higher radio frequency. Remote Control ► II to start or interrupt disc playback. to stop playing the disc. SURROUND to select multichannel surround (Dolby Digital, DTS or Dolby ProLogic) or stereo sound effect.
Connections IMPORTANT! - Before connecting the AC power cord to the wall outlet, ensure that all other connections have been made. - Never make or change any connections with the power switched on. - The type plate is located at the rear or bottom of the system. FM Indoor Antenna Connect the supplied FM antenna to the FM jack. Move the antenna in various directions until the clearest signal is received.
Connecting the speakers Connect the supplied speaker systems using the supplied speaker cables by matching the colors of the jacks and speaker cables. 1 • Use the supplied audio cables to connect AUDIO IN jacks to the corresponding AUDIO OUT jacks on the TV. VCR or other audio/visual components. • Use the supplied Pr/Cr Pb/CbY cables to connect Pr/Cr Pb/CbY jacks to the corresponding video input jacks on aTV.
Preparations Inserting batteries into the remote control Setting up the surround sound system 1 open the battery compartment 2 Place the batteries in the compartment with the correct polarity as indicated by " + “ and " — symbols. 3 Close the cover. You must connect all the speakers and set up the system properly in order to enjoy the Digital Cinema experience at home (refer to "Connections - Connecting the speakers").
T Changing the volume level System Setup (DVD) You can change the speakers’ sound distribution to suit your surround sound needs. Press CENTER + / — to adjust the level of the center speaker "CNT BB" is displayed. The system setup is carried out via the TV, it enabling you to customize the DVD system to suit your particular requirement If the preferred options selected are not available on a disc, then the disc's own preference will be used.
Setting the sound 16:9 (Wide screen) 4:3 LB (Letter Box) 4:3 PS (Pan Scan) Note: - ¡f your DVD is not encoded to allow you to change the aspect ratio, TV shape cannot be changed. - TV System Allows you to select the color system matching the connected TV set AUTO (default setting) - If the connected TV is multi system, select this mode. The output format will be in accordance with the video signal of the disc. NTSC - If the connectedTV is NTSC system, select this mode.
Setting the language - Audio - Subtitle - Disc Menu 2 Use AT keys to select a rating level. 3 Press OK to confirm. Rating - NO PARENT If parental control is not activated, it will play all discs. This is to select the audio language, subtitle language and the language used on TV screen menus or DVD menus that will always be used for every disc to be played back.The default setting is English.
Basic Functions Selecting the surround sound mode IMPORTANT! - For proper surround sound, make sure you have followed the "Connections" and "Preparations" procedures fuliy. - The center and surround speakers only operate when the system is set to surround sound mode and the source material being played is recorded or broadcast in Doiby Digital, DTS or Dolby Pro Logic surround sound. - Stereo broadcasts or recordings wili produce some surround channel effects when played In a surround mode.
Volume control Adjust VOLUME button (or press VOL + / —) to increase or decrease the volume level. "t'DL is displayed, "«.“"denotes the volume level. Fof Philips TVs only Press TV VOL +/ — on the remote control to adjust the TVs volume level. lb listen through the headphones Connect the headphones plug to the jf) socket at the front of the player. The speakers will be muted. To switch off the volume temporarily Press MUTE. Playback will continue without sound and 'T1LITE" is displayed.
Operations Notes: — Your player will not play discs that have a region code différent from the region code of your player. — pi If the inhibit icon appears on the TV screen when a ■*» button is pressed, it means the function is not available on the disc you are playing. Discs information DVI>-VID«0 G DVD video discs may have one or more Titles, and each Title may have one or more Chapters. Playback stops at the end of each Trtle.
Repeat play Special DVD/VCD features You can only select the repeat play mode during playback. A number of operations can be carried out directly via the multiple menu bars on the TV screen without interrupting disc playback. For DVD - Repeat chapter/title/disc Press REPEAT repeatedly to select the following: "P“ I" - repeat chapter. ‘‘P“R"-repeat title/disc.
Changing sound track language 3 This operation works only on DVDs with multiple soundtrack language. To resume normal play, press P-H Note: - The sound will be muted during fast reverse or forward search. Select from the menu bar and press T key to select the desired language.
Zooming in Checking the contents of DVD This function allows you to enlarge the picture on the TV screen and to pan through the enlarged image. Press DISC MENU on the remote control. If the current title has a menu, the menu will appear on the screen. Otherwise, the disc menu will be displayed. Use < ► AT keys to select the desired title or chapter followed by ► II or OK. The selected title or chapter starts playing. Select m from the menu bar and press T key repeatedly to select a zoom factor: x1.
Special MP3-CD features — — — - JPEG format Max 12 characters Max. nested directory is 7 levels The max. album number is 32 Supported VBR bit-rate Supported sampling frequencies for MP3 disc are : 32 kHz, 44.1 kHz, 48 kHz - Supported Bit-rates of MP3 disc are; 32,64,96,128, 192, 256 (kbps) — The disc reading time may exceed 30 seconds due to the lai^e number of songs compiled onto one disc. * • MP3>CD menu 1 2 Press DISC MENU to switch on the MP3-CD menu. ^ The album menu appears on the TV screen.
T Other Functions Tuning to radio stations Listening to preset radio stations Press STANDBY ON to switch on the last selected source. In tuner mode, press -4 or ► or use the numeric keypad (0-9) to select the desired preset number. Adjust SOURCE (or press TUNER) to select TUNER mode. 3 4 ^ The preset number, radio frequency, and waveband are displayed. Press TUNER again to select the desired band ; FM or AM. Press and hold 1^^ or until the frequency indication starts to change, then release.
Specifications AMPLIFIER SECTION_________________________________________ Output power - Stereo mode (DIN).......................................................................2 x 50 W - Surround mode (1 kHz)................................................50 W RMS/channel Total Harmonic Distortion................................. 10% at rated power (1 kHz) Frequency Response...........................................180 Hz — 14 kHz / ±1 dB Signal-to-Noise Ftatio...........................................
Troubleshooting WARNING! Under no circumstances should you try to repair the system yourself, as this will invalidate the warranty. Do not open the system as there Is a risk of electric shock. if a fault occurs, first check the points listed below before taking the system for repair. If you are unable to solve a problem by following these hints, consult your dealer or service center. Problem No power. No picture. Distorted or poor picture. Completely distorted picture or black/white picture.
T LIMITED WARRANTY AUDIO SYSTEM One Year Free Labor One Year Free Service on Parts This product must be carried in for repair. WHO IS COVERED? BEFORE REQUESTING SERVICE... You must have proof of purchase to receive warranty service. A sales receipt or other document showing that you purchased the product is considered proof of purchase. Please check your owner’s manual before requesting service. Adjustments of the controls discussed there may save you a service call.