
User Guide


5
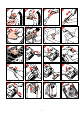
In one movement the tube is parked in a
convenient position (fig. 14).
Storage
- Switch the vacuum cleaner off (fig. 15).
- Remove the mains plug from the wall socket.
- Rewind the mains cord by pressing the
cordwinder pedal (i) (fig. 16).
- Hitch the lower tube onto the vacuum cleaner
(fig. 17-18). You can slide the clip along the
tube to change the height.
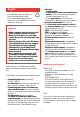
Replacing the dustbag
• Only use this vacuum cleaner with the original
Philips dustbags types Oslo
+
(type nº.
HR 6938 or service nº. 4822 015 70049) or
Oslo
+
Hygiene (closeable) (type nº.
HR 6938-OSH or service nº. 4822 015 70057)
(fig. 19). Damage due to using other dustbags
is not covered by guarantee.
- Switch the vacuum cleaner off (fig. 15).
- Remove the hose (fig. 1b).
- Open the cover (fig. 20).
- Remove the cassette with the full dustbag
(fig. 21).
- Remove the full dustbag from the cassette by
pulling the cardboard tag (fig. 22).
This automatically closes the dustbag (type
Oslo
+
Hygiene).
- Discard the full dustbag.
- Slide the cardboard front plate of the new
dustbag into the two slots of the cassette as
far as possible (fig. 23, 24).
- Position the cassette and the new dustbag in
the vacuum cleaner (fig. 25).
- Bend the rear part of the dustbag downwards.
- Close the cover ("Click!") (fig. 26).
Note: If no dustbag has been placed into the
cassette, the cover cannot be closed.
The motor protection filter
Your appliance has been equipped with a greatly
improved, triple permanent motor protection filter.
This filter ensures an optimal protection of the
motor. This filter does not need to be replaced.
This means that you can simply throw away the
replacement filter that is supplied with the
dustbags, since this filter is only required for
older versions of this vacuum cleaner.
All you have to do is shake out the permanent
filter and reinsert it into the vacuum cleaner
every time you put in a new dustbag (fig. 27-29).
- Position the filter in the holder as it was
previously placed and press it firmly.
- Push the holder with the clean filter into its
place so that the filter fits correctly at the
bottom.
Replacing the AFS-Micro filter
The indicator will help you determine if the AFS-
Micro filter needs replacing (fig. 30).
See figs. 31-32 on how to proceed.
- Position the lower edge of the new filter
properly behind the ridges of the holder.
- When closing the holder, ensure that the filter
fits in completely.
Replacing the mains cord
If the mains cord of this appliance is damaged, it
must only be replaced by Philips or their service
representative, as special tools and/or parts are
required.
Ordering dustbags and accessories
One new AFS-Micro filter is supplied with each
set of original Philips dustbags Oslo
+
or Oslo
+
Hygiene (closeable).
In case you have any difficulties obtaining
dustbags, filters or other accessories for this
vacuum cleaner, please contact the consumer
relations desk in your country.
For phone numbers please refer to the
guarantee card.