Register your product and get support at www.philips.
1 Notice Copyright About Progressive Scan Trademarks 2 Important Safety Product care 3 Your home theater Main unit Remote control 4 Connect your home theater Connectors Connect to the TV Connect audio from TV or other devices Connect a microphone 5 Use your home theater Before you start Choose your sound Play a disc Play from a USB storage device More play features for disc or USB Play from radio Play audio from TV or other devices Create MP3 audio les 6 Change settings Access the setup menu Cha
1 Notice Copyright This item incorporates copy protection technology that is protected by U.S. patents and other intellectual property rights of Rovi Corporation. Reverse engineering and disassembly are prohibited. ABOUT DIVX VIDEO-ON-DEMAND: This DivX Certi ed device must be registered in order to play DivX Video-on-Demand (VOD) content. To generate the registration code, locate the DivX VOD section in your device setup menu. Go to vod.divx.
Important Read and understand all instructions before you use your home theater. If damage is caused by failure to follow instructions, the warranty does not apply. Safety Risk of electric shock or re! • Never expose the product and accessories to rain or water. Never place liquid containers, such as vases, near the product. If liquids are spilt on or into the product, disconnect it from the power outlet immediately. Contact Philips Consumer Care to have the product checked before use.
Disposal of your old product and batteries Your product is designed and manufactured with high quality materials and components, which can be recycled and reused. When this crossed-out wheeled bin symbol is attached to a product it means that the product is covered by the European Directive 2002/96/ EC. Please inform yourself about the local separate collection system for electrical and electronic products.
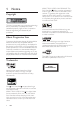
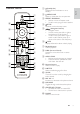
a b u c d a (Standby-On) Switches the home theater on or to standby. b OPEN/CLOSE Opens or closes the disc compartment. c REPEAT / PROGRAM • Selects or turns off repeat mode. • In radio mode, program radio stations. d SETUP Accesses or exits the setup menu. e t • • e • s r f g h q p i j o k n l m English Remote control f (Navigation buttons) Navigate menus. In video mode, press left or right to fast backward or fast forward.
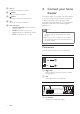
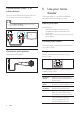
q VOL +/Increases or decreases volume. r (Mute) Mutes or restores volume. s BACK Returns to a previous menu screen. t OK Con rms an entry or selection. u Source buttons • AUDIO SOURCE : Selects an audio • • • input source. RADIO: Switches to FM radio. USB : Switches to USB storage device. DISC: Switches to disc source. 4 Connect your home theater This section helps you connect your home theater to a TV and other devices.
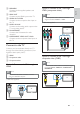
Connects to the supplied speakers and subwoofer. c HDMI OUT Connects to the HDMI input on the TV. Option 2: Connect to the TV through YPbPr (component video) English b SPEAKERS Note • The component video cable or connector d VIDEO OUT-VIDEO Connects to the composite video input on the TV. e AUDIO IN-AUX Connects to the analog audio output on the TV or an analog device. might be labeled Y Cb Cr or YUV.
Connect audio from TV or other devices Use your home theater to play audio from the TV or other device such as a cable box. 5 Use your home theater This section helps you use the home theater to play media from a wide range of sources. Tip • Press AUDIO SOURCE to select the audio Before you start output of your connection. TV Check that you: • Make the necessary connections and complete the setup as described in the Quick Start. • Switch the TV to the correct source for the home theater.
Use video options Experience an immersive audio experience with surround sound modes. Access several useful features while viewing video. English Change surround sound mode Note • Available video options depend on the video source. Press SURR repeatedly to cycle through the available surround modes. Button Action Searches slow-backward or slow-forward. Press repeatedly to change the search speed. For VCD/SVCD, slow-backward search is not available. AUDIO Selects an audio language or SYNC channel.
Use karaoke options Access several useful features while playing karaoke disc. Note • If the USB storage device does not t into the connector, use a USB extension cable. • The home theater does not support digital Note • Ensure that a microphone (not supplied) is connected to the MIC connector on this home theater before play. • Set the microphone volume to the minimum level before connecting the microphone to prevent howling. Button cameras that need a computer program to display photos.
[TT Time] : Title time. [Ch Time] : Chapter time. [Disc Time] : Disc time. [Track Time] : Track time. Enter the time of the scene, then press OK . 3 Note English • • • • • AM and digital radio are not supported. • If no stereo signal is detected, you are prompted to install the radio stations again. • For the best reception, place the antenna away from the TV or other sources of radiation. Repeat play a speci c section Select sections of audio or video for repeat playback. During playback, press INFO.
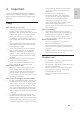
6 CREATE MP3 TRACK OPTIONS Speed Normal Track01 04:14 Bitrate 128kbps Track02 04:17 CRT ID3 Yes Track03 03:58 Device USB1 Track04 04:51 Track05 03:53 Track06 04:09 Track07 04:38 SUMMARY Select Track 0 Time 00:00 Start 5 6 7 8 Exit Select All Select the settings in the [OPTIONS] panel, then press OK . • [Speed] : Selects the write-to- le speed. • [Bitrate] : Selects the conversion quality. • [CRT ID3] : Copies information on the tracks in the MP3 les.
• 1 2 3 4 Press SETUP. Select [General Setup], then press OK . Select and adjust the following settings: • [Disc Lock] : Restricts play to disc. Password (PIN code) is required to unlock the disc before play. • [Display Dim] : Changes the brightness of the display panel. • [OSD Language] : Selects the onscreen display menu language. • [Screen Saver] : Enables or disables screen saver mode. If enabled, the screen enters idle mode after 10 minutes of inactivity (for example, in pause or stop mode).
Change preference settings 7 1 2 3 To check for new updates, compare the current software version of your home theater with the latest software version (if available) on the Philips web site. 4 Press SETUP. Select [Preference Setup], then press OK . Select and adjust the following settings: • [Audio] : Selects audio language for video. • [Subtitle] : Selects subtitle language for video. • [Disc Menu] : Selects menu language for video disc.
Product specifications Note • Speci cation and design are subject to change without notice. Region code The type plate on the back or bottom of the home theater shows which regions it supports Country DVD Europe, United Kingdom Asia Pacific, Taiwan, Korea Latin America Australia, New Zealand Russia, India China Playback media DVD-Video, DVD+R/+RW, DVD-R/-RW, DVD+R DL, CD-R/CD-RW, Audio CD, Video CD/SVCD, Picture CD, MP3-CD, WMA-CD, DivX-CD, USB storage device File Format • Audio: .mp3, .wma • Video: .
Speakers • System: full range satellite • Speaker impedance: 8 ohm (center), 4 ohm (Front/Rear) • Speaker drivers: 3” full range • Frequency response: 150 Hz-20 kHz • Dimensions (WxHxD): • Center: 160.9 x 95 x 92 (mm) • Front: 95 x 160.9 x 87 (mm) • Rear: 254 x 1001.5 x 254 (mm) • Weight: • Center: 0.77 kg • Front: 0.56 kg/each • Rear: 3.
No sound. • Ensure that the audio cables are connected and select the correct input source (for example, AUDIO SOURCE ) for the device you want to play. No sound on HDMI connection. • You might not hear any sound if the connected device is not HDCP (Highbandwidth Digital Content Protection) compliant or only DVI compatible. Use an analog or digital audio connection. • Ensure that the [HDMI Audio] is enabled. No sound from TV program.
M 10 Index MP3 create MP3 les A ampli er audio connection language settings synchronize with video 15 8 14, 9 13 10 C care change settings connect audio from TV guide microphone other devices TV connectors contact us 3 12 8 , 11 6 8 8 7 6 16 D disc play supported discs disposal of your product DivX subtitle 9 15 4 14 F le formats 15 K karaoke microphone 8 L language audio disc menu on-screen display subtitle 18 EN 14 14 13 14 11 O overview connectors main unit remote control 6 4 5 P pa
S 3 English safety settings audio general parental control preferences restore factory settings video slideshow play musical slideshow software update version sound mode surround troubleshooting subtitle language 13 13 14 14 14 13 10 14 14 8 9 17 9 T time search video troubleshooting TV audio from TV connect 10 16 8 , 11 7 U USB play software update 10 14 V video options settings synchronize with audio 9 13 10 EN 19
EN