For product support, visit www.philips.com/welcome HTS3541 User manual EN: For further assistance, call the customer support service in your country. • To obtain assistance in the U.S.A., Canada, Puerto Rico, or the U.S. Virgin Islands, contact Philips Customer Care Center at 1-866-310-0744 • To obtain assistance in Mexico, contact Philips Customer Care Center at 01 800 839 1989; Mexico city: 5887-9736 For Product recycling information, please visit - www.recycle.philips.com Product SERIAL NO.
1 2 3 5 Important 2 Important safety instructions Care for your product Care of the environment 3D health warning Help and support 2 3 3 3 4 Your home theater 4 4 4 5 6 Main unit Connectors Remote control Connect and set up 7 7 Connect speakers 7 Connect to TV 7 Connect audio from TV and other devices 9 Set up speakers 9 Set up EasyLink (HDMI-CEC control) 10 Connect and set up a home network 10 8 Use your home theater Access the home menu Discs Data files USB storage devices Audio, video, a
1 Important • • Read and understand all instructions before you use your product. If damage is caused by failure to follow instructions, the warranty does not apply. Important safety instructions • • • • • • • • • • • • 2 Read these instructions. Keep these instructions. Heed all warnings. Follow all instructions. Do not use this apparatus near water. Clean only with dry cloth. Do not block any ventilation openings. Install in accordance with the manufacturer's instructions.
Do not place this apparatus on the furniture that is capable of being tilted by a child and an adult leaning, pulling, standing or climbing on it. A falling apparatus can cause serious injury or even death. • This apparatus should not be placed in a built-in installation such as a bookcase or rack unless proper ventilation is provided. Make sure to leave a space of 7.8 inches (20cm) or more around this apparatus. Class II equipment symbol This symbol indicates that the unit has a double insulation system.
Help and support Philips provides extensive online support. Visit our website at www.philips.com/support to: • download the complete user manual • print the quick start guide • watch video tutorials (available only for selected models) • find answers to frequently answered questions (FAQs) • email us a question • chat with our support representative. Follow the instructions on the website to select your language, and then enter your product model number.
(USB) Audio, video or picture input from a USB storage device. b MUSIC iLINK Audio input from an MP3 player. Remote control English a This section includes an overview of the remote control. Rear connectors 1 2 3 22 4 21 a AC MAINS 5 b SPEAKERS 6 Connect to the power supply. Connect to the supplied speakers and subwoofer. 7 c ANTENNA FM Fixed FM antenna. 8 d AUDIO IN-AUX 9 Connect to an analog audio output on the TV or an analog device.
b (Home) Access the home menu. c Source buttons • DISC/POP-UP MENU : Switch to disc source.Access or exit the disc menu when you play a disc. RADIO : Switch to FM radio. AUDIO SOURCE : Select an audio input source. • • d BACK Return to a previous menu screen. In radio mode, press and hold to erase the current preset radio stations. • • e Navigation buttons • Navigate menus. • In radio mode, press left or right to start auto search. In radio mode, press up or down to tune the radio frequency.
Connect and set up Note English 3 • Surround sound depends on factors such as This section helps you connect your home theater to a TV and other devices, and then set it up. For information about the basic connections of your home theater and accessories, see the quick start guide. For a comprehensive interactive guide, visit www.connectivityguide.philips.com. Note • For identification and supply ratings, see the type plate at the back or bottom of the product.
1 2 Using a High Speed HDMI cable, connect the HDMI OUT (ARC) connector on your home theater to the HDMI ARC connector on the TV. • The HDMI ARC connector on the TV might be labeled differently. For details, see the TV user manual. On your TV, turn on HDMI-CEC operations. For details, see the TV user manual. • If you cannot hear the TV audio through your home theater, set up the audio manually (see 'Set up the audio' on page 10).
English Connect audio from TV and other devices Play audio from TV or other devices through your home theater speakers. Use the best quality connection available on your TV, home theater, and other devices. Note • When your home theater and TV are connected through HDMI ARC, an audio connection is not required (see 'Option 1: Connect to TV through HDMI (ARC)' on page 7).
Set up EasyLink (HDMI-CEC control) This home theater supports Philips EasyLink, which uses the HDMI-CEC (Consumer Electronics Control) protocol. EasyLink-compliant devices that are connected through HDMI can be controlled by a single remote control. • • Note • Depending on the manufacturer, HDMI-CEC is known by many names. For information on your device, see the user manual of the device. • Philips does not guarantee 100% interoperability with all HDMI-CEC devices.
• Familiarize yourself with the network router and networking principles. If necessary, read documentation that accompanies the network components. Philips is not responsible for lost, damaged, or corrupt data. Before you start • For Netflix,VUDU and software update, make sure that the network router has access to the Internet with high-speed connection, and is not restricted by firewalls or other security systems.
4 Use your home theater This section helps you use the home theater to play media from a wide range of sources. Before you start • Make the necessary connections described in the Quick start guide and the user manual. • Switch the TV to the correct source for the home theater. Play buttons Button Navigation buttons OK (Play) / / Access the home menu The home menu provides easy access to connected devices, setup and other useful features in your home theater. Press (Home). » The home menu is displayed.
2 3 Using the high speed HDMI cable, connect your home theater to a 3D compatible TV. Make sure that the 3D video setting is enabled. Press (Home), select [Setup] > [Video] > [Watch 3D video] > [Auto]. • To play 3D discs in 2D mode, select [Off]. Play a Blu-ray 3D disc and put on the 3D glasses. • During video search and in certain play modes, the video is displayed in 2D. The video display returns to 3D when you resume play. 5 6 1 2 3 4 5 Select [PIP Selection] > [PIP].
1 2 3 While playing video, press SUBTITLE to select a language. For DivX videos, if the subtitles do not appear correctly, continue the following steps to change the character set. Press OPTIONS. » The options menu is displayed. 4 Select [Character Set], and then select a character set that supports the subtitle.
• • • • • • • • • • • • • • [Subtitle Shift]: Change the subtitle position on the screen. [Info]: Display information about what is playing. [Character Set]: Select a character set that supports the DivX subtitle. [Time Search]: Skip to a specific part of the video by entering the time of the scene. [2nd Audio Language]: Select the second audio language for Blu-ray video. [2nd Subtitle Language]: Select the second subtitle language for Blu-ray video. [Titles]: Select a specific title.
Button / or Alphanumeric buttons Navigation buttons BACK OPTIONS Action Select a preset radio station. 4 Left/Right: Search for a radio station. Up/Down: Fine tune a radio frequency. Press to stop the installation of radio stations. Press and hold to erase the preset radio station. Manual: 1) Press OPTIONS. 2) Press / to select your preset. 3) Press OPTIONS again to store the radio station. Automatic: Press and hold for three seconds to reinstall the radio stations.
8 • Use the remote control to navigate and start a video play. To exit VUDU, press (Home). Note • To deactivate VUDU from your home theater, press , and then select [Setup] > [Advanced] > [Deactivation] > [VUDU]. 4 ORIGINAL: Experience the original sound of your movies and music, without added sound effects. • NEWS: Hear every word with optimized speech and clear vocals. • GAMING: Enjoy thrilling arcade sounds, ideal for action-packed video games or loud parties. Press OK to confirm.
5 Change settings The home theater settings are already configured for optimal performance. Unless you have a reason to change a setting, we recommend that you keep the default setting. Picture and video settings 1 2 3 4 Note • You cannot change a setting that is grayed out. • To return to the previous menu, press BACK. To exit the menu, press (Home). Language settings 1 2 3 4 Press (Home). Select [Setup], and then press OK. Select [Preference], and then press OK.
Energy saving settings 1 2 3 4 1 2 3 4 Press (Home). Select [Setup], and then press OK. Select [Preference], and then press OK. Press the Navigation buttons and OK to select and change: • [Change Password]: Set or change your password for parental control access. If you do not have a password or have forgotten your password, enter 0000. • [Parental Control]: Restrict access to discs that are recorded with age ratings. To play all discs, irrespective of the ratings, select 8 or [Off].
6 Update software Philips continually tries to improve its products. To get the best features and support, update your home theater with the latest software. Compare the version of your current software with the latest version on www.philips.com/support. If the current version is lower than the latest version available on the Philips support website, upgrade your home theater with the latest software. Caution • Do not install a lower version of software than the current version installed on your product.
Product specifications Note • Specifications and design are subject to change without notice. .wav .m4a .mka .mka WAV MKV MKA MKA .mka .mka .mka MKA MKA MKA PCM AAC PCM Dolby Digital DTS core MPEG MP3 .mka MKA WMA .mka MKA AAC, HEAAC Region codes 1.4 Mbps 192 kbps 27.648 Mbps 640 kbps 1.54 Mbps 912 kbps 32 kbps ~ 320 kbps 64 kbps ~ 160 kbps 192 kbps The type plate on the back or bottom of the home theater shows which regions it supports.
.mp4 or .m4v files in MP4 container Audio codec Dolby Digital, MPEG, MP3, AAC, HE-AAC Video codec MPEG 1, MPEG 2 MPEG 4 ASP H.264/AVC HP@4.1/4.0; MP@3.2/3.1/3.0 Radio Bit rate 20 Mbps (peak 40 Mbps) 10 Mbps max 20 Mbps (peak 40 Mbps) .mkv files in MKV container Audio codec PCM, Dolby Digital, DTS core, MPEG, MP3, WMA, AAC, HE-AAC Video codec MPEG 1, MPEG 2 Bit rate 20 Mbps (peak 40 Mbps) MPEG 4 ASP 10 Mbps max 20 Mbps (peak 40 Mbps) H.264/AVC HP@4.1/4.0; MP@3.2/3.1/3.
Troubleshooting Sound The buttons on the home theater do not work. • Disconnect the home theater from the power supply for a few minutes, then reconnect. No sound from home theater speakers. • Connect the audio cable from your home theater to your TV or other devices. You do not need a separate audio connection when the home theater and TV are connected through an HDMI ARC connection. • Set up the audio for the connected device (see 'Set up the audio' on page 10).
'No entry' or 'x' sign appears on the TV. • The operation is not possible. EasyLink does not work. • Make sure that the home theater is connected to a Philips brand EasyLink TV, and the EasyLink option is turned on (see 'Set up EasyLink (HDMI-CEC control)' on page 10). When you switch on the TV, the home theater automatically switches on. • This behavior is normal when you are using Philips EasyLink (HDMI-CEC).To make the home theater work independently, switch off EasyLink. Cannot access BD-Live features.
1 2 Caution • The manufacturer is not responsible for any radio or TV interference caused by unauthorized modifications to this equipment. Such modification could void the user authority to operate the equipment. Canada This Device complies with RSS210 of the IC Rules; Operation is subject to the following two conditions: This device may not cause interference, and This device must accept any interference received, including interference that may cause undesired operation.
Trademarks "Blu-ray 3D" and "Blu-ray 3D" logo are trademarks of Blu-ray Disc Association. BONUSVIEW™ 'BD LIVE' and 'BONUSVIEW' are trademarks of Blu-ray Disc Association. Java and all other Java trademarks and logos are trademarks or registered trademarks of Sun Microsystems, Inc. in the United States and/or other countries. Covered by one or more of the following U.S. patents: 7,295,673; 7,460,668; 7,515,710; 7,519,274.
2 2nd audio language 2nd subtitle language 3 3D disc in 2D mode 3D safety 3D video 5 5.
O one-touch play one-touch standby options P parental control PBC (play back control) picture options picture resolution picture settings picture-in-picture play disc play music play radio play USB storage device power settings predefined sound mode preference program radio stations R radio region codes remote control T 10 10 14 troubleshooting (network) troubleshooting (picture) troubleshooting (play) troubleshooting (sound) tune radio stations 19 19 15 18 18 13 12 16 15 14 19 17 18 15 U 15 21 5
Contents 1 Important Important safety instructions Care for your product Care of the environment 3D health warning Help and support 2 Your home theater Main unit Connectors Remote control 3 Connect and set up Connect speakers Connect to TV Connect audio from TV and other devices Set up speakers Set up EasyLink (HDMI-CEC control) Connect and set up a home network 4 Use your home theater Access the home menu Discs Data files USB storage devices Audio, video, and picture options Radio MP3 player Netflix V
1 Important Read and understand all instructions before you use your product. If damage is caused by failure to follow instructions, the warranty does not apply. •• Important safety instructions •• •• •• •• •• •• •• •• •• •• •• •• 30 Read these instructions. Keep these instructions. Heed all warnings. Follow all instructions. Do not use this apparatus near water. Clean only with dry cloth. Do not block any ventilation openings. Install in accordance with the manufacturer's instructions.
• • • •• •• •• •• •• • If you suspect that a battery has been swallowed or placed inside any part of the body, seek immediate medical attention. When you change the batteries, always keep all new and used batteries out of reach of children. Ensure that the battery compartment is completely secure after you replace the battery. If the battery compartment cannot be completely secured, discontinue use of the product. Keep out of reach of children and contact the manufacturer.
Care of the environment Your product is designed and manufactured with high quality materials and components, which can be recycled and reused. Please visit www.recycle.philips.com for additional information on a recycling center in your area. Never dispose of your product with other household waste. Please inform yourself about the local rules on the separate collection of electrical and electronic products and batteries.
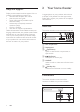
2 Your home theater Congratulations on your purchase, and welcome to Philips! To fully benefit from the support that Philips offers(e.g. notification of product software upgrade), register your product at www.philips.com/welcome. Connectors This section includes an overview of the connectors available on your home theater. Front connectors Main unit This section includes an overview of the main unit. a • (USB) Audio, video or picture input from a USB storage device.
f HDMI OUT (ARC) Connect to the HDMI input on the TV. Remote control g LAN Connect to the LAN input on a broadband modem or router. This section includes an overview of the remote control. h DIGITAL IN-OPTICAL Connect to an optical audio output on the TV or a digital device. 1 2 i DIGITAL IN-COAXIAL Connect to a coaxial audio output on the TV or a digital device. 3 21 4 20 5 6 7 19 18 8 9 10 11 17 16 12 13 15 14 a (Standby-On) Switch the home theater on or to standby.
b (Home) Access the home menu. c Source buttons • DISC/POP-UP MENU : Switch to disc source.Access or exit the disc menu when you play a disc. • RADIO : Switch to FM radio. • AUDIO SOURCE : Select an audio input source. d BACK • Return to a previous menu screen. • In radio mode, press and hold to erase the current preset radio stations. e Navigation buttons • Navigate menus. • In radio mode, press left or right to start auto search. • In radio mode, press up or down to tune the radio frequency.
3 Connect and set up SUB WOOFER FRONT LEFT FRONT CENTER FRONT RIGHT This section helps you connect your home theater to a TV and other devices, and then set it up. For information about the basic connections of your home theater and accessories, see the quick start guide. Note REAR LEFT •• For identification and supply ratings, see the type plate REAR RIGHT at the back or bottom of the product.
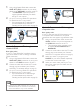
5 Place the rear surround speakers to the left and right side of your seating position, either in line with it or slightly behind it. Connect to TV Connect your home theater to a TV to watch videos. You can listen to the TV audio through your home theater speakers. Use the best quality connection available on your home theater and TV. Option 1: Connect to TV through HDMI (ARC) Best quality video Your home theater supports HDMI version with Audio Return Channel (ARC).
TV Connect audio from TV and other devices Play audio from TV or other devices through your home theater speakers. Use the best quality connection available on your TV, home theater, and other devices. Option 3: Connect to the TV through composite video Basic quality video If your TV does not have HDMI connectors, use a composite video connection. A composite connection does not support high-definition video.
Set up EasyLink (HDMI-CEC control) Option 3: Connect audio through analog audio cables Basic quality audio 1 Using an analog cable, connect the AUX connectors on your home theater to the AUDIO OUT connectors on the TV or other device. VCR This home theater supports Philips EasyLink, which uses the HDMI-CEC (Consumer Electronics Control) protocol. EasyLinkcompliant devices that are connected through HDMI can be controlled by a single remote control.
EasyLink controls With EasyLink, you can control your home theater, TV, and other connected HDMI-CEC compliant devices with a single remote control. • [One Touch Play] (One-touch play): When a video disc is in the disc compartment, press (Play) to wake up the TV from standby, and then play a disc. • [One Touch Standby] (One-touch standby): If one-touch standby is enabled, your home theater can switch to standby with the remote control of the TV or other HDMI-CEC devices.
Set up the wired network What you need • A network cable (RJ45 straight cable). • A network router (with DHCP enabled). LAN www 1 2 3 4 5 6 Using a network cable, connect the LAN connector on your home theater to the network router. Press (Home). Select [Setup], and then press OK. Select [Network] > [Network installation] > [Wired (Ethernet)]. Follow the onscreen instructions to complete the setup. • If connection fails, select [Retry], and then press OK. 1 2 3 4 5 Press (Home).
4 Use your home theater • Make the necessary connections described in the quick start guide, and then switch the TV to the correct source for your home theater. This section helps you use the home theater to play media from a wide range of sources. Discs Before you start • Make the necessary connections described in the quick start guide and the user manual. • Complete the first-time setup.
Button Action AUDIO Select an audio language or channel. Select subtitle language for video. Access or exit the disc menu. SUBTITLE DISC/ POP-UP MENU OPTIONS REPEAT Access the advanced options when you play your audio, video, or media files (see 'Audio, video, and picture options' on page 45). Select or turn off repeat mode. Synchronize picture and sound If the audio and video are not synchronized, delay the audio to match the video. 1 2 3 4 Press SOUND SETTINGS.
2 3 4 5 6 Connect a USB storage device to your home theater. Press (Home) and select [Setup]. Select [Advanced] > [BD-Live security] > [Off] to enable BD-Live. • To disable BD-Live, select [On]. Select the BD-Live icon in the disc menu, and then press OK. »» BD-Live starts to load. The loading time depends on the disc and your internet connection. Press the Navigation buttons to navigate BD-Live, and then press OK to select an option.
VOD code for DivX Before you purchase DivX videos and play them on your home theater, register the home theater on www.divx.com using the DivX VOD code. 1 2 3 Press (Home). Select [Setup], and then press OK. Select [Advanced] > [DivX® VOD Code]. »» The DivX VOD registration code for your home theater is displayed. Audio, video, and picture options Use advanced features when you play pictures, audio and video files from a disc or a USB storage device.
• • • • • • • • • • • [2nd audio language]: Select the second audio language for Blu-ray video. [2nd Subtitle Language]: Select the second subtitle language for Blu-ray video. [Titles]: Select a specific title. [Chapters]: Select a specific chapter. [Angle list]: Select a different camera angle. [Menus]: Display the disc menu. [PIP selection]: Display Picture-inPicture window when playing a Blu-ray disc that supports the Bonus View. [Zoom]: Zoom into a video scene or picture.
Button Action / or Alphanumeric buttons Navigation buttons Select a preset radio station. BACK OPTIONS SUBTITLE 1 2 Left/Right: Search for a radio station. Up/Down: Fine tune a radio frequency. Press to stop the installation of radio stations. Press and hold to erase the preset radio station. Manual: 1) Press OPTIONS. 2) Press / to select your preset. 3) Press OPTIONS again to store the radio station. Automatic: Press and hold for three seconds to reinstall the radio stations.
Choose sound Note •• To deactivate Netflix from your home theater, press , and then select [Setup] > > [Deactivation] > [Netflix]. •• When you contact Netflix customer service, you may ask to provide the ESN (electronic serial number) of your home theater. To display the ESN, press , and then select [Setup] > [Advanced] > [Netflix ESN]. VUDU Use VUDU to stream movies through your home theater. VUDU provides on-demand videos and rich internet applications. For more information on VUDU services, visit www.
• • 4 NEWS: Hear every word with optimized speech and clear vocals. GAMING: Enjoy thrilling arcade sounds, ideal for action-packed video games or loud parties. Press OK to confirm. Surround sound mode Experience an immersive audio experience with surround sound modes. 1 2 3 4 Press SOUND SETTINGS. Select SURROUND, and then press OK. Press the Navigation buttons (up/down) to select a setting on the display: • AUTO: Surround sound based on the audio stream.
5 Change settings Picture and video settings The home theater settings are already configured for optimal performance. Unless you have a reason to change a setting, we recommend that you keep the default setting. 1 2 3 4 Note •• You cannot change a setting that is grayed out. •• To return to the previous menu, press BACK. To exit the menu, press (Home). Language settings 1 2 3 4 Press (Home). Select [Setup], and then press OK. Select [Preference], and then press OK.
• • • • [Night mode]: For quiet listening, decrease the volume of loud sounds on your home theater. Night mode is only available in DVDs and Blu-ray discs with Dolby Digital, Dolby Digital Plus, and Dolby True HD soundtracks. [HDMI Audio]: Set the HDMI audio output from your TV, or disable HDMI audio output from the TV. [Speaker setup]: Set the volume level and distance of each speaker to obtain the best possible surround sound.
Tip •• Enable audio post processing before you select a predefined sound mode (see 'Sound mode' on page 48). Restore default settings 1 2 3 4 52 Press (Home). Select [Setup], and then press OK. Select [Advanced] > [Restore default settings], and then press OK. Select [OK], and then press OK to confirm. »» Your home theater is reset to its default settings except for some settings such as parental control and DivX VOD registration code.
6 Update software Philips continually tries to improve its products. To get the best features and support, update your home theater with the latest software. Compare the version of your current software with the latest version on www.philips.com/support. If the current version is lower than the latest version available on the Philips support website, upgrade your home theater with the latest software.
Update software through the Internet 1 2 3 4 Connect your home theater to a home network with a high-speed Internet access (see 'Connect and set up a home network' on page 40). Press (Home). Select [Setup], and then press OK. Select [Advanced] > [Software update] > [Network]. »» If an upgrade media is detected, you are prompted to start or cancel the update. »» Downloading of the upgrading file may take long, depending on your home network condition.
7 Product specifications Extension Container .wma ASF .aac AAC .wav .m4a .mka .mka WAV MKV MKA MKA .mka .mka .mka MKA MKA MKA BD .mka MKA A .mka MKA Note •• Specifications and design are subject to change without notice. Region codes The type plate on the back or bottom of the home theater shows which regions it supports.
.divx files in AVI container .mpg and .mpeg files in PS container Audio codec Video codec Bit rate Audio codec Video codec Bit rate PCM, Dolby Digital, MP3, WMA DivX 3.11, DivX 4.x, DivX 5.x, DivX 6.x MPEG 1, MPEG 2 MPEG 4 ASP 10 Mbps max PCM, DTS core, MPEG, MP3 MPEG 1, MPEG 2 20 Mbps (peak 40 Mbps) MPEG 1, MPEG 2 20 Mbps (peak 40 Mbps) 20 Mbps (peak 40 Mbps) 10 Mbps max .mp4 or .
Radio Laser • • • • Tuning range: FM 87.5-108 MHz (100 kHz) Signal-to-noise ratio: FM 50 dB Frequency response: FM 200 Hz-12.5 kHz / ±6 dB USB • • • • • • Laser Type (Diode): InGaN/AIGaN (BD), AIGaInP (DVD/CD) Wave length: 405 +7 nm/-7 nm (BD), 655 +10 nm/-10 nm (DVD), 790 +10 nm/-20 nm (CD) Output power (Max. ratings): 20 mW (BD), 6 mW (DVD), 7 mW (CD) Compatibility: Hi-Speed USB (2.
8 Troubleshooting Troubleshooting Disc does not play high-definition video. • Make sure that the disc contains highdefinition video. • Make sure that the TV supports highdefinition video. • Use an HDMI cable to connect to the TV. Warning •• Risk of electric shock. Never remove the casing of the product. To keep the warranty valid, never try to repair the product yourself. If you have problems using this product, check the following points before you request service.
• • Make sure that the home theater supports the region code of the disc. If the disc is a DVD±RW or DVD±R disc, make sure that it is finalized. Cannot play a DivX file. • Make sure that the DivX file is encoded according to the 'Home Theater Profile' with the DivX encoder. • Make sure that the DivX file is complete. DivX subtitles do not display correctly. • Make sure that the subtitle file name is the same as the movie file name (see 'Subtitles' on page 44).
• You need a high speed Internet connection for your router. Netflix and VUDU does not work. • Make sure that the network is correctly connected and set up (see 'Connect and set up a home network' on page 40). • Check the router connection (refer to the user manual for the router).
9 Notice Notice of compliance This section contains the legal and trademark notices. The device complies with the FCC rules, Part 15 and with 21 CFR 1040.10.Operation is subject to the following two conditions: Copyright This item incorporates copy protection technology that is protected by U.S. patents and other intellectual property rights of Rovi Corporation. Reverse engineering and disassembly are prohibited.
This transmitter must not be co-located or operated in conjunction with any other antenna or transmitter. Warning: Changes or modifications made to this equipment not expressly approved by Philips may void the FCC authorization to operate this equipment. Model number: PHILIPS HTS3541/F7 Trade Name: Philips Responsible Party:P&F USA, Inc. PO Box 2248 Alpharetta, GA 30023-2248; 1-866-3100744 Canada: This device complies with Industry Canada licence-exempt RSS standard(s).
Manufactured under license from Dolby Laboratories. Dolby and the double-D symbol are trademarks of Dolby Laboratories. CLASS 1 LASER PRODUCT ABOUT DIVX VIDEO: DivX® is a digital video format created by DivX, LLC, a subsidiary of Rovi Corporation. This is an official DivX Certified® device that plays DivX video. Visit divx.com for more information and software tools to convert your files into DivX videos.
10 Index 2 2nd audio language 2nd subtitle language 3 3D disc in 2D mode 3D safety 3D video 5 5.
M main unit manual setup media formats menu language MP3 musical slideshows N Netflix network night mode O one-touch play one-touch standby options P parental control PBC (play back control) picture options picture resolution picture settings picture-in-picture play disc play music play radio play USB storage device power settings predefined sound mode preference program radio stations R radio region codes remote control repeat 33 39 55 50 47 46 47 40 50 40 40 45 51 51 46 50 50 43 42 47 46 45 5
W watch 3D wired network wireless network 66 43 41 41
ONE (1) YEAR LIMITED WARRANTY WARRANTY COVERAGE: This warranty obligation is limited to the terms set forth below. WHO IS COVERED: This product is warranted to the original purchaser or the person receiving the product as a gift against defects in materials and workmanship as based on the date of original purchase (“Warranty Period”) from an Authorized Dealer. The original sales receipt showing the product name and the purchase date from an authorized retailer is considered such proof.
P&F USA, Inc. PO Box 2248 Alpharetta, GA 30023-2248 Specifications are subject to change without notice © 2014 Koninklijke Philips N.V. All rights reserved. Trademarks are the property of Koninklijke Philips N.V. or their respective owners. HTS3541_F7_M2_UM_V1.