Philips Multimedia projector LC5141, LC5131 n Standby/O Status User guide English Input e Auto imag
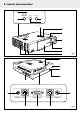
0. Controls and connections 1 yI Status Standby/On Input Auto image 2 4 3 ! 0 9 n Standby/O Status Input e Auto imag OPEN 8 7 6 5 fig. 1 In pu t Status St an db y/O n y Au to im ag e ¡ ) ( in Video r / YCbC Data in Audio eo in S Vid Mouse * @ & # Audio in Mouse Data / YCbCr $ % S-Video in Video in ^ 2 fig.
0. Controls and connections ™ ª £ Mouse • Standby /On Menu Video ≥ Data § Cancel ≤ ∞ ‡ Mouse Standby /On Menu Video Data Cancel fl Auto image D-Freeze A/V Mute fi º D-Zoom D-Keystone Volume › ⁄ ‹ ¤ fig.
1. Introduction 2. Things You Should Know Table of contents Note: This equipment has been tested to comply with the limits for a class A digital device in accordance with Part 15 of the FCC Rules as well as the European CE marking and Canadian ICES-003. 0. Controls and connections.....................................................2 1. Introduction............................................................................4 Table of contents .............................................................
3. Important Safeguards 12. As a safety feature, this projector is equipped with power cord with a 3-pin grounded plug (for USA-versions only) or a 2-pin grounded plug (for European versions only). The 3-pin/2pin grounded plug will fit only into a grounding type power outlet. If the plug does not fit, use an adapter that is properly grounded or have an electrician install a grounded type outlet. Do not attempt to modify this AC plug.
4. Projector Features The local keyboard and remote control provide direct access buttons for those functions that are most often used during presentations: Input / source selection buttons With the VIDEO and DATA buttons you can directly select the required source: S-video, Video or Data. Standby/On Switches the projector in the Standby/On mode. 1. UGO X-lite; LC5141 Fully compatible with true XGA; support for SXGA using advanced intelligent compression technology.
5. Functional Overview See illustrations Projector front (fig. 1) rear (fig. 2) 1 Indicators Standby / On (y |) indicator – Lights up orange in Standby mode – Flashes green when the lamp is starting up (1 min.) – Lights up green when the lamp is on – Flashes orange when the projector is switched from the on into the standby mode (1 min) Status indicator (see also page 24) – Off: projector is in normal mode – On: lamp life of the projection lamp nears or the end or is expired.
6. Set Up The distance from the projector lens to the screen determines to the size of the projected image, therefore, you need to consider the place where you set up the projector and screen before making connections. You also need to consider the screen size and height of the projector and screen as other important factors. • Tip: A non-glossy wall may be used as a substitute for a screen. • Warning • Always carry the projector in the carrying bag.
6. Set Up 4. To switch off the mains supply completely, pull the mains plug out of the wall socket. Skew correction • Turn the rear adjuster either clock-wise or counterclockwise to accurately adjust the skew. • Use the Focus ring to readjust the focus of the image. Note: Before disconnecting the power cord, make sure that the cooling fan has stopped (about 3 minutes after the projector has been switched to Standby).
6. Set Up Inserting the batteries in the remote control Note: The remote sensors are located on the front and back of the projector. The controllable range is 50 degrees horizontally and 30 degrees vertically relative to a line that is at a right angle to the remote sensor. And the distance between the point of the remote control and remote sensor must be shorter than four meters (13 feet). 1. Press firmly and slide the battery cover off. 2. Insert the two supplied batteries (size AAA1,5V/LR03).
7. Installation No. Video/computer cables and adapter CONNECTIONS CABLE Projector side Computer/AV products side 1 Computer VGA Cable Mini D-Sub 15P (male) 2 RCA Video Cable RCA pin (male) 3 PC Audio Cable 3.5 mm stereo mini-jack (male) 4 Audio Conversion Cable 3.
7. Installation Connecting to a computer Connecting to a computer Connecting to PC mouse connector General – This projector can be used as a display for numerous applications by connecting the Data output connector of a PC to the Data/YCbCr jack of this projector and setting the Data/YCbCr connector to Data. General – The remote control of this projector can be used as the PC mouse (wireless mouse function) by connecting the Mouse connector of this projector to the corresponding connector of the PC.
7. Installation Connecting to video equipment Connecting to video equipment S-VIDEO SIGNAL General – You can connect up to two pieces of video equipment to the projector following the illustrations below. – You can switch the input source to Video or S-Video when you connect two pieces of equipment. (The S-Video connection provides more vivid color and higher resolution compared to the composite Video in & connection.
7. Installation Connecting to video equipment COMPONENT VIDEO SIGNAL (YCbCr) (4) (optional) (3) # Audio in % Mouse Data / YCbCr S-Video in Video in 1. To use YCbCr component video input, set ‘SOURCE CHANGE’ under ‘COLOR’ in the Advanced menu to ‘YCbCr’ (See page 20). 2. Connect the Y (green), Cb (blue) and Cr (red) connectors of a DVD player or other component video equipment to the corresponding Data/YCbCr connector % of the projector. For this, use a YCbCr Component cable (optional). 3.
8. Operation Preparation Preparation On Screen Display menu - General explanation All video and data adjustments and settings (except A/V Mute) are done via On Screen Displays and with help of Menu and Cursor Control on the remote control. The basic settings, concerning image and lamp usage, are presented in the normal menu. This menu will be displayed when the Menu button is pressed with the remote control Flip cover closed. General 1. Press the Standby/On button to switch on the projector.
8. Operation Menu structure - data input Data mode - Normal menu flip cover closed IMAGE Mouse INFORMATION IMAGE INFORMATION BRIGHTNESS 0 -RESET- CONTRAST 0 -LAMP USAGE HOURS RESET- PICTURE ADJ 0 RESOLUTION 1024 X 768 FINE PICTURE 0 FREQUENCY H: 48.4 KH z V: 60 Hz LAMP USAGE 34 -0.02 12 Standby /On Menu Video Data Cancel -POSITION- POSITION STATUS Note: The IMAGE and INFORMATION features are also accessible in the Advanced menu.
8. Operation Menu structure - video input Video mode - Normal menu flip cover closed IMAGE Mouse Standby /On INFORMATION BRIGHTNESS 0 CONTRAST 0 COLOR 0 TINT 0 SHARPNESS 1 IMAGE INFORMATION -RESET- Menu Video Data Cancel -LAMP USAGE HOURS RESETLAMP USAGE 34 STATUS 21212.13361 Note: The IMAGE and INFORMATION features are also accessible in the Advanced menu. Video mode - Advanced menu flip cover open IMAGE Mouse COLOR VIEW SET UP OPTION INFO.
8. Operation Display and picture control/Audio volume control General Menu access of projector functions The projector’s picture is set to standard specifications at the factory. However, you can adjust the image to suit your own preferences. The projector will store the last used settings for every source. So when you switch from one source to another, the settings of the source switched from will be stored and the settings of the source switched to will be recalled.
8. Operation Display and picture control VIEW – ASPECT To set the aspect ratio. Four different settings can be selected for images: - REAL: input signal projection without pixel replacement; - AUTO: projection after automatic input signal zoom-in / zoom-out; - DIRECT: the original aspect ratio of the image is maintained at all times; - 4:3 > 16:9: 4:3 aspect ratio images are projected after conversion to the 16:9 aspect ratio.
8. Operation Display and picture control/Other settings VIEW – ASPECT To set the aspect ratio.
8. Operation – Other settings PROJECTION The projector can be used in various positions with respect to the viewers and the projection screen. With the PROJECTION function via setup menu the picture can be displayed in a way that is suitable for a specific application. Use the cursor / keys to select a projection type in accordance with the set conditions. The setting items will change as shown below each time a key is pressed.
9. Maintenance Cleaning Lamp replacement 1. Press the Standby/On button to switch off the projector. – The standby indicator lights up red. 2. Wait until the cooling fan has stopped (about 3 minutes after the projector has been switched off) and disconnect the power cord and all other cables. 3. Turn the projector over. Never place the projector on the side where the connections are located! Be sure to replace the lamp when the Status indicator comes on.
9. Maintenance – – – – – Caution! Do not use a lamp cartridge other than the Philips replacement lamp cartridge. Order this from your Philips dealer using the unit model number (see ‘Note’ under ‘Lamp’). Be very careful. The lamp and lampholder may still be too hot to touch. Do not loosen any screws except for those mentioned in the instructions below. There is danger of electric shock. Keep lamp holder opening to your right. Do not touch lamp or point lamp holder opening at anyone.
10. Troubleshooting If a fault occurs, first check the points listed below before taking the projector for repair. If you are unable to remedy a problem by following these hints, consult your dealer or service organisation. Blurred images • • • Warning: Under no circumstances should you try to repair the projector yourself as this could invalidate the warranty.