Internet Terminal MAT960 Owner’s Manual Important! Return your Warranty Registration Card within 10 days. See why inside.
Return your Warranty Registration card today to ensure you receive all the benefits you’re entitled to. Once your PHILIPS MAGNAVOX purchase is registered, you’re eligible to receive all the privileges of owning a PHILIPS MAGNAVOX product. So complete and return the Warranty Registration Card enclosed with your purchase at once. And take advantage of these important benefits.
Safety Information READ BEFORE OPERATING EQUIPMENT SAVE THESE INSTRUCTIONS This product was designed and manufactured to meet strict quality and safety standards. There are, however, some installation and operation precautions which you should be particularly aware of. 1. Read Instructions - All the safety and operating instructions should be read and understood before the appliance is operated. 2. Retain Instructions - The safety and operating instructions should be retained for future reference. 3.
Safety Information (cont’d) 17. Do not overload wall outlets and extension cords, as this can result in the risk of fire or electric shock. 18. Never push objects of any kind into this product through cabinet slots, as they may touch dangerous voltage points or short out parts, resulting in the risk of fire or electric shock. Never spill liquid of any kind on the product. 19.
Canadian Ringer Equivalence Number Notice The Canadian Department of Communications label identifies certified equipment. This certification means that the equipment meets certain telecommunications network protective, operational, and safety requirements. The department does not guarantee the equipment will operate to the user’s satisfaction. Before installing this equipment, users should ensure that it is permissible to be connected to the facilities of the local telecommunications company.
Federal Communications Commission Information FCC Rules This equipment complies with Part 68 of the FCC rules. On the bottom of this equipment is a label that contains, among other information, the FCC Registration Number and Ringer Equivalence Number (REN) for this equipment. You must, upon request, provide this information to your telephone company.
Introduction Hello! Thanks for purchasing the Philips Magnavox Internet Terminal. You need to become a subscriber to the WebTV™ Network to access the Internet with this product. Becoming a subscriber is an easy process once you’ve connected your Internet Terminal and learned the basic remote control functions described in the following pages. This manual takes you through easy-to-follow instructions so that you can ultimately enjoy the Internet.
Getting Started Package Contents Before you connect your Internet Terminal, make sure you have received all of the following items: ◆ Remote control ◆ Two AAA batteries ◆ AC power cord ◆ Phone cable ◆ Video cable (yellow) ◆ Audio cables (red and white) ◆ Telephone-splitter (T-splitter) ◆ Wireless Keyboard Additional accessories are available. See page 40 for details. + + Battery Installation 1 Remove the battery compartment cover by pressing in the tab, then lifting the cover.
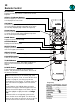
Control Panels AC INPUT jack Connect the AC (120V) power cord here. Plug the other end into the wall outlet. (Connect the AC power cord last.) TEL LINE jack Connect one end of a telephone cable to this jack. Connect the other end to the wall telephone jack. RESET Button Press this button to reset the Internet Terminal. KEYBOARD jack You may connect a personal computer keyboard with a PS/2 (6-pin connector) to the Internet Terminal. See page 36 for details.
Remote Control BACK Button Displays the last page viewed, or hides the on-screen keyboard. SCROLL (Up/Down) Buttons Moves the page up or down when the page is too long to be displayed on one screen. GO Button Activates a highlighted link or command; displays the on-screen keyboard; displays a moveable arrow when the currently displayed page contains an image map.
General Information The Title Bar Any time you leave the Home Page, WebTV displays a Title Bar across the bottom of your screen. Example of Title Bar information Page Title Indicator Arrows Connection Indicator Page Title Displays the title of the page currently on your screen. Indicator Arrows The indicator arrows are green when the currently displayed page is longer than your screen. Green arrows indicate the direction or directions in which more of the page can be viewed.
Connections Connecting your System Before you can connect to the WebTV Network, you must connect your Internet Terminal to each of the following: ◆ Your TV (either directly or through your VCR) ◆ A telephone line ◆ And an AC power outlet. The type of connection you choose depends on whether your TV: ◆ Has S-VIDEO, RCA-type A/V (audio/video), or RFU coaxial jacks ◆ Or is connected to a VCR. An S-VIDEO connection provides the best picture quality of all the connection options.
Connections (cont’d) Connecting to a TV with an S-VIDEO jack This connection will provide the best picture quality. 1 Back of Internet Unit Connect the AUDIO R(ight) and L(eft) jacks on the Internet Terminal to your TV’s AUDIO IN jacks, using the supplied audio cables. Do not connect the VIDEO cable (yellow) to the VIDEO OUT jack. 2 Use an S-VIDEO cable (not supplied) to connect the SVIDEO OUT jack on your Internet Terminal to the SVIDEO IN jack on your TV.
Connections (cont’d) Connecting to a TV without Audio/Video jacks If your TV does not have Audio/Video jacks, you must use an RFU adapter (not supplied) to connect the Internet Terminal to your TV. Back of Internet Unit 1 Set the channel switch on the RFU adapter to VHF channel 3 or 4, whichever is not used or least used in your area. RFU Adapter Phone Cable AC Power Cord 2 Connect the RFU adapter to the VIDEO and AUDIO OUT jacks on the Internet Terminal.
Connections (cont’d) Connecting to a TV or a VCR with Audio/Video jacks Back of Internet Unit 1 Connect the audio cables (red and white) to the AUDIO OUT R(ight) and L(eft) jacks on the back of the Internet Terminal and to the AUDIO IN jacks on your TV, matching colors. If there is only one audio jack, connect the white plugs.
On-Screen Keyboard The On-Screen Keyboard Use the on-screen keyboard to type information on your TV screen. When you request an activity that requires typing, such as sending an e-mail message, a text box appears on the screen. A text box contains a vertical yellow line, which indicates exactly where you can type in the text box. Displaying the on-screen keyboard 1 Move the yellow highlight to a text box using the remote control Arrow buttons. The highlight becomes a vertical yellow line inside the box.
On-Screen Keyboard (cont’d) Erasing or changing a character 1 Highlight an arrow key on the on-screen keyboard. Press the GO button repeatedly until the vertical line is located to the right of the character you 2 want to erase. 2 Highlight DELETE on the on-screen keyboard, then press the GO button on the remote. 3 Highlight the character you wish to substitute, then press the GO button on the remote.
Signing Up for WebTV Signing Up for WebTV Signing up for the WebTV Network is an easy process that asks you to provide your name, billing address, phone number, credit card information, and an Internet name (which acts as your e-mail address). When you complete the last sign-up page, you will be given the opportunity to correct mistakes. Once the information is correct, the WebTV Home Page will appear. You are ready to begin your Internet experience.
Signing Up for WebTV (cont’d) 7 The STREET box will be highlighted. Press the GO button. The on-screen keyboard will appear. Enter your street address. When you finish, use the Arrow buttons to highlight CONTINUE or RETURN. 8 The CITY box will be highlighted. Enter your city name. When you finish, highlight CONTINUE or RETURN, then press the GO button. 9 The STATE box will be highlighted. Enter your state’s postal abbreviation. When you finish, highlight CONTINUE or RETURN, then press the GO button.
Signing Up for WebTV (cont’d) 16 CONTINUE will be highlighted. Press the GO button again. The Internet name box will be highlighted. Press the GO button. The onscreen keyboard will appear. Type in your Internet name. Your Internet name acts as your e-mail address. It can contain letters and numbers, but must start with a letter. For example, T42 is okay, 24T is not. It must contain at least three characters, and no more than 15. It cannot contain spaces or punctuation marks.
Connecting to the Home Page Exploring the Internet on WebTV This chapter explains how to access various pages on the Internet from the WebTV Home Page. Because the Internet is constantly changing, the Home Page will also occasionally change. When you see new icons, explore! WebTV will provide help for using new icons through the INSTRUCTIONS icon. To connect to the Home Page 1 Turn on your television. 2 Press the POWER button on the remote to turn on the Internet Terminal.
Explore EXPLORE is designed to make your exploration of the Internet easy and fun. When you enter the EXPLORE area, you’ll find links to some of the most exciting and useful pages on the Internet. WebTV will continuously update EXPLORE. Go to a page from the EXPLORE page 1 Highlight any icon on the EXPLORE page and press the GO button on the remote control. The icons either lead to more selections or directly to a page.
Search SEARCH links you to the SEARCH page, which enables you to search the Internet for information on both general and specific topics. To search for specific information: 1 Highlight SEARCH on the Home Page and press the GO button. 2 Type a topic in the text box. You can enter one word, many words, or even a question. 3 Highlight the SEARCH command and press the GO button. A list appears on your screen.
Mail The MAIL icon links you to your MAILBOX, which lists the e-mail messages you have received. To read a message, simply highlight a message on the list and press the GO button. The MAILBOX page contains the following icons: ◆ ◆ ◆ ◆ ◆ write storage setup names discard Note: When you have unread messages in your MAILBOX, the red MESSAGE light on the front of your Internet Terminal is illuminated. If you receive a message while you are connected to the WebTV™ Network, the red MESSAGE light will flash.
Mail (cont’d) The NAMES icon links to your NAMES page, which allows you to store and edit e-mail addresses. You can automatically address messages from your list of names. The DISCARD icon allows you to discard messages from your MAILBOX. To open and read an e-mail message Highlight an e-mail message on the MAILBOX page and press the GO button. The contents of the message appear on your screen. To return to the MAILBOX page Highlight MAILBOX and press the GO button.
Mail (cont’d) To resend an e-mail message 1 With a message open on your screen, highlight RESEND and press the GO button. The RESEND A MESSAGE page appears with the subject entered for you. 2 Type one or more e-mail addresses in the TO text box. Separate addresses by a comma and a space if you type more than one address. 3 Type a message to add to the forwarded message in the text box on the bottom of the page (optional). 4 Highlight SEND and press the GO button.
Mail (cont’d) Add a name to your NAMES page 1 Highlight NAMES on the MAILBOX page and press the GO button. The NAMES page appears. 2 Highlight NEW and press the GO button. 3 Type the appropriate information in the text boxes, then highlight ADD and press the GO button. Use your list of NAMES 1 Highlight NAMES on the WRITE A NEW MESSAGE page and press the GO button. The NAMES panel appears. 2 Highlight the name of the person to whom you want to send a message and press the GO button.
Favorites Save a page to your FAVORITES list 1 Go to a page you wish to visit frequently and press the OPTIONS button on the remote control. The OPTIONS panel appears at the bottom of the screen. 2 Highlight SAVE on the OPTIONS panel and press the GO button. A panel that displays the SAVE PAGE command appears. 3 Highlight the SAVE PAGE command and press the GO button. The page is saved in your personal FAVORITES list.
Setup Enter the SETUP area to display options that allow you to: ◆ Restrict access to pages on the Internet that contain mature material. (Different users can have different access settings.) ◆ Choose whether your on-screen keyboard displays the letter keys in alphabetical order or standard typewriter order (QWERTY). ◆ Make the text that appears on your screen smaller or larger. ◆ Update your sign-up information. ◆ Turn off WebTV sounds. ◆ Turn off Call Waiting interruptions.
Setup (cont’d) Create separate accounts and set access restrictions (WebTV users) 1 Highlight WEBTV USERS and press the GO button. 2 Highlight ADD A USER and press the GO button. 3 Enter an Internet name, then highlight CONTINUE and press the GO button. 4 Enter a password and select CONTINUE. Different access options will appear. Follow the on-screen instructions to set the desired level of access restriction. 5 Highlight the check box next to an option and press the GO button.
Setup (cont’d) Display Advanced Options 1 Highlight ADVANCED OPTIONS and press the GO button. The ADVANCED OPTIONS appear on your OPTIONS panel if you choose this setting. The ADVANCED OPTIONS allow you to: RELOAD: Update the version of the page you are visiting currently. HANG UP: Temporarily disconnect from the WebTV Network to make a phone call. To reconnect, press the GO button on the remote. WebTV reconnects you to the same location you were visiting when you disconnected.
Options Panel The OPTIONS panel offers several features that enable you to navigate your way through WebTV and to perform other functions easily and efficiently. Using the OPTIONS panel 1 Press the OPTIONS button on the remote control. The OPTIONS panel slides onto the bottom of your screen. 2 Highlight an option and press the GO button. Each option brings up a different panel. The following sections describe the various options, and how to use each option’s features.
Options Panel (cont’d) Find a new word or phrase 1 Highlight CLEAR and press the GO button. 2 Type a new word or phrase in the text box, then highlight FIND and press the GO button. Scroll to the top or the bottom of a page 1 Highlight SCROLL TO TOP or SCROLL TO BOTTOM and press the GO button. The GO TO option allows you to go directly to a page by typing in an Internet address. Go directly to a page 1 Highlight GO TO on the panel and press the GO button.
Options Panel (cont’d) The SAVE option allows you to save the currently displayed page on your FAVORITES list. Save a currently displayed page 1 Highlight SAVE and press the GO button. 2 Highlight SAVE PAGE and press the GO button. The SEND option allows you to send an e-mail message that contains a link to the currently displayed page. Send a page by e-mail 1 Open the page you want to send, then press the OPTIONS button on the remote control. 2 Highlight the SEND option and press the GO button.
Advanced Options See Display Advanced Options on page 31 for details on how to display the ADVANCED OPTIONS on your OPTIONS panel. The RELOAD option loads an updated version of the page you are currently visiting. Use this option when the page you are viewing contains information that is updated frequently, such as sports scores or stock quotes. Reload a page 1 Open a page, then highlight the RELOAD option and press the GO button.
Using a Computer Keyboard You may connect a personal computer keyboard (wired) to the Internet Terminal. This will allow you to type information into the text boxes which appear on-screen. The keyboard must have a PS/2 (6-pin) type connector, and it must be an AT type. Connect the keyboard to the KEYBOARD jack on the back of the Internet Terminal. The function keys on a PC keyboard will have different operations once the keyboard is connected to the Internet Terminal.
Specifications Terminals ◆ Video Output ◆ Audio Outputs (right and left) ◆ S-Video Output ◆ Telephone line Input ◆ RFU DC Output ◆ Keyboard (PS/2 style keyboard connector) ◆ WebTV port (96 pin) Dimensions 280mm x 49.2mm x 214.7mm (11 1/8" x 2" x 8 1/4") Weight 1.
Limited Warranty Internet Terminal 90 Days Free Labor One Year Parts Exchange WHO IS COVERED? You must have proof of purchase to receive warranty service. A sales receipt or other document showing that you purchased the product is considered proof of purchase. BEFORE REQUESTING SERVICE... Please check your owner’s manual before requesting service. Adjustments of the controls discussed there may save you a service call. WHAT IS COVERED? Warranty coverage begins the day you purchase your product.
Index ac input jack . . . . . . . . . . . . . . . . .9 access restrictions setup . . . . . . .30 accessories . . . . . . . . . . . . . . . . .40 account setup . . . . . . . . . . . . . . .30 advanced options . . . . . . . . .31, 35 arrow buttons . . . . . . . . . . . . . .10 audio jacks . . . . . . . . . . . . . . . . . .9 back button . . . . . . . . . . . . .10, 23 battery installation . . . . . . . . . . . .8 connected indicator . . . . . . . . . . .9 connecting to the home page . . .
ACCESSORIES The following accessories are packed with your Internet Terminal. These accessories are provided to help you use or set up your Internet Terminal. If any of these items are not included, or if you need to replace an accessory, contact Philips Service Solutions Group at the address listed below.