Wireless Broadband Internet Audio System i250 MC- For more information on Streamium, go to: http://My.Philips.
DK SF Advarsel: Usynlig laserstråling ved åbning når sikkerhedsafbrydere er ude af funktion. Undgå utsættelse for stråling. Luokan 1 laserlaite Varoitus! Laitteen käyttäminen muulla kuin tässä käyttöohjeessa mainitulla tavalla saattaa altistaa käyttäjän turvallisuusluokan 1 ylittävälle näkymättömälle lasersäteilylle. Oikeus muutoksiin varataan. Laite ei saa olla alttiina tippu-ja roiskevedelle. Bemærk: Netafbryderen er sekundært indkoblet og ofbryder ikke strømmen fra nettet.
MC-i250 12NC : 3139 115 22221 This Quick Use Guide gives a rough overview and helps to quickly start with basic steps. Please read the supplied instruction manual for detailed information. General Requirements Registration For online music services (INTERNET): To activate the online features of MC-i250, you have to register your set after completing the “Prerequisites for Setup” and “Connecting Streamium MC-i250”.
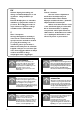
Connecting Streamium MC-i250 õ For wireless operation (Wi-Fi, 802.11b): õ For wired operation (Ethernet): wireless access point router gateway router PC with wireless network adaptor DSL or cable modem DSL or cable modem Data port from RJ45 INTERNET Power outlet Power outlet 1 2 After the Internet connection of a PC in the home network has proven to be working, connect the MC-i250 to the gateway router with the supplied cable. Press INTERNET.
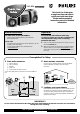
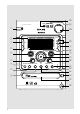
SOUND JOG WOOX TREBLE BASS MICRO HIFI SYSTEM 1 STANDBY•ON ) ECO POWER 2 NAVIGATE PLAY INCR. SURR.
Important notes for users in the U.K. Mains plug This apparatus is fitted with an approved 13 Amp plug. To change a fuse in this type of plug proceed as follows: 1 2 Remove fuse cover and fuse. 3 Refit the fuse cover. Fix new fuse which should be a BS1362 5 Amp, A.S.T.A. or BSI approved type. If the fitted plug is not suitable for your socket outlets, it should be cut off and an appropriate plug fitted in its place. If the mains plug contains a fuse, this should have a value of 5 Amp.
English Index Français English ----------------------------------------- 6 Español Français -------------------------------------- 39 Deutsch Español -------------------------------------- 72 Nederlands Deutsch ------------------------------------- 105 Italiano Nederlands -------------------------------- 138 Italiano -------------------------------------- 171 5
Contents English General Information About MC-i250 ..................................................... About MP3 ............................................................. Environmental information ................................ Supplied accessories ............................................ Safety information ................................................ Internet Audio 8 8 9 9 9 Preparations Rear connections ........................................
Contents English Personalised and interactive features Multiple users ...................................................... 31 Creating your user account Selecting a user account Favourites ............................................................. 31 Creating your favourites list Accessing your favourites list Returning to normal list (exit from favourites list) Getting extra information ................................ 31 External Sources Connecting an external device .......................
General Information English About MC-i250 About MP3 disc Philips Streamium MC-i250 is a wireless broadband internet audio system. It is compliant with the IEEE 802.11B specification, which is, known under the name WiFi™. WiFi™ is the leading wireless industry standard for broadband networking, and delivers, depending on your environment, bandwidth of up to 11 Mbps over distances up to 100 metres. Supported formats – MP3PRO, MP3 – ISO9660, Joliet, Multisession – Supported sampling frequencies : 16, 22.
This product complies with the radio interference requirements of the European Community. Environmental information All unnecessary packaging has been omitted. We have tried to make the packaging easy to separate into three materials: cardboard (box), polystyrene foam (buffer) and polyethylene (bags, protective foam sheet). Your system consists of materials which can be recycled and reused if disassembled by a specialised company.
Preparations English FM wire antenna AM loop antenna speaker (right) DIGITAL OUT R LINE OUT B IN DIGITAL OUT L AC MAINS ~ speaker (left) L R AUX/ CDR IN AM ANTENNA FM ANTENNA SUB WOOFER OUT _ R + _ L + C VOLTAGE SELECTOR 110V127V 220V240V SPEAKERS 6Ω NOT FOR ALL COUNTRIES AC power cord Rear connections The type plate is located at the rear of the system. For users in the U.K.: please follow the instructions on page 2.
C Speakers connection Front Speakers Connect the speaker wires to the SPEAKERS terminals, right speaker to "R" and left speaker to "L", coloured (marked) wire to "+" and black (unmarked) wire to "-". 1 Notes: – Do not connect equipment to both the LINE OUT and AUX/CDR IN terminals at the same time. Otherwise, noise will be generated and malfunction might occur. – If you are connecting equipment with a monaural output (a single audio out terminal), connect it to the AUX/CDR IN left terminal.
Preparations English Prerequisites for home network setup 1 Connect your PC, (wireless) gateway router and broadband modem (cable / DSL) according to the router’s setup instruction. 2 Configure your home network following the directions specified in your router’s manual and make sure that the PC’s Internet connection is installed properly and working. If you have problems with the setup of the Internet connection, contact your networking equipment manufacturer or Internet Service Provider.
As soon as you are asked to enter your email address on the screen, your set has successfully established a connection to the Internet. To activate the online features of MC-i250, you still have to complete the registration. For wired operation (Ethernet) gateway router DSL or cable modem from RJ45 Data port Registration INTERNET 1 Enter your email address (using the remote control) on the set and press OK/PLAY (2). 2 After a short moment you will receive an e-mail at the entered address.
Controls (main system’s illustration on page 3) English Controls on the system and remote control 1 STANDBY ON / ECO POWER – – – % AUX – to select the input for an additional appliance. ^ Ç (CANCEL) for CD ................. to stop playback. for Tuner ............. to stop programming for Clock ............ to exit clock setting or cancel timer. for Plug & Play…to exit plug & play mode. to switch the system on (on the system only). to switch the system to standby mode.
Controls – English ≤à/á for CD (play view)…to search backward/ forward. for Tuner ............. to tune to a lower or higher radio frequency. used as a soft keys, to select from the available choices on the bottom line of the screen. ∞ USER – to select an active user. § INFO! – to request on-line information about currently playing item through e-mail (if available). ≥ CLK /TIMER – to display or set the clock /timer. • TIMER ON/ OFF – to activate or deactivate the timer function.
Basic Functions English SOUND JOG WOOX TREBLE BASS MICRO HIFI SYSTEM STANDBY•ON ECO POWER NAVIGATE PLAY INCR. SURR.SLEEP • • FAVORITES DIM 123 SHUFFLE REPEAT ALL MW LW AM FM NEWS REC 1 2 3 FAVORITES VIEW • • OK BACK ENTER RESUME OPTIONS INTERNET PC LINK CANCEL CD TUNER IMPORTANT! Before you operate the system, complete the preparation procedures. AUX 3 Plug and Play Plug and Play allows you to store all available RDS stations and radio stations automatically.
To exit without storing the Plug and Play ● Press Ç. ➜ If you do not complete the Plug and Play installation, the function will be restarted when you next turn on the power supply again. Notes: – When the power is turned on, the disc tray may open and close to initialise the system. – If no stereo frequency is detected during PLEASE CHECK ANTENNA Plug and Play, "PLEASE ANTENNA" is displayed. Switching the system on In standby mode ● Press STANDBY ON to switch on the last selected source.
Basic Functions English Sound control For optimal sound listening, you are only able to select BASS/TREBLE or wOOx at a time. wOOx There are three wOOx settings to enhance the bass response. ● Press wOOx repeatedly to select the next wOOx level or switch the wOOx effect off : wOOx 3, wOOx 2, wOOx 1 or wOOx OFF. ➜ WOOX and the corresponding wOOx level will appear on the display, except for wOOx OFF mode. Notes: – When switched off the wOOx effect, the last Bass/Treble will resume automatically.
Screen display The system has two main screen display views – NAVIGATION and PLAY. Switching between Navigation view and Play view ● Press VIEW on the system. Navigation view Using the soft keys Allows you to navigate through the contents of the currently selected source/service. Each source/service has different sort modes. For example, the sort modes when playing back an MP3CD are ALBUM, PLAYLIST, ARTIST and TRACK.
Basic Functions English Scrolling All lists in navigation view are sorted in alphabetical or numerical order. To scroll through a list ● Adjust the navigation jog clockwise to scroll down or anti-clockwise to scroll up. There are two scrolling speeds : 1slow and 2fast. 1 Enables you to skip forward /backward to an item on the list. 2 Enables you to skip forward/backward by several items on the list.
Connecting to your PC (PC LINK) Connecting to online music services This feature allows you to stream your favorite MP3 music from your PC via the home PC’s network. In order to enjoy the PC Link, you have to install the PC Link PC application. This application can be downloaded from “http://My.Philips.com”. 1 2 Press PC LINK. SEARCHING... ➜ “SEARCHING... SEARCHING...” is displayed. ➜ If no PC is found within 30 seconds, an error NO PC’S FOUND message “NO FOUND” is displayed. Check your network setup.
Internet Audio English 1 2 Set options Network Configuration An option menu exists for each source/service except for TUNER and AUX. The available option menus are detailed within the respective source/service sections in this manual. Depending on the type of Internet connection you have, “DHCP” or “STATIC” must be selected to enable your system to connect to the Internet. Check with your service provider to obtain the correct IP mode. Press INTERNET followed by OPTIONS.
Proxy Configuration About “My.Philips.com” Check with your service provider to obtain the correct proxy name and proxy port. “My.Philips.com” provides a personal online tool for managing your entertainment choices. It is an exclusive service to owners of Philips’ premium internet-connected products. Once you have registered with “My.Philips.com”, you will be able to : – create and personalise your music selections. – update on latest music releases or favourite artists.
CD/MP3-CD Operations English NAVIGATE PLAY INCR. SURR.SLEEP • • FAVORITES DIM 123 SHUFFLE REPEAT ALL MW LW AM FM NEWS REC 1 2 3 FAVORITES VIEW • • OK BACK ENTER RESUME OPTIONS INTERNET PC LINK CANCEL CD TUNER AUX iR OPEN/ CLOSE IMPORTANT! – This system is designed for regular discs. Therefore, do not use any accessories such as disc stabiliser rings or disc treatment sheets. – Do not load more than one disc into the tray.
Basic operations Repeat and Shuffle Playing a disc You can select and change the various play modes before or during playback. ● Press 2 . Repeat play To interrupt playback ● Press Å. ➜ The current track time flashes. 1 Press REPEAT on the remote control repeatedly to select the following : ➜ REPEAT TRACK – repeat the current track. ➜ REPEAT ALL – repeat the entire disc. 2 To resume normal playback, press REPEAT REPEAT OFF until "REPEAT OFF" is displayed. ● To resume playback, press Åagain.
CD/MP3-CD Operations English display screen 1 3 5 Activating the favourites list ● Press FAVORITES ( 4 1 The selected item is shown (album name, playlist name, artist name or MP3-CD name) 2 Track name. 3 Elapsed play time. 4 Artist name is shown. If 1 shows the artist name, then album name is shown here. 5 Next track name. Deactivating the favourites list ● Press CD.
Artist and title information The system is able to display artist and title information such as CD title, artist’s name, musical genre, track titles and so forth (metadata). CD The tracks on the disc are displayed in numerical order when no CD information is available. If artist and title information is detected, the song titles will be displayed instead.
Radio Reception English NAVIGATE PLAY INCR. SURR.SLEEP • • FAVORITES DIM 123 SHUFFLE REPEAT ALL MW LW AM FM NEWS REC 1 2 3 FAVORITES VIEW • • OK BACK ENTER RESUME OPTIONS INTERNET PC LINK CANCEL CD TUNER AUX iR Tuning to radio stations Storing favourite radio stations 1 Press TUNER to select TUNER mode. TUNER ➜ "TUNER TUNER" is displayed. The current radio frequency will appear on the display. ➜ If an FM station is received in stereo, is displayed.
Erasing a favourite radio station Manual Preset Programming 1 Tune to your desired radio station (refer to “Tuning to radio stations”). 1 2 Press (UN)MARK ( ). ➜ The current station will be stored in the next available preset number. 2 Press (UN)MARK ( ). icon will disappear. ➜ The ➜ The preset numbers of all other preset stations in the waveband with a higher number are decreased by one. ● Repeat steps 1–2 to store other radio stations.
Radio Reception English RDS Setting the RDS clock RDS (Radio Data System) is a broadcasting service that allows FM stations to send additional information along with the regular FM radio signal. This additional information can contain: Some RDS radio station may be transmitting a real clock time at an interval of every minute. It is possible to set the clock by using a time signal which is broadcast together with the RDS signal. STATION NAME: The radio station name is displayed.
Multiple users Creating your favourites list This system allows personalisation for multiple users. Your personal selections are bound to a user account. This feature is available for PC LINK, INTERNET and CD only. Refer to “Preparations - Registration”. When in CD/PC LINK/ INTERNET-mode, press (UN)MARK ( ) to add / remove tracks or stations to/from your favourites lists. In TUNERmode, press (UN)MARK ( ) to save and delete radio stations and hold down (UN)MARK ( ) to auto programme radio stations.
External Sources English Notes: – You are advised not to listen to and record from the same source simultaneously. – All the sound control features (INCR. SURR., BASS/TREBLE, for example) are available for selection. – Refer to the operating instructions for the connected equipment for details. This source enables you to connect external sound devices and play the sound through your system’s built-in speakers.
NAVIGATE PLAY INCR. SURR.SLEEP • • FAVORITES DIM 123 SHUFFLE REPEAT ALL MW LW AM FM NEWS REC 1 2 3 English Clock/Timer FAVORITES VIEW • • OK BACK ENTER RESUME OPTIONS INTERNET PC LINK CANCEL CD TUNER IMPORTANT! When in Eco Power standby mode, it is not possible to operate the clock or timer function. View clock The clock (if it is set) will be shown in standby mode. To view the clock in any source mode (CD or TUNER for example) ● Press CLK/TIMER on the remote control.
Clock/Timer English Timer setting The system can switch on to CD, TUNER, INTERNET or PC LINK mode automatically at a preset time, serving as an alarm to wake you up. IMPORTANT! – Before setting the timer, ensure that the clock is set correctly. – The timer will always be switched on after it has been set. – The volume of the timer will increase gradually from the minimum level to the last tuned volume level.
Clock/Timer The sleep timer enables the system to switch to standby mode automatically at a preset time. 1 2 Press SLEEP on the remote control repeatedly to select a preset time. ➜ The selections are as follows (time in minutes): 15 ™ 30 ™ 45 ™ 60 ™ 90 ™ 120 ™ OFF ™ 15 … XX MINUTES OFF XX ➜ "XX MINUTES" or "OFF OFF" is displayed. "XX XX" is the time in minutes. When you reach the desired length of time, stop pressing the SLEEP button. OFF ➜ SLEEP is shown, except for "OFF OFF" mode.
Specifications English AMPLIFIER Output power .............................................. 2 x 100 W MPO 2 x 50 W RMS(1) Signal-to-noise ratio .......................... ≥ 70 dBA (IEC) Frequency response ......... 50 – 16000 Hz, ± 3 dB Input sensitivity AUX In / CDR/DVD In .................... 500 mV / 1V Output Speakers .................................................................... ≥ 6 Ω Headphones ...................................... 32 Ω – 1000 Ω Subwoofer Out .............. 1.
WARNING Under no circumstances should you try to repair the system yourself, as this will invalidate the warranty. Do not open the system as there is a risk of electric shock. If a fault occurs, first check the points listed below before taking the system for repair. If you are unable to remedy a problem by following these hints, consult your dealer or service centre. Problem Solution CD/MP3-CD OPERATIONS NO CD AVAILABLE! PLEASE “NO INSERT CD CD” is displayed.
Troubleshooting English GENERAL The system does not react when buttons are pressed. Sound cannot be heard or is of poor quality. The left and right sound outputs are reversed. The remote control does not function properly. The timer is not working. Not all buttons are lit. The Clock/ Timer setting is erased. – Remove the AC power plug for one minute. Then reconnect and switch on the system again. – Adjust the volume. – Disconnect the headphones. – Check that the speakers are connected correctly.