MCD149 DVD Micro Theatre Register your product and get support at www.philips.com/welcome User manual pg001-pg038_MCD149-05-Eng 1 2007.9.
Important notes for users in the U.K. Mains plug This apparatus is fitted with an approved 13 Amp plug. To change a fuse in this type of plug proceed as follows: 1 2 Remove fuse cover and fuse. 3 Refit the fuse cover. Fix new fuse which should be a BS1362 5 Amp, A.S.T.A. or BSI approved type. If the fitted plug is not suitable for your socket outlets, it should be cut off and an appropriate plug fitted in its place. If the mains plug contains a fuse, this should have a value of 5 Amp.
7 @ 8 9 0 1 2 3 4 5 6 ! 4 3 pg001-pg038_MCD149-05-Eng 3 2007.9.
1 4 $ ¡ 5 8 7 ) ^ 6 7 8 & @ # ! ( ™ £ % ≤ 9 * 2; 0 2 3 4 pg001-pg038_MCD149-05-Eng 4 2007.9.
Manufactured under license from Dolby Laboratories. "Dolby", "Pro Logic" and the double-D symbol are trademarks of Dolby Laboratories. MANUFACTURED UNDER LICENSE FROM DIGITAL THEATER SYSTEMS, INC. US PAT. NO 5,451,942,5,956,674, 5,974,380, 5,978,762 AND OTHER WORLDWIDE . PATENTS ISSUED AND PENDING. "DTS" AND "DTS DIGITAL SURROUND" ARE RESISTERED TRADEMARKS OF DIGITAL THEATER SYSTEMS, INC. COPYRIGHT 1996, 2000 DIGITAL THEATER SYSTEMS, INC. ALL RIGHTS RESERVED.
Language Code Inupiaq Irish Íslenska Italiano Ivrit Japanese Javanese Kalaallisut Kannada Kashmiri Kazakh Kernewek Khmer Kinyarwanda Kirghiz Komi Korean Kuanyama; Kwanyama Kurdish Lao Latina Latvian Letzeburgesch; Limburgan; Limburger Lingala Lithuanian Luxembourgish; Macedonian Malagasy Magyar Malayalam Maltese Manx Maori Marathi Marshallese Moldavian Mongolian Nauru Navaho; Navajo Ndebele, North Ndebele, South Ndonga Nederlands Nepali Norsk Northern Sami North Ndebele Norwegian Nynorsk; Occitan; Provencal
General Information Disc Operations Features .................................................................. 9 Discs for playback ................................................ 9 Supplied accessories ............................................ 9 Environmental information .............................. 10 Care and safety information ............................ 10 Playing discs ......................................................... 23 Using the disc menu ..........................................
Contents English System Menu Options Basic operations ................................................. 28 SYSTEM SETUP ............................................ 28-29 TV SYSTEM SCREEN SAVER TV TYPE PASSWORD RATING DEFAULT DIVX(R) VOD registration code LANGUAGE SETUP .......................................... 30 VIDEO SETUP .................................................... 30 BRIGHTNESS CONTRAST HUE SATURATION TV MODE AUDIO SETUP ...................................................
Congratulations on your purchase and welcome to Philips! To fully benifit from the support that Philips offers, register your product at www.philips.com/welcome. English General Information • Supported Bit-rates of MP3 disc are: 32, 64, 96, 128, 192, 256 (kbps). Features Additional Component Connections Lets you connect other audio and audio/visual components to the system so you can use the system’s surround sound speakers.
General Information/Maintenance English Environmental information Any unnecessary packaging has been omitted. We have tried to make the packaging easy to separate into three materials: cardboard (box), polystyrene foam (buffer) and polyethylene (bags, protective foam sheet). Your system consists of materials which can be recycled and reused if disassembled by a specialised company. Please observe the local regulations regarding the disposal of packaging materials, exhausted batteries and old equipment.
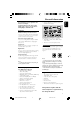
English Connections FM antenna 1.000 DB15 CONNECTOR TO MAIN UNIT SPEAKERS 4 Speaker (right) Speaker (left) AC MAINS ~ AC power cord IMPORTANT! – The type plate is located at the rear of the system. – Before connecting the AC power cord to the wall outlet, ensure that all other connections have been made. – Never make or change any connections with the power switched on. – High voltage! Do not open.You run the risk of getting an electric shock.
Connections English Step 2: Connecting speakers and subwoofer Step 3: Antenna connection Connect the supplied FM antenna to the respective terminal. Adjust the position of the antenna for optimal reception. FM Antenna 1.000 DB15 CONNECTOR TO MAIN UNIT SPEAKERS 4 1 Connect the supplied DB15 cable to DVD player’s DB15 CONNECTOR TO SPEAKER jack and the Subwoofer’s DB15 CONNECTOR TO MAIN UNIT jack. ● Fix the two screws on each connector to ensure firm connection.
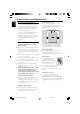
Using an accessory RF modulator Using component Video In jack (Pr Pb Y) ● Use the component video cables (red/blue/ green, not supplied) to connect the system’s PR/ PB/ Y jacks to the corresponding Component video input jacks (or labeled as Pr/Cr Pb/Cb Y or YUV) on the TV set. IMPORTANT! – If your TV set only has a single Antenna In jack (or labelled as 75 ohm or RF In), you will need a RF modulator in order to view the DVD playback via TV.
Connections English Step 5: Connecting the power cord AUDIO IN VIDEO IN L L R IMPORTANT! – Never make or change any connection with the power switched on. 1.000 B After everything is connected properly, connect the AC power cord to the system and then to the power outlet. Using the VCR for recording DVDs B Connect one of the system's VIDEO OUT jacks to the corresponding VIDEO IN jack and LINE OUT (R/L) jacks to the AUDIO IN jacks on the VCR.
Step 6: English Connections Connecting digital audio equipment 1.000 Digital audio recorder Recording (digital) Connect the system’s DIGITAL OUT jack to the DIGITAL IN jack on a digital recording device (DTS-Digital Theater System compatible, with a Dolby Digital decoder, for example). Before operation, set DIGITAL OUTPUT according to the audio connection. 15 pg001-pg038_MCD149-05-Eng 15 2007.9.
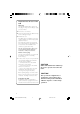
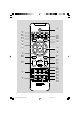
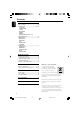
Controls English Controls on the system Controls on the remote control 1 DBB 1y – – enables or disables bass enhancement. 2 DSC – selects different types of preset sound equalizer settings. 2 Numeric Keypad (0-9) – Tuner .................... searches for a radio station Disc ....................... fast searches backward/forward in a disc at different speeds. 4 ECO POWER/STANDBY-ON B switches the system on or to Eco-power standby /normal standby mode.
¡ REPEAT A-B 0 í/ë – – Disc: skips to the previous/next chapter/title/ track. Tuner: selects a preset radio station. – In DISC mode, to stop playback or clear a program. – @ 2; – for VCD/CD: to repeat a specific section within the same track. for DVD: to repeat a specific section in a disc. ™ AUDIO !9 – – In DISC mode, to start or interrupt playback. – for VCD sets Stereo, Mono-Left or Mono-Right sound mode. for DVD selects an audio language.
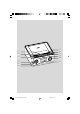
Preparations English IMPORTANT! – Make sure to complete the preparation procedures before operating the system. Step 1: Setting the clock 1 2 Before using the remote control 1 2 Pull out the plastic protective sheet. 3 Then select the desired function (for example ÉÅ , à , á). Select the source you wish to control by pressing one of the source select keys on the remote control (for example DISC, TUNER).
1 2 – In stop mode or during playback, press SYSTEM MENU. Press 22/33/5/4 on the remote control to toggle through the functions and select your preferential option. ➜ Move to SYSTEM SETUP and press 4. ➜ Move to one of the following and press 33. 16:9 (Wide screen mode) – If you have a widescreen TV set, use this setting (you must also set your widescreen TV to “full size”) available on a disc, then the disc’s own preference will be used.
Preparations English 6 Press 22/33 repeatedly to select "VIDEO SETUP". 7 Select "TV MODE" to "P-SCAN", then OK to confirm. ➜ The instruction menu appears on the TV. the DVD Micro System cannot be changed once selected. ITALIAN RUSSIAN 8 Press 22/33 to highlight OK in the menu and press OK to confirm. There will be a distorted picture on your TV at this state until you turn on the progressive scan mode on your TV. 9 Turn on your TV progressive scan mode (refer to your TV user manual).
Switching the system on ● Press ECO POWER/STANDBY-ON B on the front panel. ➜ The system will switch to the last selected source. ● Press SOURCE repeatedly (or DISC, USB, TUNER or AUX on the remote). ➜ The system will switch to the selected source. Switching the system to Eco Power Standby mode English Basic Functions DSC (Digital Sound Control) DSC provides a different type of preset sound equalizer setting. ● Press DSC repeatedly to select: ROCK, JAZZ, POP, CLASSIC or OFF.
Basic Functions English Plug and Play (for tuner installation) Plug and play allows you to store all available radio stations automatically. 1 2 1 2 If plug and play has not been installed When you turn on the system, “AUTO INSTALL- PRESS PLAY TO START” will be displayed. Press 38 to start installation. ➜ "AUTO" is displayed. ➜ PRG will start to flash. ➜ The system will search all radio stations on the FM band. ➜ All available radio stations with strong signal strength will be stored automatically.
IMPORTANT! – This system is designed for regular discs.Therefore, do not use any accessories such as disc stabiliser rings or disc treatment sheets, etc., as offered on the market, because they may jam the disc mechanism. – Do not move the system during playback. Doing so may damage the system. – DVD discs and players are designed with regional restrictions. Before playing a disc, make sure the disc matches the regional code of your player.
Disc Operations English Repeat A-B (DVD/VCD/CD/MP3/WMA) Zoom (DVD/VCD/JPEG) 1 2 Zooming allows you to enlarge or reduce the video image during playback. Press ZOOM on the remote repeatedly to enlarge or reduce the playback video image. 1 Press REPEAT A-B at your chosen starting point. 2 Press REPEAT A-B again at your chosen end point. ➜ The section A and B can be set only within the same chapter/track. ➜ The section will now repeat continuously. 3 To exit the sequence, press REPEAT A-B again.
Special disc features Forward/Reverse Searching (DVD/VCD/ CD/MP3/WMA) 1 2 Press TUNING 22/33 during playback to select the required speed: X2, X4, X8 or X20 (backward or forward). ➜ Sound will be muted. To return to normal speed, press 2;. Time search & search by chapter/track number (DVD/VCD/CD/MP3/WMA) 1 Press GOTO until the time or chapter/track edit box appears. 2 Enter hours, minutes and seconds from left to right in the time edit box using the Numeric Keypad (0-9) on the remote.
Disc Operations English Playing MP3/WMA/JPEG Disc Playing JPEG Picture CD IMPORTANT! – You have to turn on your TV and set to the correct Video In channel. (See "Setting up the TV".) General operation Playing MP3/WMA disc General operation 1 Load an MP3/WMA disc. ➜ A data disc menu appears on the TV screen and playback starts automatically from the first track. 2 Press 22 to move to the album column on the left of the TV screen, then use 5/4 to select an album and press OK to open it.
Special JPEG features Playing a DivX disc Zoom picture (JPEG) This DVD player suppor ts the DivX movie playback that you download from your computer onto a CD-R/RW (see “System Menu Options-DIVX(R) VOD registration code” for more information). Load a DivX disc, and press ÉÅ. ● During playback, press ZOOM repeatedly to display the picture with different scales (ZOOM2, ZOOM3 and ZOOM4). ● Use 22/33/5/4 to view the zoomed picture (ZOOM1/2, ZOOM1/3 and ZOOM1/4).
System Menu Options English Basic operations 1 Press SYSTEM MENU to enter the Setup Menu. 2 3 4 5 Press 22/33 to select a page to be set. 6 Press 5/4 to highlight an option. Enter its submenu by pressing 33 or OK. Move the cursor by pressing 5/4 to highlight the selected item. ➜ In cases of value setting, press 5/4 to adjust values. Press OK to confirm. ➜ ON: In STOP, PAUSE or No DISC mode, if no actions are performed about 3 minutes, the screen saver will be activated.
that parents restrict children under 17 from viewing or allow them to view only when supervised by a parent or adult guardian. 7 NC-17 – No children under age 17; not recommended for children under age 17. 8 ADULT – Material for adults only; viewed only by adults due to graphic sexual scenes, violence, or language. RATING Some DVDs may have a parental level assigned to the complete disc or to certain scenes on the disc. This feature lets you set a playback limitation level.
System Menu Options English LANGUAGE SETUP The options included in LANGUAGE SETUP page are: "OSD LANGUAGE", "AUDIO LANG", "SUBTITLE LANG" and "MENU LANG". See "Preparations-Step 4: Setting language preference" for details. VIDEO SETUP The options included in VIDEO SETUP page are: "BRIGHTNESS", "CONTRAST", "HUE", "SATURATION" and "TV MODE". DIGITAL OUT ➜ DIGITAL/OFF: Turns off the digital output. ➜ DIGITAL/RAW: If you have connected your DIGITAL OUT to a multi-channel decoder/ receiver.
English Radio Reception 2; 4 Tuning to radio stations 1 Press SOURCE on the set or TUNER on the remote repeatedly until the desired waveband (FM) is displayed. 2 Press and hold TUNING 22/33 and release the button. ➜ The radio automatically tunes to a station with sufficient reception. 3 Repeat Step 2 if necessary until you find the desired station. ● To tune to a weak station, press TUNING 22/33 briefly and repeatedly until you have found optimal reception.
External Sources English Using a non-USB device 1 Connect the system's AUX IN jack to the AUDIO OUT jacks on another audio/visual device (such as a VCR, Laser Disc player or cassette desk). 2 Press AUX to select external equipment. ➜ "AUX" is displayed. Note: – All the sound control features (DSC or DBB, for example) are available for selection. – Refer to the operating instructions for the connected equipment for details.
How to transfer music files from PC to a USB mass storage device By dragging and dropping music files, you can easily transfer your favorite music from PC to a USB mass storage device. For the flash player, you can also use its music management software for the music transfer. However, those WMA files may be unplayable for compatibility reasons. How to organize your MP3/WMA files on the USB mass storage device This Hi-Fi system will browse the MP3/WMA files in the folders/sub-folders/titles order.
Clock/Timer English 2; 4 Clock setting 4 Press VOLUME +/- on the front panel or VOL +/- on the remote to set the minutes and press SLEEP/TIMER to confirm. ➜ The timer is now set and activated. 5 In standby mode, press SLEEP/TIMER on the remote control to activate or deactivate the timer. ➜ Display shows if activated, and disappears if deactivated. See "Preparations-Step 2: Setting the clock".
AMPLIFIER Output power .................. 2 x 50 W + 100W RMS Signal-to-noise ratio ....................................... ≥ 60 dBA Frequency response .......... 35– 20000 Hz, ± 3 dB Input sensitivity AUX ....................... 0.9 V (max. 2 V) Impedance loudspeakers ......................................... 4 Ω DVD PLAYER Laser Type ................................................ Semiconductor Disc Diameter .............................................. 12cm / 8cm Video Decoding ........................
Troubleshooting English WARNING Under no circumstances should you try to repair the system yourself, as this will invalidate the warranty. Do not open the system as there is a risk of electric shock. If a fault occurs, first check the points listed below before taking the system for repair. If you are unable to remedy a problem by following these hints, consult your dealer or Philips for help. Problem Solution ✔ Check if the AC power cord is properly No power. connected.
Problem Solution The language for the sound or subtitle cannot be changed when playing a DVD. ✔ Multi-language sound or subtitle is not recorded on the DVD. ✔ Changing the language for the sound or subtitle is prohibited on the DVD. No image is output when a function is selected. ✔ Make sure the component is connected correctly. ✔ Press the correct function button for the input source. Sound cannot be heard or is of poor quality ✔ ✔ ✔ ✔ ✔ Poor radio reception.
Glossary English Analog: Sound that has not been turned into numbers. Analog sound varies, while digital sound has specific numerical values. These jacks send audio through two channels, the left and right. Aspect ratio: The ratio of vertical and horizontal sizes of a displayed image. The horizontal vs. vertical ratio of conventional TVs. is 4:3, and that of wide-screens is 16:9. AUDIO OUT Jacks: Jacks on the back of the DVD System that send audio to another system (TV set, Stereo, etc.).
Meet Philips at the Internet http://www.philips.com English Français Español Deutsch Nederlands Italiano Svenska MCD149 Dansk Suomi CLASS 1 LASER PRODUCT Português Polski Printed in China PageBack_MCD149 232 PDCC-ZC-0737 2007.9.