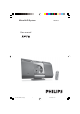
Micro Hi-Fi System MCM275 User manual 001-029_MCM275_98_Eng 1 2/17/2006, 16:19
CAUTION Visible and invisible laser radiation. If the cover is open, do not look at the beam. High voltage! Do not open. You run the risk of getting an electric shock. The machine does not contain any userserviceable parts. Modification of the product could result in hazardous radiation of EMC or other unsafe operation. If you disconnect the product from the mains, make sure to take the plug out of the wall socket completely.
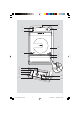
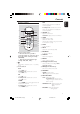
8 1 2 7 6 3 5 4 9 0 ! @ % # $ 3 001-029_MCM275_98_Eng 3 2/17/2006, 16:19 3140 115 xxxxx
001-029_MCM275_98_Eng 4 2/17/2006, 16:19 3140 115 xxxxx
English Index English ------------------------------------------------ 6 ------------------------------------------------- 30 5 001-029_MCM275_98_Eng 5 2/17/2006, 16:19 3140 115 xxxxx
Contents English General Information CD Supplied accessories ............................................ 7 Environmental information ................................ 7 Safety information ................................................ 7 Discs for playback .............................................. 17 Playing discs ................................................... 17-18 Selecting and searching .....................................
Supplied accessories – – – – – – Safety Information 2 speaker boxes including 2 speaker cables remote control (with 1 x CR2025 battery) MW loop antenna FM wire antenna stand mounting kit Environmental Information All unnecessary packaging has been omitted. We have tried to make the packaging easy to separate into three materials: cardboard (box), polystyrene foam (buffer) and polyethylene (bags, protective foam sheet).
Controls English Controls on the set (illustrations on page 3) 2 – – – press briefly to switch the set on or to standby mode SOURCE selects sound source CD, USB,TUNER or AUX In standby mode: switches the set on and selects sound source CD, USB,TUNER or AUX @ – – # – $ – 3 IR – 4 – 5 – 6 7 – – sensor for the infrared remote control Helpful hints: Always point the remote control towards this sensor.
English Controls AUX Remote control – selects the audio input from an additional connected appliance – In standby mode:: switches the set on and selects the audio input from an additional connected appliance / % 1 USB 2 3 VOLUME +/- 3 – adjusts the volume level – Clock/Timer: adjusts the hours and minutes $ 4 5 # @ ! 0 9 6 7 8 4 TIMER – – – displays the timer setting switches the timer on/off enters the timer setting mode (press and hold for more than 2 seconds) 5 SLEEP – set the sleep
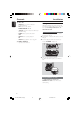
Controls Installation – – – – With the detachable stand and by-packed wall mounting kit , MCM275 allows you to place it in two ways: on desktops with stand or on walls without stand. ALBUM/ PRESET 3 / 4 CD/USB: selects the next/previous album (for MP3/WMA only) TUNER: selects a preset radio station ÉÅ CD/USB: starts or pauses playback 9 CD/USB: stops playback; erase a program % OPEN • CLOSEç – Placing MCM275 Mounting stand onto the set 1 2 MCM275 is equipped with a stand.
English Installation FM wire antenna MW loop antenna Speaker (right) Speaker (left) AC power cord Rear connections Warning: – Never make or change connections with the mains supply switched on. – Install your set near the AC outlet and where the AC power plug can be reached easily. A Speaker connections Use the supplied speakers only. Using other speakers can damage the set or the sound quality will be negatively affected.
Installation English Or Insert the loop antenna into the slot on the set 2 3 Move the antenna in different positions for optimal reception (as far away as possible from the TV, VCR or other radiation sources) Fix the antenna’s end to the wall Connecting an additional appliance Connecting a USB device or memory card 2 3 Fit the plug of the loop antenna to AM (MW) ANTENNA as shown below Adjust the position of the antenna for optimal reception (as far away as possible from the TV, VCR or other radiation
Using AC power Connecting a non-USB device It is possible to use an additional appliance, e.g. TV, VCR or CD recorder with the set. On MCM275, you can playback music from an external source.
Preparation English Using the remote control Setting the clock IMPORTANT! After connecting MCM275 to the power supply, set the clock first. – Remove the protective plastic tab before using the remote control. 1 In the standby mode, press and hold DISPLAY/ – Always point the remote control directly towards IR area. Notes for remote control: – First select the source you wish to control by pressing one of the source select keys on the remote control (for example CD,TUNER).
English Basic Functions Switching on/off the set and selecting functions 1 To switch on, press STANDBY-ON or SOURCE on the set (or y on the remote control) ➜ The set switches to the last source selected OR On the remote control, press the source button (e.g.
Basic Functions English Volume control Sound control Volume adjustment ● Adjust the volume by using the VOLUME rotary on the set or by pressing VOLUME +/on the remote control ➜ VOL and the actual value (between 1 and 31) are displayed ➜ VOL MIN is the minimum volume level ➜ VOL MAX is the maximum volume level DSC Digital Sound Control enables you to select predefined sound settings.
IMPORTANT! – Make sure that the file names of MP3 files end with .mp3. – For DRM protected WMA files, use Windows Media Player 10 (or later) for CD burning/ conversion. Visit www. microsoft.com for details about Windows Media Player and WM DRM (Windows Media Digital Rights Management).
CD English Helpful hints: – If you have not organized MP3/WMA files into any albums on your disc, an album “00” will be automatically assigned for all those files.
Programming tracks 1 You may store up to 40 tracks in the desired sequence. If you like, store any track more than once. In the stop position, press PROGRAM to start programming ➜ flashes ➜ Audio CD: Display shows PROG and current track number MP3/WMA: Display shows current album/ track number English CD Helpful hints: – The set will return to the stop position if no button is pressed within 90 seconds. disappears. To resume programming, press PROGRAM.
CD English Different play modes: REPEAT, SHUFFLE REPEAT TRACK– plays the current track continuously REPEAT ALL– plays the entire disc/program continuously SHUFFLE – plays all the tracks in random order 1 During playback, press once or more REPEAT or SHUFFLE to select play modes 2 To return to normal playback, press REPEAT or SHUFFLE repeatedly until the various modes are no longer displayed Display track information (MP3/WMA only) The ID3 tag is part of an MP3/WMA file and contains various track infor
Tuning to radio stations 1 2 Press SOURCE once or more to select TUNER (or TUNER on the remote control) Press TUNER on the remote control repeatedly to select your desired waveband, FM or MW ➜ Display shows: , radio station frequency, waveband and if programmed, a preset number 1 Press the ALBUM/ PRESET buttons once or more to select the preset number where programming should start. Note: – If no tuner preset number is selected, default is preset 1 and all your presets will be erased.
Tuner English Changing tuning grid (not available for all versions) In North and South America, the frequency step between adjacent channels in the MW band is 10 kHz (9 kHz in some areas). Changing the tuning grid will erase all previously stored preset radio stations. 1 2 Select TUNER source Press STOP on the set for at least 5 seconds. ➜ The display will show "GRID 9" or "GRID10". Note: – GRID 9 and GRID 10 indicate that the tuning grid is in step of 9 kHz and 10 kHz respectively.
Using a USB mass storage device By connecting a USB mass storage device to the Hi-Fi system, you can enjoy the device’s stored music through the powerful speakers of Hi-Fi system. Playing a USB mass storage device Compatible USB mass storage devices With the Hi-Fi system, you can use – USB flash memory (USB 2.0 or USB1.1) – USB flash players (USB 2.0 or USB1.
USB English 1 2 AUX Check the USB device has been properly connected.
SLEEP Setting the timer The set can be used as an alarm clock, whereby the selected source (CD, TUNER or USB) star ts playback at a preset time. Make sure the clock is set before using the timer. 1 Press and hold TIMER on the remote control until SET TIMER appears ➜ flashes.
Specifications English AMPLIFIER Output power .......................................... 2 x 5 W RMS ............................................................ 10 W + 10 W MPO Signal-to-noise ratio ....................................... ≥ 75 dBA Frequency response ........ 50 – 20,000 Hz, ± 3 dB Input sensitivity AUX ....................... 0.5 V (max. 2 V) Impedance loudspeakers ..................................... ≥ 4 Ω Impedance headphones .................... 32 Ω -1000 Ω ..........................
WARNING Under no circumstances should you try to repair the system yourself, as this will invalidate the warranty. Do not open the system as there is a risk of electric shock. If a fault occurs, first check the points listed below before taking the system for repair. If you are unable to remedy a problem by following these hints, consult your dealer or Philips for help. Problem Solution “NO DISC” is displayed. ✔ Insert a disc. ✔ Wait until the moisture condensation at the lens has cleared.
Troubleshooting English The remote control does not function properly. ✔ Select the source (CD or TUNER, for example) ✔ ✔ ✔ ✔ before pressing the function button (ÉÅ,4 , ¢). Reduce the distance between the remote control and the system. Insert the battery with its polarities (+/– signs) aligned as indicated. Replace the battery. Point the remote control directly toward IR sensor on the front of the system. The timer is not working. ✔ Check the set is switched off ✔ Set the clock correctly.
How to mount your MCM275 onto walls Mounting your MCM275 1 IMPORTANT! – The wall mounting instructions are for the use of the qualified wall mounting person only! – Ask a qualified person to help you with the wall mounting, which includes drilling holes on the wall and mounting the set onto walls. What’s in the supplied mounting kits Align the template in the chosen location on a wall. Use a pencil to mark the drilling positions (as shown) 140 mm (5.51") 2 3 140 mm (5.