OWNER’S MANUAL P R O J E C T I O N T E L E V I S I O N MX5472C MX6072C MX6472C I M P O R T A N T ! Return Your Warranty Registration Card Within 10 Days. See Why Inside.
Return your Warranty Registration card today to ensure you receive all the benefits you’re entitled to. Once your PHILIPS MAGNAVOX purchase is registered, you’re eligible to receive all the privileges of owning a PHILIPS MAGNAVOX product. So complete and return the Warranty Registration Card enclosed with your purchase at once. And take advantage of these important benefits.
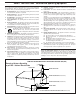
SAFETY INSTRUCTIONS - Read before operating equipment This product was designed and manufactured to meet strict quality and safety standards. There are, however, some installation and operation precautions which you should be particularly aware of. 1. Read Instructions - All the safety and operating instructions should be read before the appliance is operated. 2. Retain Instructions - The safety and operating instructions should be retained for future reference. 3.
TABLE OF CONTENTS Getting Started Remote Control Operation Welcome/Product Registration ...................2 Using the Remote Locator Feature........34-35 Safety/Precautions .....................................................3 Setting the Smart Picture Control..........36-37 Table of Contents.......................................................4 Using Smart Sound Control .....................................38 Features, Model and Cabinet Information .................
11 12 1 2 10 3 9 4 8 7 6 5 FEATURES As you unpack your TV please note that the following items have been included with your set: First Time Set Up - automatically sets the TV for local channels, the correct picture signal (antenna or cable), and assists in the setting of TV’s Guide Plus+ feature. • Owner's Manual - Safety Tip Information Infrared Remote Control - operates your TV set and a variety of wireless remote control VCRs and Cable TV Converters.
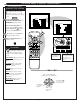
PICTURE MENU CONTROL ADJUSTMENTS COLOR, BRIGHTNESS, SHARPNESS, TINT, PICTURE T o adjust your TV color and picture controls, select a TV channel and follow the steps shown below: BEGIN 1 MAIN MENU Select BRIGHTNESS, PICTURE, COLOR, TINT, or SHARPNESS picture control. PICTURE SOUND FEATURES HELP 1ST TIME SETUP EXIT PICTURE MENU COLOR With the PICTURE MENU on screen, move the RED highlight with the MENU (M) buttons. Then press the MENU button.
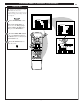
PICTURE MENU CONTROLS (CONTINUED) CLEARVIEW C learview is a sharpness feature which smoothes out background snow (or picture noise) without losing picture image detail or crispness. BEGIN MAIN MENU 1 Select CLEARVIEW control. PICTURE FEATURES With the PICTURE MENU on screen, move the RED highlight with the MENU (M) buttons. Then press the MENU button. 2 Press the MENU ▲▼ buttons to move the RED highlight. Press the MENU button to select (U) the ENHANCED mode.
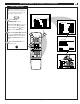
PICTURE MENU CONTROLS (CONTINUED) RED/BLUE CONVERGENCE C onvergence is the correct lining up of the red and blue light paths on the TV screen. NOTE: If no color fringing (see Smart Help) shows, then no Convergence adjustments are necessary for your TV. MAIN MENU BEGIN 1 PICTURE Select CONVERGENCE control. SOUND FEATURES PICTURE MENU HELP COLOR 1ST TIME SETUP With PICTURE MENU (2 of 2) on screen, move the RED highlight with the MENU (M) buttons. Then press the MENU button.
PICTURE MENU CONTROLS (CONTINUED) FLESH CORRECTION U se the Flesh Correction control to keep skin tone hues (or facial tint) from varying from TV channel to TV channel. BEGIN MAIN MENU 1 Select FLESH CORRECTION control. PICTURE SOUND FEATURES PICTURE MENU COLOR With PICTURE MENU (2 of 2) on screen, move the RED highlight with the MENU (M) buttons. Then press the MENU button. 2 HELP TINT EXIT 1ST TIME SETUP BRIGHT PICTURE SHARP CLEARVIEW MORE...
FEATURE MENU CONTROL ADJUSTMENTS PICTURE SOURCE T he picture for the TV can come through either the ANTENNA plug or the AUDIO/VIDEO INput jacks (on the rear of the TV). The Picture Source control simply tells the TV which one of these picture sources it is to show on the TV screen. BEGIN MAIN MENU PICTURE 1 Select PICTURE SOURCE FEATURES SELECT control. With the FEATURES MENU on screen, move the RED highlight with the MENU (M) buttons. Then press the MENU button.
FEATURE MENU CONTROLS (CONTINUED) CLOSED CAPTION C losed Captioning (CC) allows you to read the voice content of television programs on the TV screen. Designed to help the hearing impaired this feature uses on-screen "text boxes" to show dialogue and conversations while the TV program is in progress. NOTE: Not all TV programs and product commercials are made for broadcast with Closed Caption (CC) information included.
FEATURE MENU CONTROLS (CONTINUED) CABLE TUNING Y ou need to make sure the TV is set to pick up either Cable TV or Antenna signals. In other words, the TV needs to know if you connected a Cable TV signal or a normal antenna to its ANTENNA plug. MAIN MENU PICTURE NOTE: If you went through First Time Setup (in your Quick Use Guide), this task has already been completed for you. SOUND FEATURES HELP 1ST TIME SETUP EXIT FEATURE MENU BEGIN 1 Select CABLE CHANNEL TUNING control.
FEATURE MENU CONTROLS (CONTINUED) CHANNEL MEMORY AUTO-PROGRAMMING our TV can automatically set itself for local area (or Cable TV) channels. This makes it easy for you to select only the TV stations in your area when the CHANNEL ▲▼ buttons are pressed. Y MAIN MENU PICTURE NOTE: If you went through First Time Setup (in your Quick Use Guide), this task has already been completed for you.
FEATURE MENU CONTROLS (CONTINUED) ADD/DELETE CHANNELS A uto-Programming (see previous page) adds all the channels it can find (on your Antenna or Cable TV system) into the TV's memory. Add/Delete Channels makes it easy for you to add other channels, or drop unwanted channels, from the list of channels in the TV's memory. MAIN MENU BEGIN 1 Select CHANNEL MEMORY (ADD/DELETE CHANNELS) control.
FEATURE MENU CONTROLS (CONTINUED) SET CLOCK Y our TV comes with an onscreen clock. During normal operation the clock appears on the screen with every channel change (and when the STATUS button is pressed). BEGIN 1 FEATURE MENU MAIN MENU Select SET CLOCK control. PICTURE With FEATURES MENU (2 of 5) on screen, move the RED highlight with the MENU (M) buttons. Then press the MENU button. 2 Press the remote's number buttons to set the time clock.
FEATURE MENU CONTROLS (CONTINUED) SET ON TIMER J ust like an alarm clock you can set the TV to turn itself on at the same time everyday. BEGIN 1 FEATURE MENU MAIN MENU Select SET ON TIMER control. PICTURE With FEATURES MENU (2 of 5) on screen, move the RED highlight with the MENU (M) buttons. Then press the MENU button. 2 3 FEATURES 5 3 2 1 5 REC • CLEAR Press the MENU ▲▼ and then the MENU (M) buttons to select "SET ON TIME". Press the STATUS button to set the "ON TIME" and clear the screen.
FEATURE MENU CONTROLS (CONTINUED) SLEEP TIMER H ave you ever fallen asleep in front of the TV only to have it wake you up at two in the morning with a test pattern screeching in your ears? Well, your TV can save you all that trouble by automatically turning itself off. BEGIN 1 Press the SLEEP button on the remote control. FEATURE MENU MAIN MENU PICTURE Note: you can also select the SLEEP control with the TV’s onscreen FEATURES MENU (2 of 5). Move the RED highlight with the MENU (M) buttons.
FEATURE MENU CONTROLS (CONTINUED) CHANNEL DISPLAY W ith the Channel Display control you can change the size and location of the on screen channel and clock information. BEGIN 1 Select CHANNEL DISPLAY control. FEATURE MENU MAIN MENU With FEATURES MENU (2 of 5) on screen, move the RED highlight with the MENU (M) buttons. Then press the MENU button. 2 3 PICTURE SOUND FEATURES HELP EXIT 1ST TIME SETUP PICTURE SOURCE CABLE TUNING CLOSED CAPTION CHANNEL MEMORY MORE...
FEATURE MENU CONTROLS (CONTINUED) HALF HOUR REMINDER W ith the Half Hour Reminder control the TV automatically shows you the current time and channel every thirty minutes. MAIN MENU BEGIN 1 2 Select HALF HOUR REMINDER control. PICTURE With FEATURES MENU (2 of 5) on screen, move the RED highlight with the MENU (M) buttons. Then press the MENU button. 1ST TIME SETUP Press the MENU ▲▼ and MENU (M) buttons to highlight and select (U) the EVERY HALF HOUR item.
FEATURE MENU CONTROLS (CONTINUED) PARENTAL CONTROL P arental Control allows parents to block out, or "censor", any channels they think children should not watch. A channel placed under Parental Control cannot be viewed until a correct access code is used to unlock the channel for viewing. NOTE:Your TV left the factory with the Parental Code set to "0000".
FEATURE MENU CONTROLS (CONTINUED) PARENTAL CONTROL A fter your personal Parental Code number has been set (see previous page), you are now ready to select the channels you want to block out or censor. BEGIN 1 Select the BLOCK CHANNELS control. With FEATURES MENU (3 of 5) on screen, move the RED highlight with the MENU (M) buttons. Then press the MENU button. MAIN MENU PICTURE SOUND FEATURES 3 Press the MENU ▲▼ and MENU (M) buttons to highlight and select the BLOCK CHANNELS item.
FEATURE MENU CONTROLS (CONTINUED) CHANNEL LABELS D o you ever have trouble remembering on which channel a particular station or network is located? The Channel Labels Control is a quick way to view and select channels from a list of Labelled channels. FEATURE MENU A Label is a four letter callout you can set to appear with the on screen channel number. Example Label: WXYZ - for a TV station's call letters. CHANNEL LABELS PARENTAL CONTROL ACCESSORY RF SWITCH LANGUAGE SELECTION MORE...
FEATURE MENU CONTROLS (CONTINUED) LANGUAGE N ote: If you went through First Time Setup, This task has already been completed for you. For our Spanish and French speaking TV owners an on-screen LANGUAGE option is present. With the LANGUAGE control you can set the TV’s on-screen features to be shown in either English, Spanish or French. FEATURE MENU MAIN MENU PICTURE BEGIN 1 Select the LANGUAGE DISPLAY control. With FEATURES MENU (3 of 5) on screen, move the RED highlight with the MENU buttons.
SOUND MENU CONTROL ADJUSTMENTS BASS, TREBLE, BALANCE Y our TV also has individual sound adjustment controls. The BASS (low frequency), TREBLE (high frequency) , and Speaker BALANCE may all be used to adjust the sound playback of TV programs. MAIN MENU PICTURE SOUND FEATURES HELP EXIT 1ST TIME SETUP BASS BOOST INCREDIBLE SURROUND 3 Select BASS, or TREBLE, or BALANCE sound control. With the SOUND MENU on the screen, move the RED highlight with the MENU (M) buttons. Then press the MENU button.
SOUND MENU CONTROLS (CONTINUED) SMART HELP STEREO Y our TV is able to receive broadcast stereo TV programs. The TV is equipped with an amplifier and twin speaker system through which the stereo sound can be heard. MAIN MENU PICTURE A RED stereo light (on the front of the TV) will come on when a stereo broadcast is received. SOUND FEATURES HELP SOUND MENU EXIT 1ST TIME SETUP BASS Remember.
SOUND MENU CONTROLS (CONTINUED) INCREDIBLE SURROUND T he Incredible Surround control can be used to add greater depth and dimension to both monaural (MONO) and STEREO TV sound. MAIN MENU PICTURE SOUND FEATURES HELP SOUND MENU 1ST TIME SETUP BEGIN 1 BASS EXIT TREBLE BALANCE Select the Incredible Surround control. BASS BOOST INCREDIBLE SURROUND MORE... EXIT With the SOUND MENU on the screen, move the RED highlight with the MENU (M) buttons. Then press the MENU button.
SOUND MENU CONTROLS (CONTINUED) TV SPEAKERS NOTE: The TV’s PIP AUDIO OUTPUT jacks can also be used for additional stereo playback options such as wireless transmitter headphone hook-up, or as an external amplifier connection source. However, with normal PIP feature operations (when the ANT A and ANT B Input sources are connected for use), the PIP AUDIO OUTPUTs will switch from stereo to monaural (mono) sound.
SOUND MENU CONTROLS (CONTINUED) SMART HELP SURROUND SOUND B y adding optional external speakers to the TV's sound system, you can create the feeling of reflected sound that surrounds you at a movie theater or concert hall. REAR SURROUND SOUND SPEAKER TERMINALS REAR SURROUND EXT.
OPTIONAL SURROUND SOUND CONNECTIONS E xtra speaker connections have been supplied on the rear of the TV. These extra connections are especially important for some of the optional Amplifier and multispeaker arrangements that are possible with Dolby Pro Logic Surround Sound audio features.
USING THE AUDIO/VIDEO INPUT JACKS VCR/AUX INPUTS T he TV's Audio/Video Input jacks are for direct picture and sound connections between the TV and a VCR (or Video Disc Player, etc.) that has Audio/Video Output jacks. To view the playback of a VCR tape by using the Audio/Video Input jacks on the TV: PICTURE AND SOUND FROM PLAYBACK OF VCR TAPE BACK OF TV PICTURE SOURCE CABLE TUNING Select the "VCR/AUX 1" PICTURE SOURCE SELECT control on the TV.
USING THE AUDIO/VIDEO INPUT JACKS (CONTINUED) AUX 3 INPUTS or more convenient Direct playback connections the TV's Front Audio/Video Input panel can be used. Located next to the TV's front control panel (under a small cover door) these Input jacks allow for quick and easy connections, particularly for the playback of Camcorder tape recordings.
USING THE AUDIO/VIDEO INPUT JACKS (CONTINUED) AUX1 - S-VIDEO INPUTS T he S(uper)-Video connection on the rear of the TV can give you better picture detail and clarity, for the playback of S-VHS VCR tapes or Video Discs, than the normal antenna picture connections. NOTE: Connections and use of the TV's S-VIDEO 2 Audio/Video Input jacks are the same as for the S-VIDEO 1 jacks (except "S-VIDEO 2" is selected as the Picture Source in step 3).
USING THE AUDIO/VIDEO OUTPUT JACKS (CONTINUED) AUDIO/VIDEO OUTPUTS T he Audio/Video Output jacks on the TV can be used to record TV programs on VCRs which have Audio/Video Input jacks. PICTURE AND SOUND BEING RECORDED ON VCR. BACK OF TV FEATURE MENU To record TV programs by using the Audio/Video jacks on the TV: PICTURE SOURCE CABLE TUNING – PICTURE SOURCE SELECT CLOSED CAPTIONS BEGIN REAR SURROUND EXT.
USING THE REMOTE LOCATOR FEATURE H ave you ever played hide and seek with your remote control? Are you tired of tearing the house apart trying to find if someone has stuffed the remote under the couch, put it on the shelves, or hid it in the desk? Well, your TV remote can save you all that looking by automatically signaling its location to you. Here's how it works: BEGIN 1 Press the POWER button on the set to turn the TV ON.
REMOTE LOCATOR (CONTINUED) ADDRESS CODE PROGRAMMING OF REMOTE For most homes this step would not be needed but for your information: Up to 9 different remote locator address codes can be set on which the TV can send out its "homing" signal. This is done in case there is more than one TV (with a remote locator) present, and you want only one specific remote to be signaled when the TV is turned ON.* To set a Locator Address Code: BEGIN 1 With TV turned ON, press the LOCATOR CODE button on the remote.
REMOTE CONTROL OPERATION (CONTINUED) SMART PICTURE R egardless of what type of program your watching, your TV has automatic video control settings matched for your current program source or content. The Smart Picture feature quickly resets your TV’s video controls for a number of different types of programs and viewing conditions you may have in your home. BEGIN 1 Press the SMART button on the remote. 2 Press the MENU (M) button to select the Smart Picture feature (highlighted in RED).
REMOTE CONTROL OPERATION (CONTINUED) SMART PICTURE T o use the Smart Picture settings you placed in memory (see previous page): BEGIN 1 Press the SMART button on the remote and then press the MENU (M) to select the SMART PICTURE control. List of “SMART PICTURE” categories show on the TV screen. 2 Press the MENU (M) ▲▼ buttons to highlight the “CUSTOM” Smart Picture category. 3 Press the MENU (M) button to select “CUSTOM.
REMOTE CONTROL OPERATION (CONTINUED) SMART SOUND re you tired of the sound of commercials following you into the next room or all through the house? Smart Sound allows you to preset a desired volume level that the TV sound will not go above. This makes for an even, more consistent sound by reducing the “peaks” and “valleys” that can occur during program changes or commercial breaks. A BEGIN 1 Press the SMART button on the remote.
REMOTE CONTROL OPERATION (CONTINUED) 2-CHANNEL SURF/SMART SURF SMART HELP A “list” or series of previously viewed channels can be selected with the SURF button on your remote control. With this feature you can easily switch between different TV programs that currently interest you. The Smart Surf control allows you to set up to 10 channels in its quick viewing “list”.
SETTING THE REMOTE TO WORK VCRS Y our remote control is set to work your TV and many infrared remote (IR) control VCRs. However, an easy onetime step may be necessary before the remote will work your VCR. Try this initial check to see if going on to the following section is necessary. ENTER SLEEP 7 SMART POWER 8 9 0 VCR TV CBL VCR BEGIN 2 Point remote toward VCR and press the POWER button. 3 Does the remote turn the VCR ON? IF YES, STOP and try the other VCR buttons on the remote.
SETTING THE REMOTE TO WORK VCRS (CONTINUED) N ow that you have looked up the two-digit Remote Code Number for your brand of VCR (on previous page), you are ready to follow the four simple steps below. 1 Please read through steps 1-4 before beginning. VCR BEGIN 1 VCR REC•/ Plus + CLEAR Press and release the REC (RECORD) button. MENU REW ! §§ 2 Within thirty seconds after releasing the REC button, press and release the VCR System button.
SETTING THE REMOTE TO WORK CABLE TV CONVERTERS Y our remote control is set to work your TV and many infrared remote (IR) control Cable Converters. However, an easy one-time step may be necessary before the remote will work your Converter. Try this initial check to see if going on to the following section is necessary.
SETTING THE REMOTE TO WORK CABLE TV CONVERTERS (CONTINUED) N ow that you have looked up the two-digit Remote Code Number for your brand of Cable Converter (on previous page), you are ready to follow the four simple steps below. 1 Please read through steps 1-4 before beginning. BEGIN 1 Press and release the REC (RECORD) button. VCR REC•/ Plus + CLEAR Cable Converter MENU REW ! §§ 2 Within thirty seconds after releasing the REC button, press and release the CBL System button.
SETTING YOUR REMOTE TO WORK VCRS, CONVERTERS - SEARCH Y our TV remote can be set to work your VCR or Cable Converter by what is called the SEARCH method. If the "REMOTE CODE" number method shown in the previous section did not set your remote to work your VCR or Converter, then follow the easy steps listed below. CABLE CONVERTER 06 1 08 06 Please read through steps 1-4 before beginning. BEGIN 1 2 Press the POWER button on the VCR or Converter to turn the unit ON.
USING THE REMOTE'S VCR BUTTONS W hen using the TV remote with a VCR, first make certain it is set to control your VCR ( by the REMOTE CODE or SEARCH method - see earlier section). BEGIN 1 Press the VCR System button on the remote. Play Button 2 Point the top of the remote toward the front of the VCR (remote sensor window) when pressing buttons. STOP VCR REC•/ Plus + Hold the RECORD button down, and then press the PLAY button to begin a VCR recording.
HOW TO USE THE PICTURE-IN-PICTURE (PIP) FEATURE P icture-in-Picture (PIP) is the showing of two pictures on the TV screen at the same time. (One main screen picture and one small inset picture - or PIP). For your ease and convenience this TV has two separate inputs (ANTenna A and ANTenna B) for your home’s Antenna and/or Cable TV system signal. The ANT A input is primarily for the TV’s main screen picture.
N ow that you have completed the required connections on the previous page you are ready to follow the simple steps shown below. - PIP WINDOW - - MAIN SCREEN - PIP SOURCE SELECT Turn the TV ON. ANT A Place the TV's PIP SOURCE SELECT control to "ANT B"• With FEATURES MENU (4 of 5) on screen, move the RED highlight with the MENU (M) buttons. Then press the MENU button. • AUX3 EXIT Press the PIP ON/OFF button on the remote. The PIP window should show in one of the corners of the TV screen.
USING PIP WITH THE REMOTE CONTROL B y using the PIP buttons on the remote the PIP picture can be moved and swapped with the main screen. The main screen picture can also be frozen in the PIP window. SMART HELP Remember, if the TV is showing a "VCR/AUX" supplied picture on the main screen (when the TV and VCR are turned OFF), a blank screen will appear when the TV is turned back ON again. BEGIN 1 Press the PIP ON/OFF button to show the PIP picture. PIP appears in a corner of TV screen.
SELECTING THE PICTURE SOURCE FOR PIP PIP SOURCE T he picture for the PIP window can come through either the ANT(enna) A / B Inputs or the AUX 1/2/3 Inputs (on the front and rear of the TV). PIP Picture Source simply tells the TV which one of these sources it is to show in the PIP window. FEATURE MENU MAIN MENU PICTURE BEGIN 1 FEATURES CLOSED CAPTIONS CHANNEL MEMORY HELP MORE... EXIT 1 OF 5 Select PIP SOURCE control.
ADJUSTING PICTURE-IN-PICTURE COLOR AND TINT PIP COLOR / PIP TINT T he Picture-In-Picture (PIP) Color and Tint controls are used to make fine tune adjustments to the color settings for PIP (when it is shown on the TV screen). 1 FEATURE MENU BEGIN Select PIP COLOR (or PIP TINT) control. PICTURE With FEATURES MENU (5 of5) on screen, move the RED highlight with the MENU (M) buttons. Then press the MENU button. 2 Press the MENU ▲▼ buttons to move the RED highlight.
MORE PIP CONNECTIONS SMART HELP P IP hookup with Cable Converter Box and VCR. Remember to use the Cable TV Converter Box to select channels for PIP, the VCR must be set to the same channel as the channel selection switch on the rear of the Cable Converter (either channel 3 or 4). BEGIN 1 First use an optional signal splitter and connect the original cable TV signal to both the CABLE IN on the Cable Converter and the ANTENNA plug on the rear of the TV.
TV HELP MENU T he on screen HELP menu offers both Operating Tips and a list of Glossary definitions for different features on your TV. These items are given to provide you with more information and details on a select group of feature operations. BEGIN 1 Select "HELP" on the TV's Main Menu. MAIN MENU HELP MENU PICTURE Press the remote's Menu buttons to move UP/DOWN and from SIDE-TO-SIDE within the list of on-screen features.
TIPS IF SOMETHING ISN'T WORKING P lease make these simple checks before calling for service. These tips can save you time and money since charges for TV installation and adjustment of customer controls are not covered under your warranty.
GLOSSARY TO TELEVISION TERMS A/V Inputs * Connector plugs which allow the introduction of distinct audio and video signals into the TV from accessory VCRs, camcorders, etc. These plugs bypass the normal tuner or RF/Antenna signal circuitry. Pre-Amplifier * The control center of a hi-fi system. Not only amplifies source inputs, but also allows for source selection, volume, tone, balance and all other controls that affect the sound.
INDEX Accessories/Optional........10, 27, 28, 29, 30-33, 46, 51 *Q/U-1 Parental Control.................................................................20-21 Adapter Connector..............................................46, 51, *Q/U-1 Picture-In-Picture (PIP).......................................46-51, *Q/U-2 Add/Delete Channels ..........................................13-14, *Q/U-2 Power Light Indicator.....................................................*Q/U-3 Advance Buttons ....................
Philips Consumer Electronics Company Factory Service Center Locations See Reverse Side for More Details. ★ Seattle/Tacoma Area Detroit/Toledo • Cleveland/ • N Ohio • • Chicago ★ Columbus • • San Francisco/Metro Area ★ Los Angeles • Charlotte • Knoxville/E Tennessee • ★ Pittsburgh/WV Area • Atlanta/N Georgia ★ Dallas ★ Wash/Balt ★ Orlando • ★ Indicates In-Home Service Only 1-800-242-9225 • Philadelphia/S New Jer Houston/Galveston Beaumont/Austin San Antonio • Tampa/W Florida • Ft.
QUALITY SERVICE IS AS CLOSE AS YOUR TELEPHONE! SIMPLY LOOK OVER THE LIST BELOW FOR THE NUMBER OF A FACTORY SERVICE CENTER NEAR YOU. YOUR PRODUCT WILL RECEIVE EFFICIENT AND EXPEDIENT CARRY-IN, MAIL-IN, OR IN-HOME SERVICE, AND YOU WILL RECEIVE PEACE OF MIND, KNOWING YOUR PRODUCT IS BEING GIVEN THE EXPERT ATTENTION OF PHILIPS’ FACTORY SERVICE. AND, IF THE PHONE NUMBER LISTED FOR YOUR AREA IS LONG DISTANCE, CALL 1-800-242-9225 FOR FACTORY SERVICE.
NOTES 58
NOTES 59
LIMITED WARRANTY PROJECTION TELEVISION One Year Free Labor One Year Free Service on Parts Two Years Free Service on Cathode Ray Tube Parts / 30 days Free Service on Projection TV Screen This product can be repaired in-home. WHO IS COVERED? MAKE SURE YOU KEEP... You must have proof of purchase to receive warranty service. A sales receipt or other document showing that you purchased the product is considered proof of purchase. Please keep your sales receipt or other document showing proof of purchase.
FEATURES 11 12 2 3 4 8 7 6 As you unpack your TV please note that the following items have been included with your set: First Time Set Up - automatically sets the TV for local channels and the correct picture signal (antenna or cable). It even helps you make the necessary connections for the Picture-In-Picture (PIP) feature. • Owner's Manual - Safety Tip Information Infrared Remote Control - operates your TV set and a variety of wireless remote control VCRs and Cable TV Converters.
3135 015 07470 62