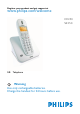
Register your product and get support at www.philips.com/welcome CD250 SE250 GB Telephone Warning Use only rechargeable batteries. Charge the handset for 24 hours before use.
Table of contents 1 1.1 1.2 1.3 1.4 1.5 2 2.1 2.2 2.3 2.4 3 3.1 3.2 Important Power requirements Conformity Using GAP standard compliance Recycling & disposal Electric, Magnetic and Electromagnetic Fields (“EMF”) 3 3 4 Your phone What’s in the box Overview of your phone Display icons Overview of the base station 6 6 7 9 4 4 5 10 11 11 3.3 3.3.1 3.3.2 3.4 3.5 3.
5.6.4 5.7 5.7.1 5.7.2 5.7.3 5.7.4 5.8 5.8.1 5.8.2 5.8.3 5.8.4 5.8.5 5.9 5.10 5.11 5.11.1 5.11.2 5.11.3 5.11.4 6 6.1 6.2 6.2.1 6.2.2 6.2.3 6.3 6.4 7 7.
1 Important • Take time to read this user manual before you use your phone. It contains important information and notes regarding your phone. 1.1 Power requirements • This product requires an electrical supply of 100-240 volts AC. In case of power failure, communication can be lost. • The Electrical network is classified as hazardous. The only way to power down the charger is to unplug the power supply from the electrical outlet. Ensure that the electrical outlet is always easily accessible.
• Power supply information for charger (multihandset pack only) Input: AC100-240V/0.3A, 50Hz/60Hz Output: DC6V/0.21A JOD-SWR-07343 JODEN • Risk of explosion if battery is replaced by an incorrect type. Dispose of used batteries according to the instructions. About operating and storage temperatures: • Operate in a place where temperature is always between 0 and 35ºC (32 to 95ºF). • Store in a place where temperature is always between -20 and 70ºC (-4 to 158ºF).
Do not dispose of your old product in your general household waste bin. 1.5 Inform yourself about the local separate collection system for electrical and electronic products marked by this symbol: 1. Use one of the following disposal options: 1. Dispose of the complete product (including its cables, plugs and accessories) in the designated WEEE collection facilities. 2. If you purchase a replacement product, hand your complete old product back to the retailer.
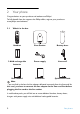
2 Your phone Congratulations on your purchase and welcome to Philips! To fully benefit from the support that Philips offers, register your product at www.philips.com/welcome. 2.1 What’s in the box Handset Base Station Battery door 2 AAA rechargeable batteries Power supply Line cord* User manual Guarantee Quick Start Guide Note * You may find in the box the line adaptor delivered separately from the line cord.
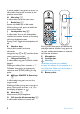
2.2 Overview of your phone A B C D E F G A Earpiece B Display See page 9 for an overview of the display icons. C OK key o In idle mode: Long press to toggle between displaying the handset name and the date/time. In other modes: Select the function displayed on the screen. Also used to Your phone confirm entries (for example when setting date and time). D Back/Clear key c Press to clear (delete) a character or number when making an entry. Long press to clear all.
In other modes: Long press to return to idle mode. Short press to move to the previous menu level. H Menu key m In idle mode: Go to the main menu. I Redial key r Access the Redial list in idle mode. When making a call, press to redial the last number dialed. J Loudspeaker key l In idle mode: Turn on the loudspeaker and dial the number. Answer an incoming call using handsfree mode. During a call: Toggle the loudspeaker on/ off. K Number keys Use to dial numbers and write characters.
2.3 Display icons Indicates that the battery is fully charged. This icon blinks during charge and when the battery is low. When the Icon is empty the battery is practically discharged. Note If WARNING BATT appears together with a blinking battery icon, batteries of the wrong type are installed in the handset. Replace with batteries of the correct type. Blinks when there is an incoming call. Steady ON during a call. Indicates new and missed calls in the call log records. Blinks when there are missed calls.
2.4 Overview of the base station A A Paging key a Page handset. Long press to start registration procedure.
3 Getting started 3.1 Connect the base station 1 Place the base station in a central location near the telephone line socket and electricity socket. 2 Connect the line cord and the power cable to their corresponding connectors at the back of the base station. 3 Connect the other end of the line cord and power cable to their respective sockets. Note The line adaptor may not be attached to the line cord.
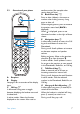
bracket and ➁ rotating the bracket outward. 6 Slide the base down into place. 5.20 83.00 17.00 2 Turn the bracket around. 3 Attach the bracket to the opposite side of the base station. 4 Insert screws (not included) into the wall. Align the mounting holes on the back of the base with the screws on the wall. 5 12 5.20 3.3 Install your phone Before using the handset, the batteries have to be installed and fully charged.
3 2 Place the batteries in the correct polarity as indicated and replace the cover. 3.3.2 Charge battery Warning The handset must be charged for at least 24 hours before using it for the first time. When the battery level becomes low, the low battery sensor alerts you by sounding an audible tone and blinking the battery icon. If the battery level becomes exceedingly low, the phone automatically switches off shortly after the alert and any function in progress will not be saved.
Press o to confirm your selection. (WAITING will be displayed while the default line settings and menu language for the selected country are automatically configured.) 4 The product now goes to the DATE/TIME selection menu. Enter the current date (DD/MM) and press o to confirm. 5 Enter the time (HH-MM) and press o to confirm. (The time format, 12 hour or 24 hour, depends on the country selected. If the 12-hour format has been selected, use n to scroll between AM and PM.) • A validation tone is emitted.
3.6 Menu structure The chart below shows the menu tree of your phone. Press the menu key m to enter each option. Press c to go to the previous level in a menu. Use navigation keys n to navigate within the menus. Menus PHONEBOOK NEW ENTRY LIST ENTER NAME Entry list displayed ENTER NUMBER KEY 1 EDIT DELETE EDIT DELETE EDIT ENTRY DELETE DELETE ALL DIRECT MEM.
CLOCK&ALARM DATE/TIME SET FORMAT Enter date TIME FORMAT Enter time 12 HOURS DATE FORMAT 24 HOURS DD/MM MM/DD ALARM ALARM TONE OFF ON ONCE ON DAILY MELODY 1 MELODY 2 MELODY 3 ADVANCED SET CHANGE PIN REGISTER UNREGISTER SEL.
4 Using your phone 4.1 Make a call 4.1.1 Predialling 1 Dial the number (maximum 24 digits). 2 Press t. • The call is initiated. Tip You may insert a prefix number to the beginning of your predial number, see “Set Prefix” on page 31 for more information. 4.1.2 Direct dialling 1 Pick up the handset and press t. (Or press l to start a call in speaker mode.) 2 Dial the number. • The call is initiated. 4.1.3 Call from redial list 1 Press r in idle mode. 2 Scroll n to an entry in the redial list. 3 Press t.
4.1.7 Call using Direct Access Memory In idle mode, long press 1 or 2 to dial a stored direct access memory number. Note See section 5.5.6 for instructions on how to store, edit, and delete direct access memory numbers. 4.1.8 Enter a Dialing Pause Make a long press # after entering one or more digits to enter a pause in the dialling sequence. 4.
5 Use more of your phone 5.1 Switch the handset on/off Press h for at least one second to switch the handset on. To switch it off, press and hold h in idle mode for at least 5 seconds. 5.2 Keypad lock/unlock Press and hold * for 3 seconds to lock/ unlock the keypad in idle mode. 5.3 Text or number entry When you select a field in which you can enter text, you can enter the letters that are printed on the keys by pressing the relevant key once or several times.
1 2 During a call, press l to activate the loudspeaker mode. Press l again to deactivate the loudspeaker mode. 5.5 Using your Phonebook Your phone can store up to 100 phonebook memories. Each phonebook entry can have a maximum of 24 digits for the phone number and 12 characters for the name. Note If you have multiple handsets, the phonebook can only be accessed by one handset at a time. 5.5.
• A validation tone is emitted. 5.5.4 Delete a phonebook entry 1 Press m in idle mode, scroll n to PHONEBOOK and press o, scroll n to DELETE and press o. 2 Scroll n to select an entry to delete and press o. 3 DELETE? is displayed on the screen. Press o again to confirm deletion. • A validation tone is emitted. Note Press c to discard the deletion. The screen returns to the phonebook list. Note Depending on your country, your handset may include preset phonebook entries named VOICEMAIL and/or INFO 1.
scroll n to DIRECT MEM. and press o. Scroll n to KEY 1 or KEY 2 and press o. • The stored number is displayed (if any). Press m to enter direct memory menu. Scroll n to DELETE and press o. CONFIRM? is displayed on the screen. Press o to confirm deletion. • A validation tone is emitted and the screen returns to the previous menu. 5.6 Using the Redial list The redial list stores the last 10 numbers dialed. A maximum of 24 digits can be displayed for each entry. 5.6.
Note Press c to discard the deletion. The screen returns to the previous high menu level. 5.6.4 Delete all redial numbers Press r in idle mode and press o. Scroll n to DELETE ALL and press o. CONFIRM? is displayed on the screen. Press o again to confirm deletion. • A validation tone is emitted. Note Press c to discard the deletion. The screen returns to the redial list. 5.7 Using the Call log The call log stores the last 20 external calls and any new voice mail received.
5.7.3 Delete a call list entry 1 Press u in idle mode, scroll n to select an entry and press o, scroll n to DELETE and press o. 2 DELETE? is displayed on the screen. Press o again to confirm deletion. • A validation tone is emitted. Note Press c to discard the deletion. The screen returns to the previous high menu level. 5.7.4 Delete all call list entries 1 Press u in idle mode and press o. 2 Scroll n to DELETE ALL and press o. 3 CONFIRM? is displayed on the screen. Press o again to confirm deletion.
Note If there is no answer from the called handset, press i to resume the external call. 5.8.3 Answer an external call during intercom 1 During intercom, a new call tone is emitted when there is an incoming external call. 2 Press t to answer the external call and end the intercom. • The call is established. 5.8.4 Switch between an internal and external call During the call, press i to switch between an internal or external call. 5.8.
• Each digit blinks to indicate dial out. 5.11 Clock and Alarm settings This feature allows you to set the date, time and alarm settings for your phone. The default date and time are 01/01 and 00:00 respectively. 5.11.1 Set Date and Time 1 Press m in idle mode, scroll n to CLOCK&ALARM, and press o, press o to enter DATE/TIME. 2 The last stored date is displayed. Enter the current date (DD/MM) and press o. 3 The last stored time is displayed. Enter the current time (HH-MM) and press o to confirm.
5.11.3 Set Alarm 1 Press m in idle mode, scroll n to CLOCK&ALARM and press o, scroll n to ALARM and press o. 2 Scroll n to OFF, ON ONCE or ON DAILY and press o. 3 If you select ON ONCE or ON DAILY, enter the time (HH-MM) for the alarm and press o to confirm. • A validation tone is emitted and the screen returns to the previous menu. Note The alarm tone will sound for 1 minute when the alarm time is reached. To mute the alarm tone, simply press any key on the handset. 5.11.
Press m in idle mode, scroll n to PERSONAL SET and press o. Scroll n to HANDSET TONE and press o, and then press o again to enter RING VOLUME. 2 Scroll n to your desired volume level and press o to confirm. • A validation tone is emitted and the screen returns to the previous menu. Note When RINGER OFF is activated, the icon will be displayed on the screen. 1 6.2.2 Set the Ring Melody There are 10 ring melodies available on your handset. 1 Press m in idle mode, scroll n to PERSONAL SET and press o.
free talk mode. This allows you to charge the handset during calls. The default setting for auto hang up is ON. 1 Press m in idle mode, scroll n to PERSONAL SET and press o. 2 Scroll n to AUTO HANG-UP and press o. The current setting is shown. 3 Scroll n to select ON or OFF and press o to confirm. • A validation tone is emitted and the screen returns to the AUTO HANG-UP menu. 2 7 7.
Note If no action is taken on the handset within 90 seconds, the registration procedure will be aborted. If this happens, repeat Step 1. 2 On the handset, press m, scroll n to ADVANCED SET and press o, scroll n to REGISTER and press o. 3 Enter the PIN when prompted and press o to confirm. Note By default, the PIN is 0000. 4 SEARCHING is displayed on the screen. • Upon successful registration, a validation tone is emitted and the handset numbers (1 to 5) will be assigned by the base automatically. 7.
Warning Upon reset, all your personal settings, call log and redial list entries will be deleted and the phone will return to its default settings. However, your phonebook will remain unchanged after reset. Note You may have to configure your phone once again. In this case the WELCOME mode will appear again after reset. (Go to chapter 3.3) 1 Press m in idle mode, scroll n to ADVANCED SET and press o, scroll n to RESET and press o. 2 CONFIRM? is displayed on the screen. 3 Press o again to confirm.
Scroll n to SHORT or LONG and press o to confirm. • A validation tone is emitted and the screen returns to the previous menu. Note The use of your phone cannot be guaranteed on all PABX. 3 7.8 Change the Dial Mode The default value for dial mode that is preset in your handset should be the best suited for your country network and therefore you should not need to change it. 1 Press m in idle mode, scroll n to ADVANCED SET and press o, scroll n to DIAL MODE and press o.
Parameter Default Value Redial CLEARED Memory Call Log CLEARED 8 Technical data Display • Progressive LCD backlight • The backlight remains on for 8 seconds after each activation such as an incoming call, key presses, lifting the handset off the base station, etc. • The colour of the LCD backlight is Amber.
9.1 Connection The handset does not switch on! • Charge the batteries: Put the handset on the base station to charge. After a few moments, the phone will switch on. The handset does not charge! • Check charger connections. icon is not blinking during charge! • Battery is full: There is no need to charge the battery. • Bad battery contact: Adjust the handset slightly. • Dirty contact: Clean the batteries contact with a cloth moistened with alcohol.
9.4 Product behaviour Keypad does not work! • Unlock your keypad: Long press * in idle mode. The handset warms up when making a long call! • This is a normal behavior. The handset consumes energy while calling. The handset cannot be registered to the base station! • Maximum number of handsets (5) has been reached. To register a new handset, unregister an existing handset. • Remove and replace the handset batteries.
10 INDEX A Access phonebook 20 Access Redial list 22 Access the Call log 23 Activate/Deactivate loudspeaker mode 19 Add/Edit Direct Access Memory 21 Adjust earpiece or speaker volume 19 Advanced settings 29 Alarm Tone 27 Answer a call 18 Answer an external call 25 Auto Hang-Up 28 C Call from redial list 17 Call from the call log 17 Call from the phonebook 17 Call in progress 19 Call log 23 Call using Direct Access Memory 18 Chain Dialing 25 Charge battery 13 Clock and Alarm settings 26 Conference call 25 Co
Menu structure 15 Modify a phonebook entry 20 Mute/Unmute microphone 19 O Overview of the base station 10 Overview of your phone 7 P Paging 25 Personal settings 27 Phonebook 20 PIN 29 Predialling 17 Transfer an external call 24 U Unregister 30 Use more of your phone 19 Using your phone 17 W Welcome mode 13 R Recall time 31 Redial list 22 Register 29 Reset Unit 30 Ring Melody 28 Ring Volume 27 S Save a redial number 22 Save call list entry 23 Select Country 30 Set Alarm 27 Set First Ring Detection 32 Set P
©2008 Koninklijke Philips Electronics N.V.