
User Manual

6
English Deutsch Español Français Português
日本語
简体中文
Safari 3000
1 3
7 9 10 1112
1
8
9
12
13
1514
16
2
3
4
5
6
7
13
5 64
8
2
10 11
1 3
7 9 10 1112
1
8
9
12
13
1514
16
2
3
4
5
6
7
13
5 64
8
2
10 11
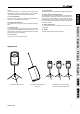
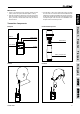
+1 2V
GN D
L- CH
S- GN D
R- CH
L- CH
S- GN D
R- CH
AU X IN
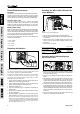
Installation of Safari CD/USB or USBR-1
We recommend that an authorized Phonic repair facility or dealer/
distributor carryout the steps below:
1. Remove all power cables and turn the Safari 3000 off.
2. Unscrew the protective faceplate on the Safari and remove it.
3. Find the cables taped just within the hole left after removing
the faceplate
4. Connect cables to the connectors at the rear of the optional player
5. Insert the player into the Safari and screw into place using the
screws removed from the protective faceplate
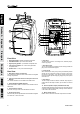
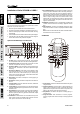
Optional CD/USB Player and Recorder
1. CD Slot: Insert a compact disc into this slot. This CD player
can accept either audio CDs or CD-Rs containing MP3 les.
2. Power/Volume Knob:
Push this button to start the unit, after
that user can adjust the volume by roll the knob.
3. Play/Pause Button:
Push this button to begin playback and
again to pause. This button is also used to pause and begin
recording.
4. Reverse/Cue Buttons:
Push either of these buttons to skip
to the previous track (rev) or to cue the next track (cue). Hold
either of them down to fast-forward (cue) or reverse (rev)
through the currently playing track. These buttons also allow
for users to scroll through menus.
5. Stop Button:
This button will stop the currently playing or
recording track.
6. Eject Button:
Pushing this button will eject the disc within the
CD slot.
7. Function Button:
Users can select from CD mode, USB mode
or SD/SDHC card mode.
8. Folder Buttons:
Push these buttons to skip backwards and
forwards alphabetically through folders found on CD, USB or
SD/SDHC card.
9. Repeat Button:
Push this button to scroll through the different
repeat modes that the CD player offers. Users can opt to play
all tracks, repeat one track only, repeat the entire folder, repeat
all, play all randomly.
10. Find Button:
Push this button once to enable search by FILE.
Push it twice to search by ALBUM. Push and hold to view the
track; push a second time to view the ID3 tag.
11. Record/Delete Button:
Push this button to initiate record mode
when set to USB or SD/SDHC mode. Recording will begin in
pause mode, and users can push the play/pause button to
begin recording. When this button is pushed during CD mode,
this will activate encoding of the current track. Push the stop
button to stop encoding. Push and hold this button to start
delete mode. Use the reverse/cue buttons to select the folder
and le you wish to delete, and push and hold the button once
again to conrm deletion.
12. SD/SDHC Card Slot:
Insert an appropriately formatted SD
or SDHC card into this slot for recording or playback of audio
les.
13. USB Connector:
Connect your USB ash drives here. Flash
drives can be used to record to or for playback of MP3 or WMA
les.
Note: Phonic recommends that SD, SDHC and USB media is
formatted as FAT-32 for best results.
CD Remote
1. Power Button: Activate and deactivate the Safari’s CD player
using this button.
2. Play/Pause Button:
Push this button to begin playback and
again to pause. Pushing the button a third time will resume
playback from the point at which the audio was paused. This
button is also used to pause and begin recording.
3. Stop Button:
This button will stop the currently playing or
recording track.
4. Program Button:
Push this button to access “program”
mode to program track order. Push stop to clear programmed
tracks.